Course 3 - Hole 4: Difference between revisions
mNo edit summary |
mNo edit summary |
||
| (6 intermediate revisions by 2 users not shown) | |||
| Line 1: | Line 1: | ||
{{Infobox-KDCHole | {{Infobox-KDCHole | ||
|image= [[File:KDC Course 3 Hole 4 map.png|300px]] | |image= | ||
|caption= Composite | <tabs> | ||
<tab name="Main Game"> | |||
[[File:KDC Course 3 Hole 4 map.png|300px]] | |||
</tab> | |||
<tab name="Extra Game"> | |||
[[File:KDC Course 3 Hole 4 extra map.png|300px]] | |||
</tab> | |||
</tabs> | |||
|caption= Composite maps of '''Course 3 - Hole 4''' from ''[[Kirby's Dream Course]]''. | |||
|course= [[Course 3]] | |course= [[Course 3]] | ||
|ability= '''Main Game'''<br>None<br>'''Extra Game'''<br>[[Stone]]<br>[[Wheel]] | |ability= '''Main Game'''<br>None<br>'''Extra Game'''<br>[[Stone]]<br>[[Wheel]] | ||
| Line 94: | Line 101: | ||
|- | |- | ||
|{{center|[[File:KDC Bumper sprite.png]]}} | |{{center|[[File:KDC Bumper sprite.png]]}} | ||
|Bumper | |[[Bumper]] | ||
|- | |- | ||
|{{center|[[File:KDC Conveyor Belt sprite.png]]}} | |{{center|[[File:KDC Conveyor Belt sprite.png]]}} | ||
| Line 108: | Line 115: | ||
|[[Turntable]] Stop Switch | |[[Turntable]] Stop Switch | ||
|} | |} | ||
== Gallery == | |||
<gallery> | |||
KDC Course 3 Hole 4 screenshot 01.png|Surveying Kracko's hill | |||
KDC Course 3 Hole 4 screenshot 02.png|Planning a shot from the left side | |||
</gallery> | |||
{{clear}} | {{clear}} | ||
{{Navbox- | {{Navbox-KDC}} | ||
[[Category:Course 3 holes]] | [[Category:Course 3 holes]] | ||
Latest revision as of 21:15, 21 September 2022
| ||||||||||
| ||||||||||
|
| ||||||||||


Course 3 - Hole 4 is the fourth hole of Course 3 in Kirby's Dream Course. It is a long and straight path which involves lots of slopes, along with Conveyor Belts and Turntables.
Summary[edit]
This hole consists of a long narrow pathway, with symmetrical changes in elevation along its length before reaching a short wall on the furthest left side. In the basin on the left is a Squishy surrounded by two spinning Turntables which can be stopped using a switch all the way on the right of the board, next to two Kabu. Kirby starts to the left of this switch in front of a small hill lined with a Conveyor Belt flanked by two Kick Panels, where Kracko waits at the top. Down the slope to the left from there - prior to a brief rise leading to Squishy's location - a Gaspar floats high above the floor. A couple conveyor belts also line the sides of the board at this point. Furthest left, close to a short wall marking the end of the board, two Gordos lay in wait, though Kirby should have no reason to go near them.
Extra Game[edit]
In the Extra Game, the Kabu are replaced with Squishys, and Kracko is replaced with Wheelie. Gaspar has been removed, the Squishy in the left basin is replaced with Rocky, and a Kabu is placed up the slope further left. Aside from that, the board is the same, and so is the strategy for the most part.
Enemies[edit]
Obstacles[edit]
| Sprite | Obstacle |
|---|---|
| Bumper | |
| Conveyor Belt | |
| Kick Panel | |
| Turntable | |
| Turntable Stop Switch |
Gallery[edit]
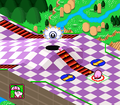
Surveying Kracko's hill
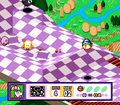
Planning a shot from the left side

