Access Ark - Stage 5: Difference between revisions
mNo edit summary |
Superbound (talk | contribs) mNo edit summary |
||
| (23 intermediate revisions by 10 users not shown) | |||
| Line 1: | Line 1: | ||
{{Infobox-KPRStage | {{Infobox-KPRStage | ||
|image=[[File:Access Ark 5. | |image=[[File:KPR Access Ark Stage 5 1.png|350px]] | ||
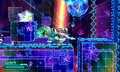
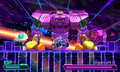
|caption=Kirby | |caption=Kirby prepares to unleash the full force of [[Spark Mode]] on a hapless [[Galbo]]. | ||
|level=[[Access Ark]] | |level=[[Access Ark]] | ||
|robobot={{Y}} | |robobot={{Y}} | ||
| Line 9: | Line 9: | ||
|midboss=[[Invader Armor]], [[Security Force]] | |midboss=[[Invader Armor]], [[Security Force]] | ||
|boss=[[Holo Defense API|Holo-Doomers]], [[Holo Defense API|Holo-Ice Dragon]], [[Holo Defense API|Holo-Kracko]], [[Gigavolt|Gigavolt II]] | |boss=[[Holo Defense API|Holo-Doomers]], [[Holo Defense API|Holo-Ice Dragon]], [[Holo Defense API|Holo-Kracko]], [[Gigavolt|Gigavolt II]] | ||
|theme music=[[File:Pink Ball Revolution sample KPR.oga]] | |||
|theme title="[[Haltmann Works Co. HQ|Pink Ball Revolution]]" | |||
|description=Clip of the music that primarily plays in Access Ark - Stage 5. | |||
|previousstage=[[Access Ark - Stage 4]] | |previousstage=[[Access Ark - Stage 4]] | ||
|nextstage=[[Access Ark - Stage | |nextstage=[[Access Ark - Stage 6]] | ||
}} | }} | ||
'''Access Ark - Stage 5''' is the fifth stage of [[Access Ark]], and the final standard stage of ''[[Kirby: Planet Robobot]]''. There are three [[Code Cube]]s and four [[Sticker (Kirby: Planet Robobot)|sticker]]s in this stage. The | '''Access Ark - Stage 5''' is the fifth stage of [[Access Ark]], and the final standard stage of ''[[Kirby: Planet Robobot]]''. There are three [[Code Cube]]s and four [[Sticker (Kirby: Planet Robobot)|sticker]]s in this stage. The rare sticker is one depicting [[Susie]]. | ||
==Overview== | ==Overview== | ||
The stage begins in the virtual area. Kirby encounters an [[Invader Armor]] in here, who he has to defeat. Doing so yields the [[Robobot Armor]], which Kirby will be using for most of the rest of the stage. | The stage begins in the virtual area. Kirby encounters an [[Invader Armor]] in here, who he has to defeat. Doing so yields the [[Robobot Armor]], which Kirby will be using for most of the rest of the stage. | ||
From here, Kirby will face a number of challenges, highlighted by special encounters with holograms from the [[Holo Defense API]]. Further in, Kirby will change to [[ | From here, Kirby will face a number of challenges, highlighted by special encounters with holograms from the [[Holo Defense API|Holo Defense API]]. Further in, Kirby will change to [[Jet Mode]] and fly through a number of sections. | ||
Once Kirby has flown far enough, the Jet Armor will crash, forcing him to continue on foot for a little while. Kirby will have to face off against a [[Security Force]] before finding another suit of Robobot Armor to pilot. | Once Kirby has flown far enough, the Jet Armor will crash, forcing him to continue on foot for a little while. Kirby will have to face off against a [[Security Force]] before finding another suit of Robobot Armor to pilot. | ||
| Line 24: | Line 27: | ||
The stage ends with a face-off against [[Gigavolt|Gigavolt II]]. Defeating this upgraded behemoth will yield the stage exit. | The stage ends with a face-off against [[Gigavolt|Gigavolt II]]. Defeating this upgraded behemoth will yield the stage exit. | ||
===Code Cube & | ===Code Cube & Rare Sticker Guide=== | ||
*'''Code Cube 1''' - In the interlude area after Holo-Ice Dragon, Kirby can find a block to carry. Placing this block down to crush some golden blocks | *'''Code Cube 1''' - In the interlude area after Holo-Ice Dragon, Kirby can find a block to carry. Placing this block down to crush some golden blocks reveals the cube. | ||
*'''Code Cube 2''' - In the interlude area after Holo-Kracko, Kirby will need to carry another block and place it in a gap in the floor beneath a treasure chest cache. Then Kirby must travel to the background to release the chest, which contains the cube. | *'''Code Cube 2''' - In the interlude area after Holo-Kracko, Kirby will need to carry another block and place it in a gap in the floor beneath a treasure chest cache. Then Kirby must travel to the background to release the chest, which contains the cube. | ||
*'''Code Cube 3''' - During the [[ | *'''Code Cube 3''' - During the [[Jet Mode]] section, Kirby will have to shoot through [[Mid-Boss]]es to hit every [[Switch]] along the tunnel. This done, the cube can be collected further down the path. | ||
*''' | *'''Rare Sticker''' - After Kirby crashes his Jet Armor, a secret door can be found high above the portal to the next area. Taking this door leads to a [[Smash Bros. room|hidden room]] containing a [[Tilt Cannon]] puzzle where this sticker and a [[Smash Bros.]] [[Copy Essence]] can be found. | ||
==Enemies, Mid-Bosses and Abilities== | ==Enemies, Mid-Bosses, Bosses and Abilities== | ||
{| style="border: 3px solid #E47575; {{round}};background: #F69D99" cellspacing=" | {| style="border: 3px solid #E47575; {{round}};background: #F69D99" cellspacing="3" | ||
! width="420px" | '''Regular Enemies''' | ! width="420px" | '''Regular Enemies''' | ||
! width="180px" | '''Mid-Bosses''' | ! width="180px" | '''Mid-Bosses''' | ||
! width="180px" | '''Bosses''' | |||
|- bgcolor="E47575" | |- bgcolor="E47575" | ||
| | | | ||
| Line 49: | Line 53: | ||
*[[Dubior]] 2.0 | *[[Dubior]] 2.0 | ||
*[[Elec]] | *[[Elec]] | ||
*[[Galbo]] | *[[Galbo]] | ||
*[[Haltworker]] | *[[Haltworker]] | ||
*[[King Doo]] 2.0 | *[[King Doo]] 2.0 | ||
*[[Miasmoros]] 2.0 | *[[Miasmoros]] 2.0 | ||
*[[NESP]] | |||
*[[Parasol Waddle Dee]] | *[[Parasol Waddle Dee]] | ||
{{col-break|width=34%}} | {{col-break|width=34%}} | ||
| Line 69: | Line 73: | ||
In order: | In order: | ||
*[[Invader Armor]] | *[[Invader Armor]] | ||
*[[Security Force]] | |||
{{col-end}} | |||
| | |||
{{col-begin|width=50%}} | |||
*[[Holo Defense API|Holo-Doomers]] | *[[Holo Defense API|Holo-Doomers]] | ||
*[[Holo Defense API|Holo-Ice Dragon]] | *[[Holo Defense API|Holo-Ice Dragon]] | ||
*[[Holo Defense API|Holo-Kracko]] | *[[Holo Defense API|Holo-Kracko]] | ||
*[[Gigavolt|Gigavolt II]] | *[[Gigavolt|Gigavolt II]] | ||
{{col-end}} | {{col-end}} | ||
| Line 86: | Line 93: | ||
*[[Mirror]] | *[[Mirror]] | ||
{{col-break|width=50%}} | {{col-break|width=50%}} | ||
*[[ | *[[Smash Bros.]] | ||
*[[Spark]] | *[[Spark]] | ||
*[[Sword]] | *[[Sword]] | ||
| Line 93: | Line 100: | ||
{{col-begin}} | {{col-begin}} | ||
{{col-break|width=50%}} | {{col-break|width=50%}} | ||
*[[Beam | *[[Beam Mode|Beam]] | ||
*[[Bomb | *[[Bomb Mode|Bomb]] | ||
*[[Cutter | *[[Cutter Mode|Cutter]] | ||
*[[ESP | *[[ESP Mode|ESP]] | ||
*[[Fire | *[[Fire Mode|Fire]] | ||
*[[Ice | *[[Ice Mode|Ice]] | ||
{{col-break|width=50%}} | {{col-break|width=50%}} | ||
*[[Jet | *[[Jet Mode|Jet]] | ||
*[[Mike | *[[Mike Mode|Mike]] | ||
*[[Parasol | *[[Parasol Mode|Parasol]] | ||
*[[Spark | *[[Spark Mode|Spark]] | ||
*[[Stone | *[[Stone Mode|Stone]] | ||
*[[Sword | *[[Sword Mode|Sword]] | ||
{{col-end}} | {{col-end}} | ||
|} | |} | ||
{{Navbox- | ==Gallery== | ||
<gallery> | |||
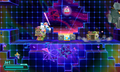
KPR Access Ark Stage 5 2.png|Kirby is wary of this landscape. | |||
KPR Access Ark Stage 5 3.png|Kirby solved a puzzle. | |||
KPR Access Ark Stage 5 4.png|Kirby contends with a flying [[Security Force]] bot. | |||
KPR Access Ark Stage 5 5.png|Kirby passes two [[Blocky]]s. | |||
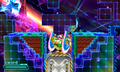
KPR Access Ark Stage 5 6.png|Battle with [[Gigavolt|Gigavolt II]]. | |||
KPR-map65.jpg|Stage map | |||
</gallery> | |||
{{Navbox-KPR}} | |||
Latest revision as of 11:40, 23 June 2023
| ||||||||||||||||||||
| ||||||||||||||||||||
| ||||||||||||||||||||
|
| ||||||||||||||||||||

Access Ark - Stage 5 is the fifth stage of Access Ark, and the final standard stage of Kirby: Planet Robobot. There are three Code Cubes and four stickers in this stage. The rare sticker is one depicting Susie.
Overview[edit]
The stage begins in the virtual area. Kirby encounters an Invader Armor in here, who he has to defeat. Doing so yields the Robobot Armor, which Kirby will be using for most of the rest of the stage.
From here, Kirby will face a number of challenges, highlighted by special encounters with holograms from the Holo Defense API. Further in, Kirby will change to Jet Mode and fly through a number of sections.
Once Kirby has flown far enough, the Jet Armor will crash, forcing him to continue on foot for a little while. Kirby will have to face off against a Security Force before finding another suit of Robobot Armor to pilot.
The stage ends with a face-off against Gigavolt II. Defeating this upgraded behemoth will yield the stage exit.
Code Cube & Rare Sticker Guide[edit]
- Code Cube 1 - In the interlude area after Holo-Ice Dragon, Kirby can find a block to carry. Placing this block down to crush some golden blocks reveals the cube.
- Code Cube 2 - In the interlude area after Holo-Kracko, Kirby will need to carry another block and place it in a gap in the floor beneath a treasure chest cache. Then Kirby must travel to the background to release the chest, which contains the cube.
- Code Cube 3 - During the Jet Mode section, Kirby will have to shoot through Mid-Bosses to hit every Switch along the tunnel. This done, the cube can be collected further down the path.
- Rare Sticker - After Kirby crashes his Jet Armor, a secret door can be found high above the portal to the next area. Taking this door leads to a hidden room containing a Tilt Cannon puzzle where this sticker and a Smash Bros. Copy Essence can be found.
Enemies, Mid-Bosses, Bosses and Abilities[edit]
| Regular Enemies | Mid-Bosses | Bosses | |||||
|---|---|---|---|---|---|---|---|
|
In order:
|
| |||||
| Abilities | Robobot Armor Modes | ||||||
|
|
|
Gallery[edit]
Kirby is wary of this landscape.
Kirby solved a puzzle.
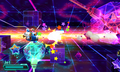
Kirby contends with a flying Security Force bot.
Kirby passes two Blockys.
Battle with Gigavolt II.
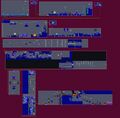
Stage map


