Rainbow Resort - Stage 3: Difference between revisions
Pinkyoshifan (talk | contribs) m (Text replacement - "(<tab name=".*)'(.*">)" to "$1’$2") |
|||
| (18 intermediate revisions by 7 users not shown) | |||
| Line 1: | Line 1: | ||
{{Infobox-KAStage | {{Infobox-KAStage | ||
|image=[[File:Rainbow Resort | |image=[[File:KNiDL Rainbow Resort Stage 3.png]] | ||
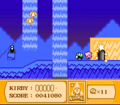
|caption=Kirby follows | |caption=Kirby follows a path lined with Noddys, and takes a quick siesta after eating one. (''Kirby: Nightmare in Dream Land'') | ||
|level=[[Rainbow Resort]] | |level=[[Rainbow Resort]] | ||
|switch={{N}} | |switch={{N}} | ||
|theme music= | |||
<tabs> | |||
<tab name="Kirby’s Adventure"> | |||
[[File:Rainbow Resort KA.mp3]] | |||
</tab> | |||
<tab name="Kirby: Nightmare in Dream Land"> | |||
[[File:KNiDL Rainbow Resort Sample.oga]] | |||
</tab> | |||
</tabs> | |||
|theme title="[[Rainbow Resort (theme)|Rainbow Resort]]" | |||
|description=Clips of the music that plays in Rainbow Resort - Stage 3 | |||
|previousstage=[[Rainbow Resort - Stage 2]] | |previousstage=[[Rainbow Resort - Stage 2]] | ||
|nextstage=[[Rainbow Resort - Stage 4]] | |nextstage=[[Rainbow Resort - Stage 4]] | ||
| Line 10: | Line 21: | ||
==Overview== | ==Overview== | ||
This stage consists of four main | This stage consists of four main rooms. The first takes Kirby along a starry walkway swarming with Noddys. Kirby should make his way through quickly lest he doze off himself. | ||
The | The second room is an ascent past several diamond-shaped icy platforms. Kirby may have a hard time keeping his footing here, especially since [[Bronto Burt]]s will be charging at him as he climbs. | ||
In the third room, Kirby can use an [[Invincible Candy]] to run across floating ice platforms and get safely to the door on the other side. | |||
The last | The last room is a rocky cavern filled with water. Throughout the cave, [[Shotzo]]s can be found guarding items, and Kirby will need to be deft if he wants to get at these goodies without dropping them into a pit along with the Shotzos which guard them. The stage exit can be found to the right from here. | ||
===Differences between versions=== | ===Differences between versions=== | ||
The last room is completely different in the original ''Kirby's Adventure''. It is a much simpler affair, having Kirby make his way along a rocky path past waterfalls and a few enemies (including Shotzos) using [[Parasol (enemy)|Parasol]]s to glide down. | The last room is completely different in the original ''Kirby's Adventure''. It is a much simpler affair, having Kirby make his way along a rocky path past waterfalls and a few enemies (including Shotzos) using [[Parasol (enemy)|Parasol]]s to glide down. | ||
====Enemies | ====Enemies==== | ||
{| | {| class="wikitable" | ||
! | !Sprite (''KA''/''KNiDL'') | ||
! | !Name | ||
!style="border-style: solid; border-width: 1px 3px 1px 1px"|Copy Ability | |||
!Sprite (''KA''/''KNiDL'') | |||
!Name | |||
!Copy Ability | |||
|- | |- | ||
|align=center|[[File:KA Blade Knight sprite.png]] [[File:KNiDL Blade Knight sprite.png]] | |||
|- | |[[Blade Knight]] | ||
| | |style="border-style: solid; border-width: 1px 3px 1px 1px"|[[Sword]] | ||
|align=center|[[File:KA Kabu sprite.png]] | |||
|[[Kabu]]* | |||
|None | |||
|- | |||
|align=center|[[File:KNiDL Blipper sprite.png]] | |||
|[[Blipper]]** | |||
|style="border-style: solid; border-width: 1px 3px 1px 1px"|None | |||
|align=center|[[File:KA Noddy sprite.png]] [[File:KNiDL Noddy sprite.png]] | |||
|[[Noddy]] | |||
|[[Sleep]] | |||
|- | |||
|align=center|[[File:KA Bronto Burt sprite.png]] [[File:KNiDL Bronto Burt sprite.png]] | |||
|[[Bronto Burt]] | |||
|style="border-style: solid; border-width: 1px 3px 1px 1px"|None | |||
|align=center|[[File:KA Parasol sprite.png]] | |||
|[[Parasol (enemy)|Parasol]]* | |||
|[[Parasol]] | |||
|- | |||
|align=center|[[File:KA Broom Hatter sprite.png]] | |||
|[[Broom Hatter]]* | |||
|style="border-style: solid; border-width: 1px 3px 1px 1px"|None | |||
|align=center|[[File:KA Shotzo sprite.png]] [[File:KNiDL Shotzo sprite.png]] | |||
|[[Shotzo]] | |||
|N/A | |||
|- | |||
|align=center|[[File:KA Cappy sprite.png]] | |||
|[[Cappy]]* | |||
|style="border-style: solid; border-width: 1px 3px 1px 1px"|None | |||
|align=center|[[File:KA Sir Kibble sprite.png]] [[File:KNiDL Sir Kibble sprite.png]] | |||
|[[Sir Kibble]] | |||
|[[Cutter]] | |||
|- | |||
|align=center|[[File:KA Chilly sprite.png]] [[File:KNiDL Chilly sprite.png]] | |||
|[[Chilly]] | |||
|style="border-style: solid; border-width: 1px 3px 1px 1px"|[[Freeze]] | |||
|align=center|[[File:KA Waddle Dee sprite.png]] [[File:KNiDL Waddle Dee sprite.png]] | |||
|[[Waddle Dee]] | |||
|None | |||
|- | |||
|align=center|[[File:KNiDL Coner sprite.png]] | |||
|[[Coner]]** | |||
|style="border-style: solid; border-width: 1px 3px 1px 1px"|None | |||
|align=center|[[File:KA Waddle Doo sprite.png]] [[File:KNiDL Waddle Doo sprite.png]] | |||
|[[Waddle Doo]] | |||
|[[Beam]] | |||
|- | |||
|align=center|[[File:KA Gordo sprite.png]] [[File:KNiDL Gordo sprite.png]] | |||
|[[Gordo]] | |||
|style="border-style: solid; border-width: 1px 3px 1px 1px"|N/A | |||
!colspan=3|<small>*appears only in ''Kirby's Adventure''<br>**appears only in ''Kirby: Nightmare in Dream Land''</small> | |||
|} | |} | ||
==Gallery== | ==Gallery== | ||
<gallery> | <gallery> | ||
KA Rainbow Resort Stage 3 screenshot 01.png|Kirby falls asleep on a pedestal after swallowing a Noddy. | |||
KA Rainbow Resort Stage 3 screenshot 02.png|Kirby begins ascending the diamond steps. | |||
KA Rainbow Resort Stage 3 screenshot 03.png|Kirby floats up towards the Maxim Tomato and igloo at the top. | |||
KA Rainbow Resort Stage 3 screenshot 04.png|Kirby leaps across floating slopes while under the effect of Invincible Candy. | |||
KA Rainbow Resort Stage 3 screenshot 05.png|Kirby hops over Sword Knight to reach the stage exit. | |||
</gallery> | </gallery> | ||
{{Navbox- | {{Navbox-KA/KNiDL}} | ||
Latest revision as of 12:40, 21 April 2024
| ||||||||||
| ||||||||||
| ||||||||||
|
| ||||||||||

Rainbow Resort - Stage 3 is the third stage of Rainbow Resort in Kirby's Adventure and its remake, Kirby: Nightmare in Dream Land.
Overview[edit]
This stage consists of four main rooms. The first takes Kirby along a starry walkway swarming with Noddys. Kirby should make his way through quickly lest he doze off himself.
The second room is an ascent past several diamond-shaped icy platforms. Kirby may have a hard time keeping his footing here, especially since Bronto Burts will be charging at him as he climbs.
In the third room, Kirby can use an Invincible Candy to run across floating ice platforms and get safely to the door on the other side.
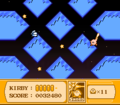
The last room is a rocky cavern filled with water. Throughout the cave, Shotzos can be found guarding items, and Kirby will need to be deft if he wants to get at these goodies without dropping them into a pit along with the Shotzos which guard them. The stage exit can be found to the right from here.
Differences between versions[edit]
The last room is completely different in the original Kirby's Adventure. It is a much simpler affair, having Kirby make his way along a rocky path past waterfalls and a few enemies (including Shotzos) using Parasols to glide down.
Enemies[edit]
| Sprite (KA/KNiDL) | Name | Copy Ability | Sprite (KA/KNiDL) | Name | Copy Ability |
|---|---|---|---|---|---|
| Blade Knight | Sword | Kabu* | None | ||
| Blipper** | None | Noddy | Sleep | ||
| Bronto Burt | None | Parasol* | Parasol | ||
| Broom Hatter* | None | Shotzo | N/A | ||
| Cappy* | None | Sir Kibble | Cutter | ||
| Chilly | Freeze | Waddle Dee | None | ||
| Coner** | None | Waddle Doo | Beam | ||
| Gordo | N/A | *appears only in Kirby's Adventure **appears only in Kirby: Nightmare in Dream Land | |||
Gallery[edit]
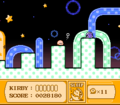
Kirby falls asleep on a pedestal after swallowing a Noddy.
Kirby begins ascending the diamond steps.
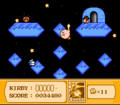
Kirby floats up towards the Maxim Tomato and igloo at the top.
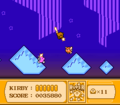
Kirby leaps across floating slopes while under the effect of Invincible Candy.
Kirby hops over Sword Knight to reach the stage exit.


