Butter Building - Stage 6: Difference between revisions
m (→Enemies) |
Pinkyoshifan (talk | contribs) m (Text replacement - "(<tab name=".*)'(.*">)" to "$1’$2") |
||
| (15 intermediate revisions by 5 users not shown) | |||
| Line 1: | Line 1: | ||
{{Infobox-KAStage | {{Infobox-KAStage | ||
|image=[[File:Butter Building | |image=[[File:KNiDL Butter Building Stage 6.png]] | ||
|caption=Kirby attempts to maneuver past a [[Gordo]] and a [[Shotzo]]. (''Kirby: Nightmare in Dream Land'') | |caption=Kirby attempts to maneuver past a [[Gordo]] and a [[Shotzo]]. (''Kirby: Nightmare in Dream Land'') | ||
|level=[[Butter Building]] | |level=[[Butter Building]] | ||
|switch={{Y}} | |switch={{Y}} | ||
|theme music= | |||
<tabs> | |||
<tab name="Kirby’s Adventure"> | |||
[[File:Butter Building KA.oga]] | |||
</tab> | |||
<tab name="Kirby: Nightmare in Dream Land"> | |||
[[File:KNiDL Butter Building Sample.oga]] | |||
</tab> | |||
</tabs> | |||
|theme title="[[Butter Building (theme)|Butter Building]]" | |||
|description=Clips of the music that plays in Butter Building - Stage 6 | |||
|previousstage=[[Butter Building - Stage 5]] | |previousstage=[[Butter Building - Stage 5]] | ||
|nextstage=[[Butter Building - Stage 7]] (boss fight) | |nextstage=[[Butter Building - Stage 7]] (boss fight) | ||
}} | }} | ||
'''Butter Building - Stage 6''' is the sixth stage of [[Butter Building]], the third level of ''[[Kirby's Adventure]]'' and its remake, ''[[Kirby: Nightmare in Dream Land]]''. It is the final regular stage of Butter Building, and is followed by a boss battle against the moon and sun duo, [[Mr. Shine | '''Butter Building - Stage 6''' is the sixth stage of [[Butter Building]], the third level of ''[[Kirby's Adventure]]'' and its remake, ''[[Kirby: Nightmare in Dream Land]]''. It is the final regular stage of Butter Building, and is followed by a boss battle against the moon and sun duo, [[Mr. Shine & Mr. Bright]]. | ||
==Overview== | ==Overview== | ||
The stage consists of seven primary areas. The first is a small room containing a trapped [[Laser Ball]]. | The stage consists of seven primary areas. The first is a small room containing a trapped [[Laser Ball]]. | ||
The | The second area is a long hallway with sloped corners, perfect for the [[Laser]] ability. | ||
In the third area, Kirby finds himself in a vertical brick ascent past a number of foes. | |||
The | The fourth area is an exterior section of the tower, where more enemies must be dealt with. The tower once again rotates (in ''Kirby's Adventure'') or fades in (in ''Kirby: Nightmare in Dream Land'') to reveal the door to the next area. | ||
In the fifth area, Kirby has to climb up the side of the tower using cloud steps. Along the way, a side-room can be accessed behind some [[Star Block]]s embedded in the tower which leads past a [[Bomb Block]] challenge to a [[Big Switch]]. Back on the main path, Kirby will need to climb still higher to progress. | |||
Kirby | For the sixth area, Kirby finds himself in a dark hallway. To illuminate the area, he can swallow a [[Cool Spook]] and use its ability. | ||
In the last area, Kirby will have to ascend a narrow tower, though this can be made easier by borrowing a nearby [[Starman]]'s power. | In the last area, Kirby will have to ascend a narrow tower, though this can be made easier by borrowing a nearby [[Starman]]'s power. | ||
| Line 27: | Line 37: | ||
==Enemies== | ==Enemies== | ||
{| class="wikitable" | {| class="wikitable" | ||
!Sprite ('' | !Sprite (''KA''/''KNiDL'') | ||
!Name | !Name | ||
!style="border-style: solid; border-width: 1px 3px 1px 1px"|Copy Ability | !style="border-style: solid; border-width: 1px 3px 1px 1px"|Copy Ability | ||
!Sprite ('' | !Sprite (''KA''/''KNiDL'') | ||
!Name | !Name | ||
!Copy Ability | !Copy Ability | ||
|- | |- | ||
|align=center|[[File:KA Blade Knight sprite.png]] [[File: | |align=center|[[File:KA Blade Knight sprite.png]] [[File:KNiDL Blade Knight sprite.png]] | ||
|[[Blade Knight]] | |[[Blade Knight]] | ||
|style="border-style: solid; border-width: 1px 3px 1px 1px"|[[Sword]] | |style="border-style: solid; border-width: 1px 3px 1px 1px"|[[Sword]] | ||
|align=center|[[File:KA Rocky sprite.png]] [[File: | |align=center|[[File:KA Rocky sprite.png]] [[File:KNiDL Rocky sprite.png]] | ||
|[[Rocky]] | |[[Rocky]] | ||
|[[Stone]] | |[[Stone]] | ||
|- | |- | ||
|align=center|[[File:KA Bomber sprite.png]] [[File: | |align=center|[[File:KA Bomber sprite.png]] [[File:KNiDL Bomber sprite.png]] | ||
|[[Bomber]] | |[[Bomber]] | ||
|style="border-style: solid; border-width: 1px 3px 1px 1px"|[[Crash]] | |style="border-style: solid; border-width: 1px 3px 1px 1px"|[[Crash]] | ||
|align=center|[[File:KA Scarfy sprite.png]] [[File: | |align=center|[[File:KA Scarfy sprite.png]] [[File:KNiDL Scarfy sprite.png]] | ||
|[[Scarfy]] | |[[Scarfy]] | ||
|N/A | |N/A | ||
|- | |- | ||
|align=center|[[File:KA Cool Spook sprite.png]] [[File: | |align=center|[[File:KA Cool Spook sprite.png]] [[File:KNiDL Cool Spook sprite.png]] | ||
|[[Cool Spook]] | |[[Cool Spook]] | ||
|style="border-style: solid; border-width: 1px 3px 1px 1px"|[[Light]] | |style="border-style: solid; border-width: 1px 3px 1px 1px"|[[Light]] | ||
|align=center|[[File:KA Shotzo sprite.png]] [[File: | |align=center|[[File:KA Shotzo sprite.png]] [[File:KNiDL Shotzo sprite.png]] | ||
|[[Shotzo]] | |[[Shotzo]] | ||
|N/A | |N/A | ||
|- | |- | ||
|align=center|[[File:KA Gordo sprite.png]] [[File: | |align=center|[[File:KA Gordo sprite.png]] [[File:KNiDL Gordo sprite.png]] | ||
|[[Gordo]] | |[[Gordo]] | ||
|style="border-style: solid; border-width: 1px 3px 1px 1px"|N/A | |style="border-style: solid; border-width: 1px 3px 1px 1px"|N/A | ||
|align=center|[[File:KA Sir Kibble sprite.png]] [[File: | |align=center|[[File:KA Sir Kibble sprite.png]] [[File:KNiDL Sir Kibble sprite.png]] | ||
|[[Sir Kibble]] | |[[Sir Kibble]] | ||
|[[Cutter]] | |[[Cutter]] | ||
|- | |- | ||
|align=center|[[File:KA Hot Head sprite.png]] [[File: | |align=center|[[File:KA Hot Head sprite.png]] [[File:KNiDL Hot Head sprite.png]] | ||
|[[Hot Head]] | |[[Hot Head]] | ||
|style="border-style: solid; border-width: 1px 3px 1px 1px"|[[Fire]] | |style="border-style: solid; border-width: 1px 3px 1px 1px"|[[Fire]] | ||
|align=center|[[File:KA Sir Slippy sprite.png]] [[File: | |align=center|[[File:KA Sir Slippy sprite.png]] [[File:KNiDL Sir Slippy sprite.png]] | ||
|[[Slippy]] | |[[Slippy]] | ||
|None | |None | ||
|- | |- | ||
|align=center|[[File:KA Laser Ball sprite.png]] [[File: | |align=center|[[File:KA Laser Ball sprite.png]] [[File:KNiDL Laser Ball sprite.png]] | ||
|[[Laser Ball]] | |[[Laser Ball]] | ||
|style="border-style: solid; border-width: 1px 3px 1px 1px"|[[Laser]] | |style="border-style: solid; border-width: 1px 3px 1px 1px"|[[Laser]] | ||
|align=center|[[File:KA Starman sprite.png]] [[File: | |align=center|[[File:KA Starman sprite.png]] [[File:KNiDL Starman sprite.png]] | ||
|[[Starman]] | |[[Starman]] | ||
|[[Hi-Jump]] | |[[Hi-Jump]] | ||
|- | |- | ||
|align=center|[[File:KA Pengi sprite.png]] [[File: | |align=center|[[File:KA Pengi sprite.png]] [[File:KNiDL Pengi sprite.png]] | ||
|[[Pengy]] | |[[Pengy]] | ||
|style="border-style: solid; border-width: 1px 3px 1px 1px"|[[Ice]] | |style="border-style: solid; border-width: 1px 3px 1px 1px"|[[Ice]] | ||
|align=center|[[File:KA Twizzy sprite.png]] [[File: | |align=center|[[File:KA Twizzy sprite.png]] [[File:KNiDL Twizzy sprite.png]] | ||
|[[Twizzy]] | |[[Twizzy]] | ||
|None | |None | ||
|- | |- | ||
|align=center|[[File:KA Poppy Bros Jr sprite.png]] [[File: | |align=center|[[File:KA Poppy Bros Jr sprite.png]] [[File:KNiDL Poppy Bros Jr sprite.png]] | ||
|[[Poppy Bros. Jr.]] | |[[Poppy Bros. Jr.]] | ||
|style="border-style: solid; border-width: 1px 3px 1px 1px"|None | |style="border-style: solid; border-width: 1px 3px 1px 1px"|None | ||
| Line 93: | Line 103: | ||
==Gallery== | ==Gallery== | ||
<gallery> | <gallery> | ||
KA Butter Building Stage 6 screenshot 01.png|Kirby walks under the box containing a Laser Ball. | |||
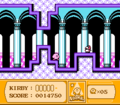
KA Butter Building Stage 6 screenshot 02.png|Kirby traverses tight metal corridors with slopes on the floor and ceiling. | |||
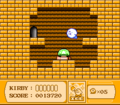
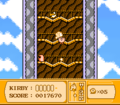
KA Butter Building Stage 6 screenshot 03.png|Kirby climbs up a wooden structure filled with ladders. | |||
KA Butter Building Stage 6 screenshot 04.png|Kirby flashes across another set of spinning towers. | |||
KA Butter Building Stage 6 screenshot 05.png|Kirby leaps up a series of cloud steps on the side of the tower. | |||
KA Butter Building Stage 6 screenshot 06.png|Kirby enters a room where he will need to race a Bomb Block chain reaction. | |||
KA Butter Building Stage 6 screenshot 07.png|Kirby stumbles upon a green Big Switch. | |||
KA Butter Building Stage 6 screenshot 08.png|Kirby uses the Light ability to illuminate a dark hall. | |||
KA Butter Building Stage 6 screenshot 09.png|The hall glows brightly after the Light ability is used. | |||
KA Butter Building Stage 6 screenshot 10.png|Kirby uses Hi-Jump to traverse the last part of the stage. | |||
</gallery> | </gallery> | ||
Latest revision as of 12:42, 21 April 2024
| ||||||||||
| ||||||||||
| ||||||||||
|
| ||||||||||

Butter Building - Stage 6 is the sixth stage of Butter Building, the third level of Kirby's Adventure and its remake, Kirby: Nightmare in Dream Land. It is the final regular stage of Butter Building, and is followed by a boss battle against the moon and sun duo, Mr. Shine & Mr. Bright.
Overview[edit]
The stage consists of seven primary areas. The first is a small room containing a trapped Laser Ball.
The second area is a long hallway with sloped corners, perfect for the Laser ability.
In the third area, Kirby finds himself in a vertical brick ascent past a number of foes.
The fourth area is an exterior section of the tower, where more enemies must be dealt with. The tower once again rotates (in Kirby's Adventure) or fades in (in Kirby: Nightmare in Dream Land) to reveal the door to the next area.
In the fifth area, Kirby has to climb up the side of the tower using cloud steps. Along the way, a side-room can be accessed behind some Star Blocks embedded in the tower which leads past a Bomb Block challenge to a Big Switch. Back on the main path, Kirby will need to climb still higher to progress.
For the sixth area, Kirby finds himself in a dark hallway. To illuminate the area, he can swallow a Cool Spook and use its ability.
In the last area, Kirby will have to ascend a narrow tower, though this can be made easier by borrowing a nearby Starman's power.
Enemies[edit]
| Sprite (KA/KNiDL) | Name | Copy Ability | Sprite (KA/KNiDL) | Name | Copy Ability |
|---|---|---|---|---|---|
| Blade Knight | Sword | Rocky | Stone | ||
| Bomber | Crash | Scarfy | N/A | ||
| Cool Spook | Light | Shotzo | N/A | ||
| Gordo | N/A | Sir Kibble | Cutter | ||
| Hot Head | Fire | Slippy | None | ||
| Laser Ball | Laser | Starman | Hi-Jump | ||
| Pengy | Ice | Twizzy | None | ||
| Poppy Bros. Jr. | None | Waddle Dee | None |
Gallery[edit]
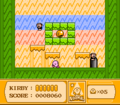
Kirby walks under the box containing a Laser Ball.
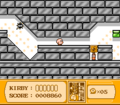
Kirby traverses tight metal corridors with slopes on the floor and ceiling.
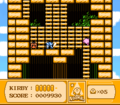
Kirby climbs up a wooden structure filled with ladders.
Kirby flashes across another set of spinning towers.
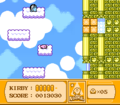
Kirby leaps up a series of cloud steps on the side of the tower.
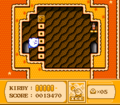
Kirby enters a room where he will need to race a Bomb Block chain reaction.
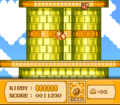
Kirby stumbles upon a green Big Switch.
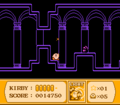
Kirby uses the Light ability to illuminate a dark hall.
The hall glows brightly after the Light ability is used.
Kirby uses Hi-Jump to traverse the last part of the stage.


