Raisin Ruins - Stage 3: Difference between revisions
m (Text replacement - "{{Navbox-RtDL}}" to "{{Navbox-KRtDL}}") |
m (Minor fix) |
||
| (16 intermediate revisions by 6 users not shown) | |||
| Line 1: | Line 1: | ||
{{Infobox-KRtDLStage | {{Infobox-KRtDLStage | ||
|image=[[File: | |image=[[File:KRtDLD Raisin Ruins Stage 3 select screenshot.png|350px]] | ||
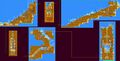
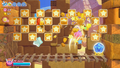
|caption= | |caption='''Raisin Ruins - Stage 3''' in the [[level hub]]. | ||
|level=[[Raisin Ruins]] | |level=[[Raisin Ruins]] | ||
|super= | |super={{N}} | ||
|sphere=4 | |sphere=4 | ||
|midboss=[[King Doo]] | |midboss=[[King Doo]] | ||
|theme music=[[File:Exotic Pyramid sample KRtDL.oga]] | |||
|theme title="[[Exotic Pyramid]]" | |||
|description=Clip of the theme that primarily plays in Raisin Ruins - Stage 3. | |||
|previousstage=[[Raisin Ruins - Stage 2]] | |previousstage=[[Raisin Ruins - Stage 2]] | ||
|nextstage=[[Raisin Ruins - Stage 4]] | |nextstage=[[Raisin Ruins - Stage 4]] | ||
}} | }} | ||
'''Raisin Ruins - Stage 3''' (simply called '''Stage 3''' or '''2-3''' in-game) is the third stage of [[Raisin Ruins]] in ''[[Kirby's Return to Dream Land]]'' and its remake—''[[Kirby's Return to Dream Land Deluxe]]''. There are four [[Energy Sphere]]s in this stage. | |||
'''Raisin Ruins - Stage 3''' is the third stage of [[Raisin Ruins]] in '' | |||
==Overview== | ==Overview== | ||
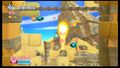
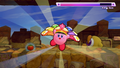
The stage begins at the base of a steep series of ruin steps, augmented by | [[File:KRtDLD Raisin Ruins Stage 3 screenshot 04.png|thumb|left|250px|Kirby makes use of [[Tornado]] to more safely traverse the steps of this big desert ziggurat.]] | ||
The stage begins at the base of a steep series of ruin steps, augmented by [[ladder]]s and foes. [[Kirby]] will need to climb his way up these ramparts. Along the way, a number of small passages can be found to obtain extra goodies. | |||
Through the door lies a vertical passage which splits into many paths. No essential items can be missed here, but some of the paths are undoubtedly more favorable than the others. | Through the door lies a vertical passage which splits into many paths. No essential items can be missed here, but some of the paths are undoubtedly more favorable than the others. Kirby should try to look for [[Point Star]]s as he ascends to get the best items. The door to the next area is up at the top. | ||
The next area has Kirby traversing up more ruin steps. Though not quite as steep, these steps are guarded by [[Shotzo]]s and [[Gigatzo]]s, making safe passage tricky. A [[Twister]] can be swallowed to obtain the elusive [[Tornado]] ability, which can be used to glide past the shots without taking a hit. | The next area has Kirby traversing up more ruin steps. Though not quite as steep, these steps are guarded by [[Shotzo]]s and [[Gigatzo]]s, making safe passage tricky. A [[Twister]] can be swallowed to obtain the elusive [[Tornado]] ability, which can be used to glide past the shots without taking a hit. The door to the next area can be found in the upper-right inside the ruins. | ||
From here, another vertical column can be found, where Kirby can use the [[Hi-Jump]] ability to ascend. | From here, another vertical column can be found, where Kirby can swallow a [[Starman]] to use the [[Hi-Jump]] ability to ascend past many barricades of blocks and enemies within them. The door forward is once again up at the top. | ||
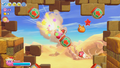
Kirby finds himself in a ruin passageway where he can find a [[Maxim Tomato | Kirby finds himself in a ruin passageway where he can find a [[Maxim Tomato box]] and carry it into a fight with the [[Mid-Boss]] [[King Doo]]. Defeating this giant cyclops yields the [[Beam]] ability, and the way forward via means of cannons. In ''Kirby's Return to Dream Land Deluxe'', a [[Don Puffle]] is present here, which will allow Kirby to use [[Festival|Festival Dance]] on the Mid-Boss. | ||
In the last area, Kirby will need to make continuous use of cannons to propel himself upward. At the top, the stage exit can be found to the right. | In the last area, Kirby will need to make continuous use of cannons to propel himself upward. At the top, the stage exit can be found to the right. | ||
===Energy Sphere Guide=== | ===Energy Sphere Guide=== | ||
*In the third area, past the firing | *In the third area, past the firing Shotzos and Gigatzos, a [[Star Block|Super Inhale Block]] can be removed to access a small chamber where a Tornado [[Copy Essence]] can be found. This can be used to break the barriers ahead to obtain the first sphere. | ||
*In the [[Hi-Jump]] area, | *In the [[Hi-Jump]] area, the second sphere can be found by jumping through the barrier in the middle of the path. | ||
*After defeating [[King Doo]], Kirby can use the [[Beam]] ability to open up a barrier along the path upward to obtain | *After defeating [[King Doo]], Kirby can use the [[Beam]] ability to open up a [[Bomb Block]] barrier along the path upward to obtain the third sphere. | ||
*In the [[Cannon]] grid, | *In the [[Cannon]] grid, the last sphere can be found by taking the cannon to the right at the top. | ||
==Enemies, Mid-Bosses and | ==Enemies, Mid-Bosses and abilities== | ||
{| style="border: 3px solid #E47575; {{round}};background: #F69D99" cellspacing="2" | {| style="border: 3px solid #E47575; {{round}};background: #F69D99" cellspacing="2" | ||
! width="420px" | '''Regular Enemies''' | ! width="420px" | '''Regular Enemies''' | ||
| Line 45: | Line 47: | ||
*[[Bronto Burt]] | *[[Bronto Burt]] | ||
*[[Cerulean]] | *[[Cerulean]] | ||
*[[Don Puffle]] <small>(KRtDLD only)</small> | |||
*[[Gigatzo]] | *[[Gigatzo]] | ||
{{col-break|width=33%}} | |||
*[[Gordo]] | *[[Gordo]] | ||
*[[Kabu]] | *[[Kabu]] | ||
*[[Mumbies]] | *[[Mumbies]] | ||
| Line 74: | Line 77: | ||
*[[Beam]] | *[[Beam]] | ||
*[[Cutter]] | *[[Cutter]] | ||
*[[ | *[[Festival]] <small>(KRtDLD only)</small> | ||
*[[Fire]] | |||
*[[Hi-Jump]] | *[[Hi-Jump]] | ||
*[[Parasol]] | *[[Parasol]] | ||
| Line 87: | Line 91: | ||
==Gallery== | ==Gallery== | ||
===''Kirby's Return to Dream Land''=== | |||
<gallery> | |||
KRtDL Raisin Ruins Stage 3 screenshot.png|Kirby deals with some Mumbies on his climb up the ruin ziggurat. | |||
KRtDL Raisin Ruins Stage 3-1.jpg|Kirby discovers a star cache. | |||
KRtDL Raisin Ruins Stage 3-2.jpg|Kirby jumps high. | |||
KRtDL Raisin Ruins Stage 3-3.jpg|Kirby tosses the Maxim Tomato Box at his opponent. | |||
KRTDL-map-A-2-3.jpg|Stage map | |||
</gallery> | |||
===''Kirby's Return to Dream Land Deluxe''=== | |||
<gallery> | <gallery> | ||
KRtDLD Raisin Ruins Stage 3 screenshot 01.png|Stone Kirby prepares to knock away a group of Bouncies. | |||
KRtDLD Raisin Ruins Stage 3 screenshot 02.png|Kirby hops along the split paths up the ruins. | |||
KRtDLD Raisin Ruins Stage 3 screenshot 03.png|Kirby waits for a Shotzo to stop firing. | |||
KRtDLD Raisin Ruins Stage 3 screenshot 05.png|Kirby uses Hi-Jump to break through a series of blocks. | |||
KRtDLD Raisin Ruins Stage 3 screenshot 07.png|Festival Kirby does his thing against King Doo. | |||
KRtDLD Raisin Ruins Stage 3 screenshot 08.png|Kirby uses the grid of cannons near the end of the stage. | |||
</gallery> | </gallery> | ||
==Video | ==Video walkthroughs== | ||
{{Youtube|2wAIKk7iG1E|300|100% walkthrough of Raisin Ruins - Stage 3.}} | {{Youtube|2wAIKk7iG1E|300|100% walkthrough of Raisin Ruins - Stage 3 in ''Kirby's Return to Dream Land''.}} | ||
{{Youtube|ibD2rgRCOnU|300|100% walkthrough of Raisin Ruins - Stage 3 in Extra Mode in ''Kirby's Return to Dream Land Deluxe''.}} | |||
{{clear}} | {{clear}} | ||
{{Navbox-KRtDL}} | {{Navbox-KRtDL/KRtDLD}} | ||
Latest revision as of 14:04, 23 June 2023
| ||||||||||||||
| ||||||||||||||
| ||||||||||||||
|
| ||||||||||||||

Raisin Ruins - Stage 3 (simply called Stage 3 or 2-3 in-game) is the third stage of Raisin Ruins in Kirby's Return to Dream Land and its remake—Kirby's Return to Dream Land Deluxe. There are four Energy Spheres in this stage.
Overview[edit]

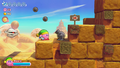
The stage begins at the base of a steep series of ruin steps, augmented by ladders and foes. Kirby will need to climb his way up these ramparts. Along the way, a number of small passages can be found to obtain extra goodies.
Through the door lies a vertical passage which splits into many paths. No essential items can be missed here, but some of the paths are undoubtedly more favorable than the others. Kirby should try to look for Point Stars as he ascends to get the best items. The door to the next area is up at the top.
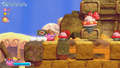
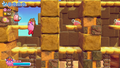
The next area has Kirby traversing up more ruin steps. Though not quite as steep, these steps are guarded by Shotzos and Gigatzos, making safe passage tricky. A Twister can be swallowed to obtain the elusive Tornado ability, which can be used to glide past the shots without taking a hit. The door to the next area can be found in the upper-right inside the ruins.
From here, another vertical column can be found, where Kirby can swallow a Starman to use the Hi-Jump ability to ascend past many barricades of blocks and enemies within them. The door forward is once again up at the top.
Kirby finds himself in a ruin passageway where he can find a Maxim Tomato box and carry it into a fight with the Mid-Boss King Doo. Defeating this giant cyclops yields the Beam ability, and the way forward via means of cannons. In Kirby's Return to Dream Land Deluxe, a Don Puffle is present here, which will allow Kirby to use Festival Dance on the Mid-Boss.
In the last area, Kirby will need to make continuous use of cannons to propel himself upward. At the top, the stage exit can be found to the right.
Energy Sphere Guide[edit]
- In the third area, past the firing Shotzos and Gigatzos, a Super Inhale Block can be removed to access a small chamber where a Tornado Copy Essence can be found. This can be used to break the barriers ahead to obtain the first sphere.
- In the Hi-Jump area, the second sphere can be found by jumping through the barrier in the middle of the path.
- After defeating King Doo, Kirby can use the Beam ability to open up a Bomb Block barrier along the path upward to obtain the third sphere.
- In the Cannon grid, the last sphere can be found by taking the cannon to the right at the top.
Enemies, Mid-Bosses and abilities[edit]
| Regular Enemies | Mid-Boss | ||||
|---|---|---|---|---|---|
|
| ||||
| Abilities | |||||
|
| |||||
Gallery[edit]
Kirby's Return to Dream Land[edit]
Kirby deals with some Mumbies on his climb up the ruin ziggurat.
Kirby discovers a star cache.
Kirby jumps high.
Kirby tosses the Maxim Tomato Box at his opponent.
Stage map


Kirby's Return to Dream Land Deluxe[edit]
Stone Kirby prepares to knock away a group of Bouncies.
Kirby hops along the split paths up the ruins.
Kirby waits for a Shotzo to stop firing.
Kirby uses Hi-Jump to break through a series of blocks.
Festival Kirby does his thing against King Doo.
Kirby uses the grid of cannons near the end of the stage.


Video walkthroughs[edit]
100% walkthrough of Raisin Ruins - Stage 3 in Kirby's Return to Dream Land.
|
100% walkthrough of Raisin Ruins - Stage 3 in Extra Mode in Kirby's Return to Dream Land Deluxe.
|