Revenge of Meta Knight - Chapter 7: Difference between revisions
mNo edit summary |
|||
| Line 21: | Line 21: | ||
<gallery> | <gallery> | ||
KSS RoMK Chapter 7 screenshot 01.png|Kirby swings around the ruined Halberd for the final run. | KSS RoMK Chapter 7 screenshot 01.png|Kirby swings around the ruined Halberd for the final run. | ||
KSSU RoMK Chapter 7 Scene 1.jpg|Same scene, in ''Kirby Super Star Ultra'' | |||
</gallery> | </gallery> | ||
| Line 35: | Line 35: | ||
<gallery> | <gallery> | ||
KSS RoMK Chapter 7 screenshot 12.png|One last explosion on the Halberd wrecks the helm after Meta Knight is defeated. | KSS RoMK Chapter 7 screenshot 12.png|One last explosion on the Halberd wrecks the helm after Meta Knight is defeated. | ||
KSSU RoMK Chapter 7 Scene 2.jpg|Kirby finds a helpful Wheelie who shares his desire to escape. | |||
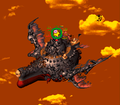
RoMK | KSSU RoMK Chapter 7 Meta Knight.jpg|Kirby makes his daring escape as a livid winged Meta Knight pursues. | ||
</gallery> | </gallery> | ||
| Line 62: | Line 62: | ||
|- | |- | ||
|[[Mace Knight]] | |[[Mace Knight]] | ||
|[[File:KSS Mace Knight Portrait 3.png]] [[File: | |[[File:KSS Mace Knight Portrait 3.png]] [[File:KSSU Mace Knight Portrait 3.png]] | ||
|''"Ain't any power left!<br>We can't fly!"'' | |''"Ain't any power left!<br>We can't fly!"'' | ||
|''We're junked! Nothing<br>left to do but crash!'' | |''We're junked! Nothing<br>left to do but crash!'' | ||
| Line 69: | Line 69: | ||
|- | |- | ||
|[[Meta Knight]] | |[[Meta Knight]] | ||
|[[File:KSS Meta Knight Portrait 1.png]] [[File: | |[[File:KSS Meta Knight Portrait 1.png]] [[File:KSSU Meta Knight Portrait 1.png]] | ||
|''"(We've failed...<br>it's over.)"'' | |''"(We've failed...<br>it's over.)"'' | ||
|''(We've failed...but there's<br>nothing we can do.)'' | |''(We've failed...but there's<br>nothing we can do.)'' | ||
| Line 76: | Line 76: | ||
|- | |- | ||
|[[Meta Knight]] | |[[Meta Knight]] | ||
|[[File:KSS Meta Knight Portrait 2.png]] [[File: | |[[File:KSS Meta Knight Portrait 2.png]] [[File:KSSU Meta Knight Portrait 2.png]] | ||
|''"Attention all crew!<br>Evacuate ship!!"'' | |''"Attention all crew!<br>Evacuate ship!!"'' | ||
|''Attention to all crew!<br>Evacuate ship immediately!'' | |''Attention to all crew!<br>Evacuate ship immediately!'' | ||
| Line 83: | Line 83: | ||
|- | |- | ||
|[[Captain Vul]] | |[[Captain Vul]] | ||
|[[File:KSS Vul Portrait 6.png]] [[File: | |[[File:KSS Vul Portrait 6.png]] [[File:KSSU Captain Vul Portrait 1.png]] | ||
|''"Waaah!<br>The ship's going down!"'' | |''"Waaah!<br>The ship's going down!"'' | ||
|''Ahhh! The ship is done for!<br>I gotta get out of here!'' | |''Ahhh! The ship is done for!<br>I gotta get out of here!'' | ||
| Line 90: | Line 90: | ||
|- | |- | ||
|[[Captain Vul]] | |[[Captain Vul]] | ||
|[[File:KSS Vul Portrait 4.png]] [[File: | |[[File:KSS Vul Portrait 4.png]] [[File:KSSU Captain Vul Portrait 2.png]] | ||
|''"I'm not staying.<br>I'm evacuating!!"'' | |''"I'm not staying.<br>I'm evacuating!!"'' | ||
|''I'm escaping now!<br>Don't think badly of me!'' | |''I'm escaping now!<br>Don't think badly of me!'' | ||
| Line 97: | Line 97: | ||
|- | |- | ||
|[[Meta Knight]] | |[[Meta Knight]] | ||
|[[File:KSS Meta Knight Portrait 2.png]] [[File: | |[[File:KSS Meta Knight Portrait 2.png]] [[File:KSSU Meta Knight Portrait 2.png]] | ||
|''"Now, it's your<br>turn to evacuate."'' | |''"Now, it's your<br>turn to evacuate."'' | ||
|''So... Now it's time for the<br>rest of you to escape as well.'' | |''So... Now it's time for the<br>rest of you to escape as well.'' | ||
| Line 111: | Line 111: | ||
|- | |- | ||
|[[Mace Knight]] | |[[Mace Knight]] | ||
|[[File:KSS Mace Knight Portrait 3.png]] [[File: | |[[File:KSS Mace Knight Portrait 3.png]] [[File:KSSU Mace Knight Portrait 3.png]] | ||
|''"Let's try one more time<br>to get Kirby!"'' | |''"Let's try one more time<br>to get Kirby!"'' | ||
|''We should finish off Kirby<br>then all escape together!'' | |''We should finish off Kirby<br>then all escape together!'' | ||
| Line 118: | Line 118: | ||
|- | |- | ||
|[[Meta Knight]] | |[[Meta Knight]] | ||
|[[File:KSS Meta Knight Portrait 1.png]] [[File: | |[[File:KSS Meta Knight Portrait 1.png]] [[File:KSSU Meta Knight Portrait 1.png]] | ||
|''"Hmmm....."'' | |''"Hmmm....."'' | ||
|''... ... ... ...'' | |''... ... ... ...'' | ||
| Line 125: | Line 125: | ||
|- | |- | ||
|[[Meta Knight]] | |[[Meta Knight]] | ||
|[[File:KSS Meta Knight Portrait 1.png]] [[File: | |[[File:KSS Meta Knight Portrait 1.png]] [[File:KSSU Meta Knight Portrait 1.png]] | ||
|''"..... It's dangerous,<br>but it's worth a try!"'' | |''"..... It's dangerous,<br>but it's worth a try!"'' | ||
|''...You are all about to perish.<br>Do as you please.'' | |''...You are all about to perish.<br>Do as you please.'' | ||
| Line 132: | Line 132: | ||
|- | |- | ||
|[[Meta Knight]] | |[[Meta Knight]] | ||
|[[File:KSS Meta Knight Portrait 2.png]] [[File: | |[[File:KSS Meta Knight Portrait 2.png]] [[File:KSSU Meta Knight Portrait 2.png]] | ||
|''"Thank you, guys."'' | |''"Thank you, guys."'' | ||
|''(...I'm sorry.)'' | |''(...I'm sorry.)'' | ||
| Line 145: | Line 145: | ||
|- | |- | ||
|[[Mace Knight]] | |[[Mace Knight]] | ||
|[[File:KSS Mace Knight Portrait 3.png]] [[File: | |[[File:KSS Mace Knight Portrait 3.png]] [[File:KSSU Mace Knight Portrait 3.png]] | ||
|''"You can't go any<br>further!"'' | |''"You can't go any<br>further!"'' | ||
|''I cannot let you go<br>any farther!'' | |''I cannot let you go<br>any farther!'' | ||
| Line 159: | Line 159: | ||
|- | |- | ||
|[[Mace Knight]] | |[[Mace Knight]] | ||
|[[File:KSS Mace Knight Portrait 3.png]] [[File: | |[[File:KSS Mace Knight Portrait 3.png]] [[File:KSSU Mace Knight Portrait 3.png]] | ||
|''"We're evacuating!"'' | |''"We're evacuating!"'' | ||
|''We'll go on ahead then!'' | |''We'll go on ahead then!'' | ||
| Line 166: | Line 166: | ||
|- | |- | ||
|[[Meta Knight]] | |[[Meta Knight]] | ||
|[[File:KSS Meta Knight Portrait 1.png]] [[File: | |[[File:KSS Meta Knight Portrait 1.png]] [[File:KSSU Meta Knight Portrait 1.png]] | ||
|''"Kirby, this is it!<br>Prepare to die!"'' | |''"Kirby, this is it!<br>Prepare to die!"'' | ||
|''This is the end! Kirby!<br>Come meet your doom!!'' | |''This is the end! Kirby!<br>Come meet your doom!!'' | ||
| Line 173: | Line 173: | ||
|- | |- | ||
|[[Sailor Waddle Dee]] | |[[Sailor Waddle Dee]] | ||
|[[File:KSS Sailor Dee Portrait 1.png]] [[File: | |[[File:KSS Sailor Dee Portrait 1.png]] [[File:KSSU Sailor Waddle Dee Portrait 2.png]] | ||
|''"Th-thump. Th-thump."'' | |''"Th-thump. Th-thump."'' | ||
|''(Heart races...)'' | |''(Heart races...)'' | ||
| Line 180: | Line 180: | ||
|- | |- | ||
|[[Meta Knight]] | |[[Meta Knight]] | ||
|[[File:KSS Meta Knight Portrait 1.png]] [[File: | |[[File:KSS Meta Knight Portrait 1.png]] [[File:KSSU Meta Knight Portrait 1.png]] | ||
|''"You'll never escape!"'' | |''"You'll never escape!"'' | ||
|''I won't let you escape!'' | |''I won't let you escape!'' | ||
Revision as of 19:36, 14 January 2022
| ||||||||||||||
| ||||||||||||||
| ||||||||||||||
|
| ||||||||||||||
Chapter 7 of Revenge of Meta Knight is the last of seven chapters in this game-mode from [[Kirby Super Star|Template:KSS KFP]] and Template:KSSU. In this chapter, Kirby heads for the helm of the Halberd as the crew evacuates to deal with Meta Knight directly. After defeating him in a sword fight and destroying the helm of the ship, Kirby hops onto a Wheelie to make his escape as an enraged Meta Knight tries everything he can to stop his rival from doing so.
Intro cut-scene
In the opening scene, Kirby flies around the Halberd as a huge hole is blown in the hull of the ship, then lands back on the deck to head for the helm.

Kirby swings around the ruined Halberd for the final run.
- KSSU RoMK Chapter 7 Scene 1.jpg
Same scene, in Kirby Super Star Ultra

Overview
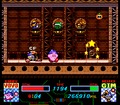
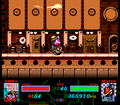
The timer resets to 3000 as Kirby heads for the helm. The crew of the Halberd panics as Captain Vul abandons ship. The Meta-Knights, however, stay to try and get their revenge on Kirby. As they discuss this, Kirby makes his way through an auto-scrolling section past crumbling bridges inside the hangar.
In the next room, Kirby makes his way up the elevator where the Meta-Knights ambush him one more time. From there, Kirby has a choice between a few more abilities before reaching Meta Knight's cabin.
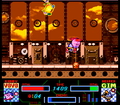
In the cabin proper, Meta Knight tosses a Sword to Kirby for an honorable duel. From there, the fight is on, as Kirby battles Meta Knight in the traditional manner. When the masked swordsman is defeated, his mask breaks, and he flees the scene. From there, the cabin explodes, and Kirby is sent tumbling to the final section.
With only 50 seconds left to escape, Kirby finds a Wheelie, and hops on it to flee the Halberd as it crashes. Meta Knight pursues, trying his best to slow Kirby down. Kirby cannot defeat Meta Knight in this phase, so he should focus on escaping. The stage ends as Kirby makes the leap off the ramp at the end of the causeway. The final cut-scene plays of the Halberd crashing, and Kirby riding off into the sunset, and the game is complete.
One last explosion on the Halberd wrecks the helm after Meta Knight is defeated.
- KSSU RoMK Chapter 7 Scene 2.jpg
Kirby finds a helpful Wheelie who shares his desire to escape.
- KSSU RoMK Chapter 7 Meta Knight.jpg
Kirby makes his daring escape as a livid winged Meta Knight pursues.

Dialogue
Intermittently, the Halberd crew can be heard by the player through dialogue boxes which pop up as Kirby makes his way through the stage. The following table lists off their dialogue in chronological order:
| Chapter 7 Dialogue in Revenge of Meta Knight | |||||
|---|---|---|---|---|---|
| Character | Portraits | Dialogue (KSS) | Dialogue (KSSU) | Dialogue (Japanese) | Notes |
| Axe Knight | "We are losing power! Engine No.3! Engine No.5!" |
All systems failing! No.3 and No.5 engines are gone! |
「各部の機能が低下しています! 第3、第5エンジン停止!」 |
||
| Mace Knight | "Ain't any power left! We can't fly!" |
We're junked! Nothing left to do but crash! |
「もうぼろぼろだス! すぐにおちるだスよ!」 |
||
| Meta Knight | "(We've failed... it's over.)" |
(We've failed...but there's nothing we can do.) |
「(不覚…だがやむをえまい)」 | ||
| Meta Knight | "Attention all crew! Evacuate ship!!" |
Attention to all crew! Evacuate ship immediately! |
「クルー全員に告ぐ! 至急本艦より脱出せよ!!」 |
||
| Captain Vul | "Waaah! The ship's going down!" |
Ahhh! The ship is done for! I gotta get out of here! |
「あひえぇぇぇ!この艦はもう だめだぁ!!わしは逃げるぅ!」 |
||
| Captain Vul | "I'm not staying. I'm evacuating!!" |
I'm escaping now! Don't think badly of me! |
「じゃ、わしは逃げますぅ! 悪く思わんで下さい!」 |
||
| Meta Knight | "Now, it's your turn to evacuate." |
So... Now it's time for the rest of you to escape as well. |
「さあ、 次はおまえたちが逃げる番だ。」 |
||
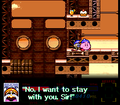
| Axe Knight | "No, I want to stay with you, Sir!" |
I will stay until the bitter end. |
「いえ、最後までおつき合い させていただきます!」 |
||
| Mace Knight | "Let's try one more time to get Kirby!" |
We should finish off Kirby then all escape together! |
「カービィをぎゃふんといわせて、 それからみんなで逃げるだス!」 |
||
| Meta Knight | "Hmmm....." | ... ... ... ... | 「……………………。」 | ||
| Meta Knight | "..... It's dangerous, but it's worth a try!" |
...You are all about to perish. Do as you please. |
「…しにぞこないどもめ。 かってにするがよい」 |
The difference in tone between translations is notable. The KSSU dialogue is closer to the Japanese text. | |
| Meta Knight | "Thank you, guys." | (...I'm sorry.) | 「(…すまない)」 | ||
| Axe Knight | "Wait, Kirby!!" | Wait, Kirby!! | 「まて、カービィ!!」 | One of the few instances where the portrait expression is different between versions. | |
| Mace Knight | "You can't go any further!" |
I cannot let you go any farther! |
「こっからさきには、 通さないだスよ!」 |
||
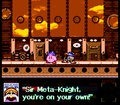
| Axe Knight | "Sir Meta Knight, you're on your own!" |
Lord Meta Knight, please take care! |
「メタナイトさま、 あとはおねがいしますぅ!」 |
||
| Mace Knight | "We're evacuating!" | We'll go on ahead then! | 「ダメなわしらは おさきにしつれいだスぅ!」 |
||
| Meta Knight | "Kirby, this is it! Prepare to die!" |
This is the end! Kirby! Come meet your doom!! |
「これが最後だ! カービィ!いざ勝負!!」 |
Note the removal of the phrase "prepare to die" in KSSU. The equivalent in the Japanese dialogue is "Let us duel!" | |
| Sailor Waddle Dee | "Th-thump. Th-thump." | (Heart races...) | 「(どきどきどきどき…)」 | ||
| Meta Knight | "You'll never escape!" | I won't let you escape! | 「のがさんぞ!」 | ||
Enemies, mid-bosses, and boss
|
Boss: Meta Knight
As Kirby enters the duel against his masked rival, he is made to pick up a Sword on the ground with the helpful text "GET IT!" ("GRAB THIS!" in SSU) overhead. Just like in the corresponding fight in Kirby's Adventure and Kirby: Nightmare in Dream Land, Kirby cannot drop his sword during the fight. Once he picks it up, Meta Knight throws his cape aside and begins to duel with Kirby. While he is not quite as able to block Kirby's attacks as before, he does have much greater durability, and he has a few new moves. One of these allows him to conjure a giant tornado which can catch Kirby and throw him into the air before slamming him into the ground. As always, when Meta Knight is defeated, his mask breaks, forcing him to retreat.
Ending cut-scene
Once Kirby hops off the Halberd, he lands on a cliffside off the ocean to watch the ship crash into the water. After a moment, Kirby then rides off on his Wheelie down a desert road as the credits roll. Once enough time has passed, the next scene has Kirby and his Wheelie riding into the sunset, ending the game mode.
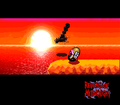
Kirby and his friend watch the Halberd sink.
- SSU RoMK End Scene.jpg
Same scene, in Kirby Super Star Ultra
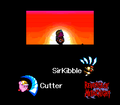
A roll call of all of Kirby's helpers shows as he rides off.


Trivia
- This stage marks the very first time that Meta Knight was depicted with wings, a trait that would stick with him for the remainder of the series.
Gallery
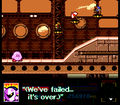
Kirby heads toward the helm as Meta Knight bemoans his failed mission.
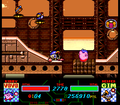
This auto-scrolling path features lots of enemies, pitfalls, and Copy Essences.
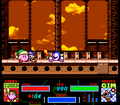
Meta Knight's crew vow to stay with him and try to get revenge on Kirby.

The Meta-Knights strike; this time, with feeling.
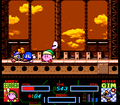
Kirby makes quick work of his foes using the Yo-Yo ability.
Meta Knight's crew are beaten back and forced to evacuate.
One last set of abilities to choose from before the duel of fate. Oddly, one of the abilities is Sleep.
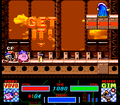
Kirby is prompted to "GET IT!". Unlike in Kirby's Adventure, he can ignore this prompt.
Even in the most dire situations, Meta Knight still prefers an honTemplate:Orable duel.
Meta Knight is briefly unmasked after his defeat, and has to retreat to hide his shame.

Kirby tumbles from the helm after it explodes.
Kirby teams up with a Wheelie to escape the condemned sinking ship.
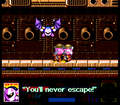
Meta Knight tries one more time to stop Kirby, revealing his wings for the very first time.

Kirby evades Meta Knight as he makes his way off the Halberd.


