Kracko Course - Hole 3
| ||||||||||
| ||||||||||
|
| ||||||||||

Kracko Course - Hole 3 is the third hole of Kracko Course in Kirby's Dream Course. It features a wide rectangular board lined with ramps and various course obstacles.
Summary
The board here is fairly large and wide, rectangular in shape and bordered on all sides by bumper walls. Along the length of the board are various ramps stretching its length, with the rest of the board being flat, though littered with all sorts of course obstacles, including Turntables, Kick Panels, Bunkers, and Trampolines. On the lower-left portion of the stage, the bumper fence gives way, instead forming a small pocket around the middle of that region which contains a Parasol Waddle Doo and Twister. Kirby and Keeby start out in the uppermost corner of the board behind the first ramp. Kracko can be found to the lower-right past two Squishys, and two Transformers can be found in the middle region.
Extra Game
In the Extra Game, the starting position is moved to the lower-left, placed within the small bumper-confined region along with a Starman. Kracko has been moved to the middle of the board, and the two Transformers are moved further apart closer to the lower end of the board. Up to the right, two UFOs can be found.
Enemies
Obstacles
| Sprite | Obstacle |
|---|---|
| Bumper | |
| Bunker | |
| Kick Panel | |
| Trampoline | |
| Turntable | |
| Turntable Power Switch |
Gallery
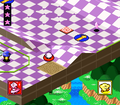
UFO Kirby slides on across the board.
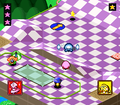
Freeze Keeby tries to close the distance.
