Orange Ocean - Stage 3: Difference between revisions
No edit summary |
No edit summary |
||
| (27 intermediate revisions by 11 users not shown) | |||
| Line 1: | Line 1: | ||
{{Infobox-KAStage | {{Infobox-KAStage | ||
|image=[[File:Orange Ocean | |image=[[File:KNiDL Orange Ocean Stage 3.png]] | ||
|caption=Kirby mans the deck of a wooden ship. (''Nightmare in Dream Land'') | |caption=Kirby mans the deck of a wooden ship. (''Kirby: Nightmare in Dream Land'') | ||
|level=[[Orange Ocean]] | |level=[[Orange Ocean]] | ||
|midboss=[[Bonkers]] | |midboss=[[Bonkers]] | ||
|switch={{Y}} | |switch={{Y}} | ||
|theme music= | |||
<tabs> | |||
<tab name="Kirby’s Adventure"> | |||
[[File:Orange Ocean KA.mp3]] | |||
</tab> | |||
<tab name="Kirby: Nightmare in Dream Land"> | |||
[[File:KNiDL Orange Ocean Sample.oga]] | |||
</tab> | |||
</tabs> | |||
|theme title="[[Orange Ocean (theme)|Orange Ocean]]" | |||
|description=Clips of the music that plays in Orange Ocean - Stage 3 | |||
|previousstage=[[Orange Ocean - Stage 2]] | |previousstage=[[Orange Ocean - Stage 2]] | ||
|nextstage=[[Orange Ocean - Stage 4]] | |nextstage=[[Orange Ocean - Stage 4]] | ||
| Line 13: | Line 24: | ||
This stage consists of five main areas. The first has Kirby walking along the shoreline and bumping into some crates, then boarding a large wooden ship against the wishes of its crew. | This stage consists of five main areas. The first has Kirby walking along the shoreline and bumping into some crates, then boarding a large wooden ship against the wishes of its crew. | ||
In the second area, Kirby will find himself in a room where [[Bonkers]] wants a piece of him. Once defeated, Kirby can progress forward and up into a higher room where a doorway can be found. Using the [[Hammer]] however, Kirby can bust a crate in the wall open to reveal another path which leads downward. This second path can take Kirby to a series of side rooms which are accessible in the place of a [[Bomb Block]] that can be broken in the bottom-most chamber. To reach the [[Big Switch]], Kirby will need to make use of a [[Cannon|Fuse Cannon]] with its [[Fuse]] starting underwater. [[Laser]] or [[UFO]] can be used here to light the fuse and then get in the cannon (the latter can only be used via Ability [[Mix]] a few rooms before). (Theoretically, Kirby could also bring [[Crash]] to this room and light the fuse with it, but since Hammer is required to enter the room in the first place, and there are no enemies from there with which to get Crash from a Mix, this presumably cannot be done.) | |||
For the third area, taking the main exit from the previous one places Kirby on the ship's deck, where there are many enemies in his way. A couple of doors can be accessed here which lead to different areas of the ship, though the one on the masts is the way forward. The side doors along the left lead to two rooms, where a [[1-Up]] always appears on the other side. Kirby can get into the same room as the 1-Up by taking a window instead. The side door on the right leads to the room with the cannon, but on the upper deck. Kirby cannot access the cannon from here, but he can frivolously light the fuse if he has Crash equipped. | |||
The fourth area can be accessed either through the door in the third area or through the door following the Big Switch. Kirby ends up on the ship's masts, where he will need to work his way up to find a [[Warp Star]] at the top. Taking it allows Kirby to ride across the ocean and far out to a distant island. | |||
For the last area, after crashing on the island, Kirby can find the stage exit to the right past a few foes. | |||
==Enemies | ==Enemies and Mid-Boss== | ||
{| | {| width=50% | ||
! | |<tabs> | ||
! | <tab name="Enemies"> | ||
{| class="wikitable" | |||
!Sprite (''KA''/''KNiDL'') | |||
!Name | |||
!style="border-style: solid; border-width: 1px 3px 1px 1px"|Copy Ability | |||
!Sprite (''KA''/''KNiDL'') | |||
!Name | |||
!style="border-style: solid; border-width: 1px 3px 1px 1px"|Copy Ability | |||
!Sprite (''KA''/''KNiDL'') | |||
!Name | |||
!Copy Ability | |||
| | |||
|- | |- | ||
|align=center|[[File:KA Blipper sprite.png]] [[File:KNiDL Blipper sprite.png]] | |||
|- | |[[Blipper]] | ||
| | |style="border-style: solid; border-width: 1px 3px 1px 1px"|None | ||
|align=center|[[File:KA Glunk sprite.png]] [[File:KNiDL Glunk sprite.png]] | |||
|[[Glunk]] | |||
|style="border-style: solid; border-width: 1px 3px 1px 1px"|None | |||
|align=center|[[File:KA Shotzo sprite.png]] [[File:KNiDL Shotzo sprite.png]] | |||
|[[Shotzo]] | |||
|N/A | |||
|- | |||
|align=center|[[File:KA Bronto Burt sprite.png]] [[File:KNiDL Bronto Burt sprite.png]] | |||
|[[Bronto Burt]] | |||
|style="border-style: solid; border-width: 1px 3px 1px 1px"|None | |||
{ | |align=center|[[File:KA Hot Head sprite.png]] [[File:KNiDL Hot Head sprite.png]] | ||
|[[Hot Head]] | |||
|style="border-style: solid; border-width: 1px 3px 1px 1px"|[[Fire]] | |||
|align=center|[[File:KA Sir Kibble sprite.png]] [[File:KNiDL Sir Kibble sprite.png]] | |||
|[[Sir Kibble]] | |||
|[[Cutter]] | |||
|- | |||
|align=center|[[File:KA Broom Hatter sprite.png]] [[File:KNiDL Broom Hatter sprite.png]] | |||
|[[Broom Hatter]] | |||
|style="border-style: solid; border-width: 1px 3px 1px 1px"|None | |||
|align=center|[[File:KA Kabu sprite.png]] [[File:KNiDL Kabu sprite.png]] | |||
|[[Kabu]] | |||
|style="border-style: solid; border-width: 1px 3px 1px 1px"|None | |||
|align=center|[[File:KA Sir Slippy sprite.png]] [[File:KNiDL Sir Slippy sprite.png]] | |||
|[[Slippy]] | |||
|None | |||
|- | |||
|align=center|[[File:KA Coconut sprite.png]] [[File:KNiDL Coconut sprite.png]] | |||
|[[Coconut]] | |||
|style="border-style: solid; border-width: 1px 3px 1px 1px"|None | |||
|align=center|[[File:KA Laser Ball sprite.png]] [[File:KNiDL Laser Ball sprite.png]] | |||
|[[Laser Ball]] | |||
|style="border-style: solid; border-width: 1px 3px 1px 1px"|[[Laser]] | |||
|align=center|[[File:KA Sparky sprite.png]] [[File:KNiDL Sparky sprite.png]] | |||
|[[Sparky]] | |||
|[[Spark]] | |||
|- | |||
|align=center|[[File:KA Coner sprite.png]] [[File:KNiDL Coner sprite.png]] | |||
|[[Coner]] | |||
|style="border-style: solid; border-width: 1px 3px 1px 1px"|None | |||
|align=center|[[File:KA Poppy Bros Jr sprite.png]] [[File:KNiDL Poppy Bros Jr sprite.png]] | |||
|[[Poppy Bros. Jr.]] | |||
|style="border-style: solid; border-width: 1px 3px 1px 1px"|None | |||
|align=center|[[File:KA Sword Knight sprite.png]] [[File:KNiDL Sword Knight sprite.png]] | |||
|[[Sword Knight]] | |||
|[[Sword]] | |||
|- | |||
|align=center|[[File:KA Flamer sprite.png]] [[File:KNiDL Flamer sprite.png]] | |||
|[[Flamer]] | |||
|style="border-style: solid; border-width: 1px 3px 1px 1px"|[[Burning|FireBall/Burning]] | |||
|align=center|[[File:KA Scarfy sprite.png]] [[File:KNiDL Scarfy sprite.png]] | |||
|[[Scarfy]] | |||
|style="border-style: solid; border-width: 1px 3px 1px 1px"|N/A | |||
|align=center|[[File:KA Waddle Dee sprite.png]] [[File:KNiDL Waddle Dee sprite.png]] | |||
|[[Waddle Dee]] | |||
|None | |||
|} | |||
</tab> | |||
<tab name="Mid-Boss"> | |||
{| class="wikitable" width=25% | |||
!Sprite (''KA''/''KNiDL'') | |||
!Name | |||
!Copy Ability | |||
|- | |||
|align=center|[[File:KA Bonkers sprite 2.png]] [[File:KNiDL Bonkers sprite.png]] | |||
|[[Bonkers]] | |||
|[[Hammer]] | |||
|} | |||
</tab> | |||
</tabs> | |||
|} | |} | ||
==Gallery== | ==Gallery== | ||
<gallery> | <gallery> | ||
KA Orange Ocean Stage 3 screenshot 01.png|Kirby slips down a ladder to grab an Energy Drink at the bow of the ship. | |||
KA Orange Ocean Stage 3 screenshot 02.png|Kirby sparks up to attack Bonkers beneath the deck. | |||
KA Orange Ocean Stage 3 screenshot 03.png|Kirby uses his Hammer to bust his way off the beaten path. | |||
KA Orange Ocean Stage 3 screenshot 04.png|Kirby springs a leak in the hull of the ship. | |||
KA Orange Ocean Stage 3 screenshot 05.png|Kirby makes use of the only ability in the game that can light fuses underwater. | |||
KA Orange Ocean Stage 3 screenshot 06.png|Kirby lands on a cloud where the Big Switch waits to be pressed. | |||
KA Orange Ocean Stage 3 screenshot 07.png|Kirby hops from the crow's nest to a doorway in the sail. | |||
KA Orange Ocean Stage 3 screenshot 08.png|Kirby grabs onto the Warp Star at the top of the rigging to fly into the sunset. | |||
KA Orange Ocean Stage 3 screenshot 09.png|Kirby floats on by at the tangerine coast to reach the stage exit. | |||
</gallery> | </gallery> | ||
{{clear}} | {{clear}} | ||
{{ | {{Navbox-KA/KNiDL}} | ||
Latest revision as of 02:50, 25 April 2024
| ||||||||||||
| ||||||||||||
| ||||||||||||
|
| ||||||||||||

Orange Ocean - Stage 3 is the third stage of Orange Ocean, the sixth level of Kirby's Adventure and its remake, Kirby: Nightmare in Dream Land.
Overview[edit]
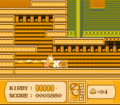
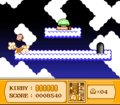
This stage consists of five main areas. The first has Kirby walking along the shoreline and bumping into some crates, then boarding a large wooden ship against the wishes of its crew.
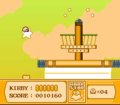
In the second area, Kirby will find himself in a room where Bonkers wants a piece of him. Once defeated, Kirby can progress forward and up into a higher room where a doorway can be found. Using the Hammer however, Kirby can bust a crate in the wall open to reveal another path which leads downward. This second path can take Kirby to a series of side rooms which are accessible in the place of a Bomb Block that can be broken in the bottom-most chamber. To reach the Big Switch, Kirby will need to make use of a Fuse Cannon with its Fuse starting underwater. Laser or UFO can be used here to light the fuse and then get in the cannon (the latter can only be used via Ability Mix a few rooms before). (Theoretically, Kirby could also bring Crash to this room and light the fuse with it, but since Hammer is required to enter the room in the first place, and there are no enemies from there with which to get Crash from a Mix, this presumably cannot be done.)
For the third area, taking the main exit from the previous one places Kirby on the ship's deck, where there are many enemies in his way. A couple of doors can be accessed here which lead to different areas of the ship, though the one on the masts is the way forward. The side doors along the left lead to two rooms, where a 1-Up always appears on the other side. Kirby can get into the same room as the 1-Up by taking a window instead. The side door on the right leads to the room with the cannon, but on the upper deck. Kirby cannot access the cannon from here, but he can frivolously light the fuse if he has Crash equipped.
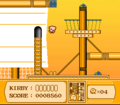
The fourth area can be accessed either through the door in the third area or through the door following the Big Switch. Kirby ends up on the ship's masts, where he will need to work his way up to find a Warp Star at the top. Taking it allows Kirby to ride across the ocean and far out to a distant island.
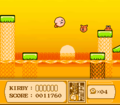
For the last area, after crashing on the island, Kirby can find the stage exit to the right past a few foes.
Enemies and Mid-Boss[edit]
|
Gallery[edit]

Kirby slips down a ladder to grab an Energy Drink at the bow of the ship.
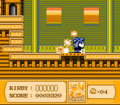
Kirby sparks up to attack Bonkers beneath the deck.
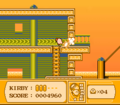
Kirby uses his Hammer to bust his way off the beaten path.
Kirby springs a leak in the hull of the ship.
Kirby makes use of the only ability in the game that can light fuses underwater.
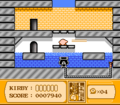
Kirby lands on a cloud where the Big Switch waits to be pressed.
Kirby hops from the crow's nest to a doorway in the sail.
Kirby grabs onto the Warp Star at the top of the rigging to fly into the sunset.
Kirby floats on by at the tangerine coast to reach the stage exit.


