Rainbow Resort - Stage 1: Difference between revisions
m (→Enemies) |
Pinkyoshifan (talk | contribs) m (Text replacement - "(<tab name=".*)'(.*">)" to "$1’$2") |
||
| (12 intermediate revisions by 6 users not shown) | |||
| Line 1: | Line 1: | ||
{{Infobox-KAStage | {{Infobox-KAStage | ||
|image=[[File:Rainbow Resort | |image=[[File:KNiDL Rainbow Resort Stage 1.png]] | ||
|caption=Kirby | |caption=Kirby contending with a long snaking [[Star Block]] barricade. (''Kirby: Nightmare in Dream Land'') | ||
|level=[[Rainbow Resort]] | |level=[[Rainbow Resort]] | ||
|switch={{Y}} | |switch={{Y}} | ||
|theme music= | |||
<tabs> | |||
<tab name="Kirby’s Adventure"> | |||
[[File:Rainbow Resort KA.mp3]] | |||
</tab> | |||
<tab name="Kirby: Nightmare in Dream Land"> | |||
[[File:KNiDL Rainbow Resort Sample.oga]] | |||
</tab> | |||
</tabs> | |||
|theme title="[[Rainbow Resort (theme)|Rainbow Resort]]" | |||
|description=Clips of the music that plays in Rainbow Resort - Stage 1 | |||
|previousstage=[[Orange Ocean - Stage 7]] | |previousstage=[[Orange Ocean - Stage 7]] | ||
|nextstage=[[Rainbow Resort - Stage 2]] | |nextstage=[[Rainbow Resort - Stage 2]] | ||
| Line 13: | Line 23: | ||
This stage consists of three main areas. It starts Kirby off in a dark series of sloped tunnels where the [[Laser]] ability can come in great handy. | This stage consists of three main areas. It starts Kirby off in a dark series of sloped tunnels where the [[Laser]] ability can come in great handy. | ||
The | The second area is a tunnel with 90-degree bends filled with [[Star Block]]s. These can be cleared easily using abilities like [[Burning]] or [[Beam]]. Near the end, a series of blocks in the walls and ceiling can be broken to reveal a way to the [[Big Switch]] (the last walls are treated like [[Block|metal blocks]], and as such can only be broken using certain abilities), though the main doorway is the more-accessible lower one. | ||
In the last area, Kirby walks outside along an open path with [[Shotzo]]s propped up by star blocks. The stage exit can be found beyond this minor series of obstructions. | In the last area, Kirby walks outside along an open path with [[Shotzo]]s propped up by star blocks. The stage exit can be found beyond this minor series of obstructions. | ||
| Line 19: | Line 29: | ||
==Enemies== | ==Enemies== | ||
{| class="wikitable" | {| class="wikitable" | ||
!Sprite ('' | !Sprite (''KA''/''KNiDL'') | ||
!Name | !Name | ||
!style="border-style: solid; border-width: 1px 3px 1px 1px"|Copy Ability | !style="border-style: solid; border-width: 1px 3px 1px 1px"|Copy Ability | ||
!Sprite ('' | !Sprite (''KA''/''KNiDL'') | ||
!Name | !Name | ||
!Copy Ability | !Copy Ability | ||
|- | |- | ||
|align=center|[[File: | |align=center|[[File:KA Blade Knight sprite.png]] [[File:KNiDL Blade Knight sprite.png]] | ||
|[[Blade Knight]] | |[[Blade Knight]] | ||
|style="border-style: solid; border-width: 1px 3px 1px 1px"|[[Sword]] | |style="border-style: solid; border-width: 1px 3px 1px 1px"|[[Sword]] | ||
|align=center|[[File: | |align=center|[[File:KA Rocky sprite.png]] [[File:KNiDL Rocky sprite.png]] | ||
|[[Rocky]] | |[[Rocky]] | ||
|[[Stone]] | |[[Stone]] | ||
|- | |- | ||
|align=center|[[File: | |align=center|[[File:KA Chilly sprite.png]] [[File:KNiDL Chilly sprite.png]] | ||
|[[Chilly]] | |[[Chilly]] | ||
|style="border-style: solid; border-width: 1px 3px 1px 1px"|[[Freeze]] | |style="border-style: solid; border-width: 1px 3px 1px 1px"|[[Freeze]] | ||
|align=center|[[File:KA Shotzo sprite.png]] [[File: | |align=center|[[File:KA Shotzo sprite.png]] [[File:KNiDL Shotzo sprite.png]] | ||
|[[Shotzo]] | |[[Shotzo]] | ||
|N/A | |N/A | ||
|- | |- | ||
|align=center|[[File: | |align=center|[[File:KA Flamer sprite.png]] [[File:KNiDL Flamer sprite.png]] | ||
|[[Flamer]] | |[[Flamer]] | ||
|style="border-style: solid; border-width: 1px 3px 1px 1px"|[[Burning|FireBall/Burning]] | |style="border-style: solid; border-width: 1px 3px 1px 1px"|[[Burning|FireBall/Burning]] | ||
|align=center|[[File: | |align=center|[[File:KA Sir Kibble sprite.png]] [[File:KNiDL Sir Kibble sprite.png]] | ||
|[[Sir Kibble]] | |[[Sir Kibble]] | ||
|[[Cutter]] | |[[Cutter]] | ||
|- | |- | ||
|align=center|[[File:KA Gordo sprite.png]] [[File: | |align=center|[[File:KA Gordo sprite.png]] [[File:KNiDL Gordo sprite.png]] | ||
|[[Gordo]] | |[[Gordo]] | ||
|style="border-style: solid; border-width: 1px 3px 1px 1px"|N/A | |style="border-style: solid; border-width: 1px 3px 1px 1px"|N/A | ||
|align=center|[[File: | |align=center|[[File:KA Sparky sprite.png]] [[File:KNiDL Sparky sprite.png]] | ||
|[[Sparky]] | |[[Sparky]] | ||
|[[Spark]] | |[[Spark]] | ||
|- | |- | ||
|align=center|[[File: | |align=center|[[File:KA Hot Head sprite.png]] [[File:KNiDL Hot Head sprite.png]] | ||
|[[Hot Head]] | |[[Hot Head]] | ||
|style="border-style: solid; border-width: 1px 3px 1px 1px"|[[Fire]] | |style="border-style: solid; border-width: 1px 3px 1px 1px"|[[Fire]] | ||
| Line 61: | Line 71: | ||
|None | |None | ||
|- | |- | ||
|align=center|[[File: | |align=center|[[File:KA Laser Ball sprite.png]] [[File:KNiDL Laser Ball sprite.png]] | ||
|[[Laser Ball]] | |[[Laser Ball]] | ||
|style="border-style: solid; border-width: 1px 3px 1px 1px"|[[Laser]] | |style="border-style: solid; border-width: 1px 3px 1px 1px"|[[Laser]] | ||
|align=center|[[File: | |align=center|[[File:KA Waddle Doo sprite.png]] [[File:KNiDL Waddle Doo sprite.png]] | ||
|[[Waddle Doo]] | |[[Waddle Doo]] | ||
|[[Beam]] | |[[Beam]] | ||
|- | |- | ||
|align=center|[[File: | |align=center|[[File:KA Noddy sprite.png]] [[File:KNiDL Noddy sprite.png]] | ||
|[[Noddy]] | |[[Noddy]] | ||
|style="border-style: solid; border-width: 1px 3px 1px 1px"|[[Sleep]] | |style="border-style: solid; border-width: 1px 3px 1px 1px"|[[Sleep]] | ||
| Line 76: | Line 86: | ||
==Gallery== | ==Gallery== | ||
<gallery> | <gallery> | ||
KA Rainbow Resort Stage 1 screenshot 01.png|Kirby inhales the first thing he sees in the stage. It will help him along this path. | |||
KA Rainbow Resort Stage 1 screenshot 02.png|Kirby makes use of the Laser ability's ricochet to take care of the obstacles ahead. | |||
KA Rainbow Resort Stage 1 screenshot 03.png|Kirby works his way through the Star Block-cramped tunnel. | |||
KA Rainbow Resort Stage 1 screenshot 04.png|Kirby clears out the breakable walls to reach the upper door. | |||
KA Rainbow Resort Stage 1 screenshot 05.png|Kirby falls onto the Big Switch in a side room. | |||
KA Rainbow Resort Stage 1 screenshot 06.png|Kirby undermines a Shotzo on the path to the exit. | |||
</gallery> | </gallery> | ||
| Line 83: | Line 97: | ||
{{Navbox-KA/KNiDL}} | {{Navbox-KA/KNiDL}} | ||
Latest revision as of 12:39, 21 April 2024
| ||||||||||
| ||||||||||
| ||||||||||
|
| ||||||||||

Rainbow Resort - Stage 1 is the first stage of Rainbow Resort in Kirby's Adventure and its remake, Kirby: Nightmare in Dream Land.
Overview[edit]
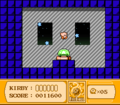
This stage consists of three main areas. It starts Kirby off in a dark series of sloped tunnels where the Laser ability can come in great handy.
The second area is a tunnel with 90-degree bends filled with Star Blocks. These can be cleared easily using abilities like Burning or Beam. Near the end, a series of blocks in the walls and ceiling can be broken to reveal a way to the Big Switch (the last walls are treated like metal blocks, and as such can only be broken using certain abilities), though the main doorway is the more-accessible lower one.
In the last area, Kirby walks outside along an open path with Shotzos propped up by star blocks. The stage exit can be found beyond this minor series of obstructions.
Enemies[edit]
| Sprite (KA/KNiDL) | Name | Copy Ability | Sprite (KA/KNiDL) | Name | Copy Ability |
|---|---|---|---|---|---|
| Blade Knight | Sword | Rocky | Stone | ||
| Chilly | Freeze | Shotzo | N/A | ||
| Flamer | FireBall/Burning | Sir Kibble | Cutter | ||
| Gordo | N/A | Sparky | Spark | ||
| Hot Head | Fire | Waddle Dee | None | ||
| Laser Ball | Laser | Waddle Doo | Beam | ||
| Noddy | Sleep | ||||
Gallery[edit]
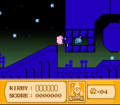
Kirby inhales the first thing he sees in the stage. It will help him along this path.
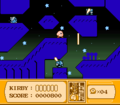
Kirby makes use of the Laser ability's ricochet to take care of the obstacles ahead.
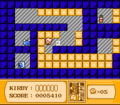
Kirby works his way through the Star Block-cramped tunnel.
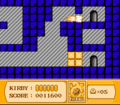
Kirby clears out the breakable walls to reach the upper door.
Kirby falls onto the Big Switch in a side room.
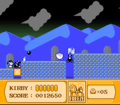
Kirby undermines a Shotzo on the path to the exit.


