Revenge of Meta Knight - Chapter 4: Difference between revisions
m (→Dialogue) |
|||
| Line 59: | Line 59: | ||
|- | |- | ||
|[[Mace Knight]] | |[[Mace Knight]] | ||
|[[File:KSS Mace Knight Portrait 1.png]] [[File: | |[[File:KSS Mace Knight Portrait 1.png]] [[File:KSSU Mace Knight Portrait 2.png]] | ||
|''"Look! Kirby's reached<br>the deck."'' | |''"Look! Kirby's reached<br>the deck."'' | ||
|''But...! But...!<br>Kirby is on the deck!'' | |''But...! But...!<br>Kirby is on the deck!'' | ||
| Line 66: | Line 66: | ||
|- | |- | ||
|[[Meta Knight]] | |[[Meta Knight]] | ||
|[[File:KSS Meta Knight Portrait 1.png]] [[File: | |[[File:KSS Meta Knight Portrait 1.png]] [[File:KSSU Meta Knight Portrait 1.png]] | ||
|''"Remain calm. Let's come<br>up with a plan."'' | |''"Remain calm. Let's come<br>up with a plan."'' | ||
|''Relax. We must handle<br>this calmly.'' | |''Relax. We must handle<br>this calmly.'' | ||
| Line 73: | Line 73: | ||
|- | |- | ||
|[[Captain Vul]] | |[[Captain Vul]] | ||
|[[File:KSS Vul Portrait 2.png]] [[File: | |[[File:KSS Vul Portrait 2.png]] [[File:KSSU Captain Vul Portrait 5.png]] | ||
|''"All soldiers!<br>Get Kirby. Now!"'' | |''"All soldiers!<br>Get Kirby. Now!"'' | ||
|''Listen, you lubbers!<br>I want you all after that Kirby!'' | |''Listen, you lubbers!<br>I want you all after that Kirby!'' | ||
| Line 80: | Line 80: | ||
|- | |- | ||
|[[Meta Knight]] | |[[Meta Knight]] | ||
|[[File:KSS Meta Knight Portrait 1.png]] [[File: | |[[File:KSS Meta Knight Portrait 1.png]] [[File:KSSU Meta Knight Portrait 1.png]] | ||
|''"Kirby! Got ya!"'' | |''"Kirby! Got ya!"'' | ||
|''That's far enough, Kirby!'' | |''That's far enough, Kirby!'' | ||
| Line 87: | Line 87: | ||
|- | |- | ||
|[[Captain Vul]] | |[[Captain Vul]] | ||
|[[File:KSS Vul Portrait 2.png]] [[File: | |[[File:KSS Vul Portrait 2.png]] [[File:KSSU Captain Vul Portrait 5.png]] | ||
|''"Now you get a taste<br>of our power."'' | |''"Now you get a taste<br>of our power."'' | ||
|''Now you will know the<br>power of Meta Knight!'' | |''Now you will know the<br>power of Meta Knight!'' | ||
| Line 94: | Line 94: | ||
|- | |- | ||
|[[Sailor Waddle Dee]] | |[[Sailor Waddle Dee]] | ||
|[[File:KSS Sailor Dee Portrait 2.png]] [[File: | |[[File:KSS Sailor Dee Portrait 2.png]] [[File:KSSU Sailor Waddle Dee Portrait 1.png]] | ||
|''"Fight!"'' | |''"Fight!"'' | ||
|''Fight!'' | |''Fight!'' | ||
| Line 101: | Line 101: | ||
|- | |- | ||
|[[Mace Knight]] | |[[Mace Knight]] | ||
|[[File:KSS Mace Knight Portrait 2.png]] [[File: | |[[File:KSS Mace Knight Portrait 2.png]] [[File:KSSU Mace Knight Portrait 1.png]] | ||
|''"Kirby's gonna reach<br>the deck!"'' | |''"Kirby's gonna reach<br>the deck!"'' | ||
|''Looks like Kirby is trying<br>to get on deck.'' | |''Looks like Kirby is trying<br>to get on deck.'' | ||
| Line 108: | Line 108: | ||
|- | |- | ||
|[[Captain Vul]] | |[[Captain Vul]] | ||
|[[File:KSS Vul Portrait 1.png]] [[File: | |[[File:KSS Vul Portrait 1.png]] [[File:KSSU Captain Vul Portrait 3.png]] | ||
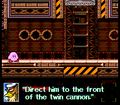
|''"Direct him to the front<br>of the twin cannon."'' | |''"Direct him to the front<br>of the twin cannon."'' | ||
|''Well then, let's guide<br>him in front of one of<br>the cannons.'' | |''Well then, let's guide<br>him in front of one of<br>the cannons.'' | ||
| Line 115: | Line 115: | ||
|- | |- | ||
|[[Captain Vul]] | |[[Captain Vul]] | ||
|[[File:KSS Vul Portrait 4.png]] [[File: | |[[File:KSS Vul Portrait 4.png]] [[File:KSSU Captain Vul Portrait 2.png]] | ||
|''"Oh no! He found it."'' | |''"Oh no! He found it."'' | ||
|''Have we been found...?'' | |''Have we been found...?'' | ||
| Line 122: | Line 122: | ||
|- | |- | ||
|[[Mace Knight]] | |[[Mace Knight]] | ||
|[[File:KSS Mace Knight Portrait 2.png]] [[File: | |[[File:KSS Mace Knight Portrait 2.png]] [[File:KSSU Mace Knight Portrait 1.png]] | ||
|''"What is this place?"'' | |''"What is this place?"'' | ||
|''What is this place?'' | |''What is this place?'' | ||
| Line 136: | Line 136: | ||
|- | |- | ||
|[[Captain Vul]] | |[[Captain Vul]] | ||
|[[File:KSS Vul Portrait 3.png]] [[File: | |[[File:KSS Vul Portrait 3.png]] [[File:KSSU Captain Vul Portrait 6.png]] | ||
|''"Kirby will be torched!<br>Wahahahahahaha!"'' | |''"Kirby will be torched!<br>Wahahahahahaha!"'' | ||
|''He'll be burnt to a crisp.<br>Hahahaha!'' | |''He'll be burnt to a crisp.<br>Hahahaha!'' | ||
| Line 143: | Line 143: | ||
|- | |- | ||
|[[Sailor Waddle Dee]] | |[[Sailor Waddle Dee]] | ||
|[[File:KSS Sailor Dee Portrait 2.png]] [[File: | |[[File:KSS Sailor Dee Portrait 2.png]] [[File:KSSU Sailor Waddle Dee Portrait 1.png]] | ||
|''"Hahahahahaha!"'' | |''"Hahahahahaha!"'' | ||
|''Ahahaha!'' | |''Ahahaha!'' | ||
| Line 150: | Line 150: | ||
|- | |- | ||
|[[Captain Vul]] | |[[Captain Vul]] | ||
|[[File:KSS Vul Portrait 3.png]] [[File: | |[[File:KSS Vul Portrait 3.png]] [[File:KSSU Captain Vul Portrait 6.png]] | ||
|''"Wahahahahahaha!<br>Gahahahahahahaha! Hum."'' | |''"Wahahahahahaha!<br>Gahahahahahahaha! Hum."'' | ||
|''Bwahahaha!<br>Gahaha! ...Hm.'' | |''Bwahahaha!<br>Gahaha! ...Hm.'' | ||
Revision as of 19:45, 14 January 2022
| ||||||||||||||
| ||||||||||||||
| ||||||||||||||
|
| ||||||||||||||
Chapter 4 of Revenge of Meta Knight is the fourth of seven chapters in this game-mode from [[Kirby Super Star|Template:KSS KFP]] and Template:KSSU. In this chapter, Kirby lands on the deck of the Halberd and makes his way over to the Combo Cannon. He battles it and destroys it, beginning the process of damaging the Halberd.
Intro cut-scene
In the intro scene, Kirby rides Dyna Blade as she approaches the Halberd. The crew of the ship responds by directing as much fire as possible toward the giant bird, and manage to hit her with a blast from the main cannon. However, this blow does not stop Kirby from landing on the ship's deck.
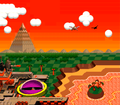
Dyna Blade escorts Kirby to the Halberd amid a hail of enemy fire.
- KSSU RoMK Chapter 4 Scene.jpg
Same scene, in Kirby Super Star Ultra

Overview
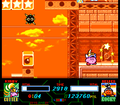
The timer resets to 6000 as Kirby lands on deck of the Halberd. Kirby will have to make his way across the deck, past its guards and many pitfalls to reach the door on the other side.
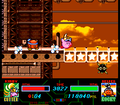
Through the door, Kirby reaches a portion of the deck closer to the main cannon. Here, he is ambushed by the Meta-Knights who try to stop him.
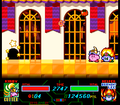
The next door leads to an interior chamber. Here, Kirby makes his way up to the upper deck by means of Elevator.
Kirby worms his way through the main hangar of the Halberd, across bridges made of Star Blocks. Here, he gets ambushed by Jukid and Poppy Bros. Sr. at the same time. A side room can be found here which contains some goodies, including an Invincible Candy.
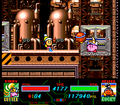
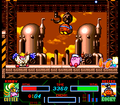
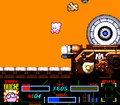
In the next room, Kirby can choose between the Fire, Beam and Yo-Yo abilities from Copy Essences. From there, he has to contend with the Combo Cannon as a boss. The only truly vulnerable part of the cannon is its main circular turret, though the other parts can also be damaged. Defeating it deals a decisive blow to the Halberd, and allows Kirby to move on to the next stage.
Dialogue
Intermittently, the Halberd crew can be heard by the player through dialogue boxes which pop up as Kirby makes his way through the stage. The following table lists off their dialogue in chronological order:
| Chapter 4 Dialogue in Revenge of Meta Knight | ||||||
|---|---|---|---|---|---|---|
| Character | Portraits | Dialogue (KSS) | Dialogue (KSSU) | Dialogue (Japanese) | Dialogue (Japanese, KSSU) | Notes |
| Axe Knight | "We shot down Dyna Blade!" |
Dyna Blade has been shot down! |
「ダイナブレイドを 撃墜しました!」 |
|||
| Mace Knight | "Look! Kirby's reached the deck." |
But...! But...! Kirby is on the deck! |
「でも!でも! カービィが甲板にいるだスぅ!」 |
|||
| Meta Knight | "Remain calm. Let's come up with a plan." |
Relax. We must handle this calmly. |
「おちつけ。 冷静に対処すればいいのだ。」 |
|||
| Captain Vul | "All soldiers! Get Kirby. Now!" |
Listen, you lubbers! I want you all after that Kirby! |
「ものどもであえぃ! カービィをけちらせっ!」 |
|||
| Meta Knight | "Kirby! Got ya!" | That's far enough, Kirby! | 「そこまでだ!カービィ!」 | |||
| Captain Vul | "Now you get a taste of our power." |
Now you will know the power of Meta Knight! |
「メタ・ナイツの力を 思い知るがいいっ!」 |
The Japanese dialogue is referring to the Meta-Knights, not Meta Knight himself. | ||
| Sailor Waddle Dee | "Fight!" | Fight! | 「ファイトっ!」 | |||
| Mace Knight | "Kirby's gonna reach the deck!" |
Looks like Kirby is trying to get on deck. |
「カービィが甲板に 出ようとしてるだスね。」 |
|||
| Captain Vul | "Direct him to the front of the twin cannon." |
Well then, let's guide him in front of one of the cannons. |
「では、そばにある主砲の前に ごあんないしろ。」 |
|||
| Captain Vul | "Oh no! He found it." | Have we been found...? | 「見つけられたか…」 | This is an optional dialogue that appears if Kirby finds the hidden stash. | ||
| Mace Knight | "What is this place?" | What is this place? | 「なんだスか?ここは。」 | This is an optional dialogue that appears if Kirby finds the hidden stash. | ||
| Axe Knight | "Kirby is getting close to the twin cannon." |
Kirby is now approaching Main Cannon #2. |
「カービィは現在、2連主砲に 近づきつつあります。」 |
|||
| Captain Vul | "Kirby will be torched! Wahahahahahaha!" |
He'll be burnt to a crisp. Hahahaha! |
「これでまっくろこげだな。 がはははははははっ!」 |
|||
| Sailor Waddle Dee | "Hahahahahaha!" | Ahahaha! | 「あははははははっ!」 | |||
| Captain Vul | "Wahahahahahaha! Gahahahahahahaha! Hum." |
Bwahahaha! Gahaha! ...Hm. |
「がはははははがははははっ! がはははがははっ!ふぅ。」 |
「がはははははがははははっ! がはははがははっ!……ふぅ。 |
||
Enemies, mid-bosses, and boss
|
Boss: Combo Cannon

- Main article: Combo Cannon
At the end of the stage, Kirby must battle the main battery of the ship, called the "Combo Cannon" in [[Kirby Super Star|Template:KSS KFP]] and other sources and "Main Cannon #2" in Template:KSSU. The fight is tricky despite the stationary nature of the cannon and its large size, since not a lot of ammunition is available for Kirby to retaliate with, and he has to jump to spit out any Star Bullets effectively.
The Combo Cannon consists of three major pieces. The central big cannon is capable of rotating and firing large slow-moving shot at Kirby, similar to a Shotzo. This central piece of the cannon is the primary thing that should be aimed for to defeat the boss. The second piece is a smaller but arguably deadlier laser cannon which sits in the cannon's base. This piece will fire off lasers regularly, and a platform may elevate below to try and push Kirby into it. Attacking this piece is optional, but disabling it can be useful. The third and final piece is the extending arm which will either try to drop bombs on Kirby or grab him and then throw him for damage. This arm can also be attacked and destroyed, but it will regenerate.
Gallery
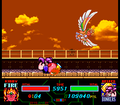
Dyna Blade pays a heavy cost to get her friends onto the Halberd.
Kirby uses a Launcher to safely pass the Gordos.
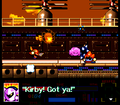
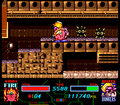
The Meta-Knights attempt to catch Kirby on the deck.
Kirby worms his way into the ship's interior.
Taking elevators up to the higher bridge
Running along a Star Block walkway
Battling Poppy Bros. Sr. and Jukid
This door leads to a bonus area.
Kirby gains access to one of the Halberd's secret caches.
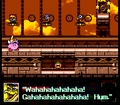
Vul relishes in the idea of Kirby failing to defeat the Combo Cannon.
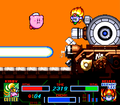
Kirby and Burnin' Leo combat the Combo Cannon.
Kirby tries to get away from the cannon's grabber arm.

Kirby "narrowly" avoids the cannon's fire.


