Shiver Star: Difference between revisions
Luigifan18 (talk | contribs) m (Grammar check) |
|||
| (43 intermediate revisions by 13 users not shown) | |||
| Line 1: | Line 1: | ||
{{Infobox-K64Level | {{Infobox-K64Level | ||
|image=[[File:K64 ShiverStar.png]] | |image=[[File:K64 ShiverStar.png]] | ||
|caption=Shiver Star as shown from the level selection menu in ''Kirby 64: The Crystal Shards''. | |caption='''Shiver Star''' as shown from the level selection menu in ''[[Kirby 64: The Crystal Shards]]''. | ||
|level=5 | |level=5 | ||
|stage=5 | |stage=5 | ||
|boss=[[HR-H]] | |boss=[[HR-H|HR-H/HR-E]] | ||
|theme music=[[File:K64 Shiver Star Stage Select theme.mp3]] | |||
|theme title="[[Shiver Star: Stage Select]]" | |||
|description=Clip of the stage select music for Shiver Star. | |||
|previous=[[Neo Star]] | |previous=[[Neo Star]] | ||
|next=[[Ripple Star]] | |next=[[Ripple Star]] | ||
}} | }} | ||
[[File:Shiver Star | [[File:K64 Shiver Star icon.png|left]] | ||
'''Shiver Star''' is the fifth planet out of seven visited by [[Kirby]] and [[Ribbon]] in ''[[Kirby 64: The Crystal Shards]]''. | '''Shiver Star''' is the fifth planet out of seven visited by [[Kirby]] and [[Ribbon]] in their mission to rid the realm of [[Dark Matter (cloud)|Dark Matter]] in ''[[Kirby 64: The Crystal Shards]]''. This level appears to be locked in perpetual winter, as all the surface areas Kirby can visit are utterly covered in layers of snow and ice. The clouds are also thick enough to become landscapes in their own right. Despite this, there is a lot of activity on this planet, both in terms of enemy inhabitants and whirring machinery. | ||
Like in all | Its appearance takes form of a white, snowy environment with marks resembling landscape and a single moon, highly resembling that of Planet Earth. | ||
==Stages== | ==Overview== | ||
Shiver Star is the final of the four intermediate levels of ''Kirby 64: The Crystal Shards'', meaning that it consists of four standard stages, a fifth [[boss]] stage, and only has one cutscene which plays at the end of the level. Very little in the way of vegetation grows on this world due to the cold, but the arctic conditions are nonetheless brimming with native inhabitants of all sorts, many of which are endemic to the vast works of architecture found on the planet. As Kirby makes his way through this level, he will traverse snowy hillsides, walk across solid cloud layers, enter a vibrant shopping mall full of traps, and delve into a deep underground factory to study it. The Japanese website for ''Kirby 64: The Crystal Shards'' mentions that all of the planet's residents moved away because it was too cold.<ref>[https://www.nintendo.co.jp/n01/n64/software/nus_p_nk4j/buru_s/index.html ''Kirby 64: The Crystal Shards'' official Japanese website]</ref> | |||
Each stage is unlocked in succession after clearing the previous one. Defeating [[HR-H]] and HR-E is necessary to move on to [[Ripple Star]]. For more information about a particular stage, click on the link to the stage's page in the table. For a full guide on how to obtain the Crystal Shards, see the [[Crystal Shard# | |||
Like in all intermediate levels of ''Kirby 64: The Crystal Shards'', the first four stages within the Shiver Star hide three [[Crystal Shard]]s, while the final stage rewards only one after the defeat of the boss. Nevertheless, all shards within one level do not need to be collected before Kirby is granted access to the next; Kirby must simply complete the level. | |||
===Stages=== | |||
Each stage is unlocked in succession after clearing the previous one. Defeating [[HR-H]] and HR-E is necessary to move on to [[Ripple Star]]. For more information about a particular stage, click on the link to the stage's page in the table. For a full guide on how to obtain the Crystal Shards, see the [[Crystal Shard#Shiver Star|Crystal Shard]] page. | |||
{| class="sortable wikitable" border=1 cellpadding=2 | {| class="sortable wikitable" border=1 cellpadding=2 | ||
!class=unsortable|Stage | !class=unsortable|Stage | ||
!class=unsortable|Mid- | !class=unsortable|Boss/Mid-Boss | ||
!class=unsortable|Notes | !class=unsortable|Notes | ||
|- | |- | ||
|[[Shiver Star - Stage 1|Stage 1]] | |{{Center|[[File:K64 Shiver Star Stage 1 icon.png]]<br>[[Shiver Star - Stage 1|'''Stage 1''']]}} | ||
|Big [[Chilly]] | |Big [[Chilly]] | ||
| | | | ||
|- | |- | ||
|[[Shiver Star - Stage 2|Stage 2]] | |{{Center|[[File:K64 Shiver Star Stage 2 icon.png]]<br>[[Shiver Star - Stage 2|'''Stage 2''']]}} | ||
|Big [[Mopoo]] | |Big [[Mopoo]] | ||
| | | | ||
|- | |- | ||
|[[Shiver Star - Stage 3|Stage 3]] | |{{Center|[[File:K64 Shiver Star Stage 3 icon.png]]<br>[[Shiver Star - Stage 3|'''Stage 3''']]}} | ||
|Big [[Pupa]] | |Big [[Pupa]] | ||
| | | | ||
|- | |- | ||
|[[ | |{{Center|[[File:K64 Factory Tour icon.png]]<br>[[Factory Tour|'''Stage 4''']]}} | ||
|Big [[Burnis]] | |Big [[Burnis]] | ||
| | |The official name of this stage is "Factory Tour". | ||
|- | |- | ||
|[[ | |{{Center|[[File:K64 Shiver Star Stage 5 icon.png]]<br>[[Shiver Star - Stage 5|'''Stage 5''']]}} | ||
|[[HR-H]] & [[HR-H|HR-E]] | |||
|Completing this stage unlocks [[Ripple Star]]. | |Completing this stage unlocks [[Ripple Star]]. | ||
|} | |} | ||
{{clear}} | |||
==Ending cutscene== | |||
[[File:K64 Ripple Rescue scene 5.png|thumb|200px|Ribbon carrying the battered Kirby into the portal after he was inadvertently trampled.]] | |||
Out in the snow, the crystal opens up to reveal the last level - Ribbon's home of [[Ripple Star]]. Seeing the sorry state it is in causes Ribbon to despair, but she is reassured by the rest of the party. Kirby calls for everyone to go in, and runs forward, but trips and falls in the snow. Everyone else tramples him in the process. Ribbon then has to carry the battered Kirby through the portal. | |||
{{clear}} | |||
==Trivia== | |||
[[File:K64 Shiver Star Earth screenshot.png|150px|thumb|Earth's likeness seen on Shiver Star (also note the Moon which heavily resembles Earth's).]] | |||
*The connection between the Shiver Star and Earth in terms of appearance has been quite the popular topic of conversation among ''Kirby'' fans, and rightly so, as one can see apparent outlines of Earth's continents in white upon the face of the Shiver Star, as well as a single moon resembling that of Earth. However, it is unclear what the developers of ''[[Kirby 64: The Crystal Shards]]'' had in mind when creating such a star in Earth's likeness. | |||
[[File:Shiver Star | |||
' | |||
* | |||
'' | |||
'' | |||
' | |||
==Gallery== | ==Gallery== | ||
<gallery> | <gallery> | ||
Shiver Star K64 stage selection.png|The stage select menu for Shiver Star. | |||
K64 Shiver Star Stage 1 screenshot 02.png|Rocketing through the tundra in [[Shiver Star - Stage 1|Stage 1]] | |||
K64 Shiver Star Stage 1 screenshot 07.png|Crashing into an igloo in [[Shiver Star - Stage 1|Stage 1]] | |||
K64 Shiver Star Stage 2 screenshot 02.png|Using [[Zebon]] to launch up into the heavens in [[Shiver Star - Stage 2|Stage 2]] | |||
K64 Shiver Star Stage 2 screenshot 12.png|Running through a cloud tunnel in [[Shiver Star - Stage 2|Stage 2]] | |||
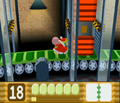
K64 Shiver Star Stage 3 screenshot 03.png|Utilizing broken escalators in an abandoned shopping mall in [[Shiver Star - Stage 3|Stage 3]] | |||
K64 Shiver Star Stage 3 screenshot 14.png|Stopped by [[Plugg]] in a television room in [[Shiver Star - Stage 3|Stage 3]] | |||
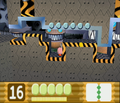
K64 Shiver Star Stage 4 screenshot 06.png|Moving through the factory conveyor belts in [[Factory Tour|Stage 4]] | |||
K64 Shiver Star Stage 4 screenshot 13.png|Worming through a crushing hazard in [[Factory Tour|Stage 4]] | |||
K64 Shiver Star Stage 5 screenshot 01.png|Battle with [[HR-H]] in [[Shiver Star - Stage 5|Stage 5]] | |||
K64 Shiver Star Stage 5 screenshot 06.png|Battle with HR-E in [[Shiver Star - Stage 5|Stage 5]] | |||
</gallery> | </gallery> | ||
== | ==Names in other languages== | ||
{{Names | |||
|ja=ブルブルスター | |||
|jaR=Buruburu Sutā | |||
|jaM=Shivering Star | |||
}} | |||
{{ | {{ref}} | ||
{{clear}} | |||
{{Navbox-K64}} | |||
[[Category:Places]] | [[Category:Places]] | ||
[[Category:Planets]] | [[Category:Planets]] | ||
Latest revision as of 21:29, 26 April 2024
| ||||||||||||
| ||||||||||||
| ||||||||||||
|
| ||||||||||||

Shiver Star is the fifth planet out of seven visited by Kirby and Ribbon in their mission to rid the realm of Dark Matter in Kirby 64: The Crystal Shards. This level appears to be locked in perpetual winter, as all the surface areas Kirby can visit are utterly covered in layers of snow and ice. The clouds are also thick enough to become landscapes in their own right. Despite this, there is a lot of activity on this planet, both in terms of enemy inhabitants and whirring machinery.
Its appearance takes form of a white, snowy environment with marks resembling landscape and a single moon, highly resembling that of Planet Earth.
Overview[edit]
Shiver Star is the final of the four intermediate levels of Kirby 64: The Crystal Shards, meaning that it consists of four standard stages, a fifth boss stage, and only has one cutscene which plays at the end of the level. Very little in the way of vegetation grows on this world due to the cold, but the arctic conditions are nonetheless brimming with native inhabitants of all sorts, many of which are endemic to the vast works of architecture found on the planet. As Kirby makes his way through this level, he will traverse snowy hillsides, walk across solid cloud layers, enter a vibrant shopping mall full of traps, and delve into a deep underground factory to study it. The Japanese website for Kirby 64: The Crystal Shards mentions that all of the planet's residents moved away because it was too cold.[1]
Like in all intermediate levels of Kirby 64: The Crystal Shards, the first four stages within the Shiver Star hide three Crystal Shards, while the final stage rewards only one after the defeat of the boss. Nevertheless, all shards within one level do not need to be collected before Kirby is granted access to the next; Kirby must simply complete the level.
Stages[edit]
Each stage is unlocked in succession after clearing the previous one. Defeating HR-H and HR-E is necessary to move on to Ripple Star. For more information about a particular stage, click on the link to the stage's page in the table. For a full guide on how to obtain the Crystal Shards, see the Crystal Shard page.
| Stage | Boss/Mid-Boss | Notes |
|---|---|---|
| Big Chilly | ||
| Big Mopoo | ||
| Big Pupa | ||
| Big Burnis | The official name of this stage is "Factory Tour". | |
| HR-H & HR-E | Completing this stage unlocks Ripple Star. |
Ending cutscene[edit]

Out in the snow, the crystal opens up to reveal the last level - Ribbon's home of Ripple Star. Seeing the sorry state it is in causes Ribbon to despair, but she is reassured by the rest of the party. Kirby calls for everyone to go in, and runs forward, but trips and falls in the snow. Everyone else tramples him in the process. Ribbon then has to carry the battered Kirby through the portal.
Trivia[edit]

- The connection between the Shiver Star and Earth in terms of appearance has been quite the popular topic of conversation among Kirby fans, and rightly so, as one can see apparent outlines of Earth's continents in white upon the face of the Shiver Star, as well as a single moon resembling that of Earth. However, it is unclear what the developers of Kirby 64: The Crystal Shards had in mind when creating such a star in Earth's likeness.
Gallery[edit]
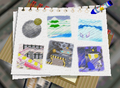
The stage select menu for Shiver Star.
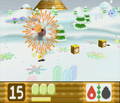
Rocketing through the tundra in Stage 1
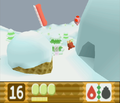
Crashing into an igloo in Stage 1

Running through a cloud tunnel in Stage 2
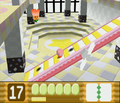
Utilizing broken escalators in an abandoned shopping mall in Stage 3
Moving through the factory conveyor belts in Stage 4
Worming through a crushing hazard in Stage 4
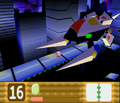
Battle with HR-E in Stage 5


Names in other languages[edit]
| Language | Name | Meaning |
|---|---|---|
| Japanese | ブルブルスター Buruburu Sutā |
Shivering Star |