Rainbow Route - Room 2: Difference between revisions
mNo edit summary |
m (→Enemies) |
||
| Line 22: | Line 22: | ||
!Copy Ability | !Copy Ability | ||
|- | |- | ||
|align=center|[[File: | |align=center|[[File:KNiDL Bronto Burt sprite.png]] | ||
|[[Bronto Burt]] | |[[Bronto Burt]] | ||
|None | |None | ||
| Line 34: | Line 34: | ||
|None | |None | ||
|- | |- | ||
|align=center|[[File: | |align=center|[[File:KNiDL Waddle Doo sprite.png]] | ||
|[[Waddle Doo]] | |[[Waddle Doo]] | ||
|[[Beam]] | |[[Beam]] | ||
Revision as of 21:16, 13 November 2021
| ||||||||||||||
|
| ||||||||||||||
Rainbow Route - Room 2 is a room in Rainbow Route, the first area of Kirby & The Amazing Mirror.
Links
This room is a one-way path, and the only way out is to the right, leading to Rainbow Route - Room 3.
Overview
This room is a continuation of the forest walkway from Room 1. Enemies patrol on the ground and keep watch from floating soft platforms. From the left, the flat path eventually reaches a small hill, down which a Roly-Poly will tumble toward Kirby. From here, the path breaks up into several small platforms over an abyss. Along the way, a cache can be accessed under the main walkway, containing a cherry. After a few more hills, a chest can be found in the open. Opening it reveals a 1-Up. At the right end of the path, two doors appear against a cliff. Both lead to Room 3, but take Kirby along different passageways.
Enemies
| Sprite | Name | Copy Ability |
|---|---|---|
| Bronto Burt | None | |
| Roly-Poly | None | |
| Waddle Dee | None | |
| Waddle Doo | Beam |
Gallery
- KTAM 1-2 Map.png
Ripped composite image of the room.
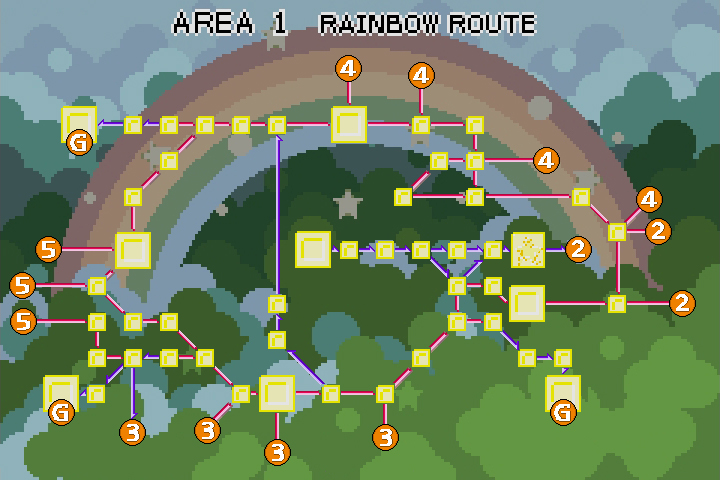
| Rainbow Route Area Map | |
|---|---|
 | |
| |||||||||||||||||||||||||||||