Temper Temple: Difference between revisions
mNo edit summary |
m (→Treasures) |
||
| (33 intermediate revisions by 17 users not shown) | |||
| Line 1: | Line 1: | ||
{{Infobox-KEYStage | {{Infobox-KEYStage | ||
|image=[[File: | |image=[[File:KEY Temper Temple Preview screenshot.jpg|300px]] | ||
|caption=The preview screen for '''Temper Temple'''. | |caption=The preview screen for '''Temper Temple'''. | ||
|treasure=-[[Furniture|Pyramid]]<br>-[[Furniture|Camel Pillow]]<br>-[[Quilty Square Soundtrack]] | |treasure=-[[Furniture|Pyramid]]<br>-[[Furniture|Camel Pillow]]<br>-[[Quilty Square (theme)|Quilty Square Soundtrack]] | ||
|patch=[[Area Patch|Hourglass Patch]] | |patch=[[Area Patch|Hourglass Patch]] | ||
|meta=[[Fire Engine]] | |meta=[[Fire Engine]] | ||
|theme music= | |theme music= [[File: KEY Lava Landing Theme.oga]] | ||
|theme title="[[Big-Bean Vine (theme)|Lava Landing]]" | |||
|devil=[[Ye-Devil]] | |||
|previous=[[Hot Wings]] | |previous=[[Hot Wings]] | ||
|next=[[Dusk Dunes]] | |next=[[Dusk Dunes]] | ||
}} | }} | ||
'''Temper Temple''' is the sixth stage (the first extra stage) of [[Hot Land]] in ''[[Kirby's Epic Yarn | '''Temper Temple''' is the sixth stage (the first extra stage) of [[Hot Land]] in ''[[Kirby's Epic Yarn]]'' and ''[[Kirby's Extra Epic Yarn]]'', unlocked by using the [[Area Patch|Hourglass Patch]] earned by doing well in the [[Hot Wings]] fight. This area takes place in an enclosed temple filled with fire and lava, making use of the [[Fire Engine]] [[Metamortex]]. Completing this stage is necessary to obtain the [[Area Patch|Candle Patch]] and unlock [[Dusk Dunes]]. | ||
Temper Temple is the inspiration for [[Slash & Bead - Stage 2|Stage 2]] of [[Slash & Bead]] in ''Kirby's Extra Epic Yarn''. | |||
== | ==Patch animation== | ||
Throwing this patch causes a large hourglass to form, which then becomes filled with sand. When it turns over, the sand fills a pyramid in the background to give it color. After this, the hourglass disappears, and the door to Temper Temple opens. | |||
==Overview== | |||
The entirety of this stage makes use of the [[Fire Engine]] transformation. Through this stage, there are three separate sections which involve Kirby riding along moving platforms over magma pits while dousing fire spouts, [[Emba]]s and [[Embaconda]]s. The first involves a single platform, but the other two have a platform which splits in two and goes on slightly different paths before joining back together. After the third platform ride, Kirby can pass through a [[Reel Gate]] and finish the stage. | The entirety of this stage makes use of the [[Fire Engine]] transformation. Through this stage, there are three separate sections which involve Kirby riding along moving platforms over magma pits while dousing fire spouts, [[Emba]]s and [[Embaconda]]s. The first involves a single platform, but the other two have a platform which splits in two and goes on slightly different paths before joining back together. After the third platform ride, Kirby can pass through a [[Reel Gate]] and finish the stage. | ||
<gallery> | <gallery> | ||
Temper Temple 1.jpg|Kirby sprays for some beads | KEY Temper Temple 1.jpg|Kirby sprays for some beads | ||
Temper Temple 2.jpg|Kirby sprays away the fire wall | KEY Temper Temple 2.jpg|Kirby sprays away the fire wall | ||
Temper Temple 3.jpg|Kirby clears the way upward. | KEY Temper Temple 3.jpg|Kirby clears the way upward | ||
KEY-map26.jpg|Stage map | |||
</gallery> | </gallery> | ||
==Medal Bead scores== | |||
*Bronze - 300 points | *Bronze - 300 points | ||
*Silver - 600 points | *Silver - 600 points | ||
*Gold - 900 points | *Gold - 900 points | ||
==Enemies== | |||
{| style="border: 3px solid #E47575; {{round}}; background: #F69D99" cellspacing="2" | {| style="border: 3px solid #E47575; {{round}}; background: #F69D99" cellspacing="2" | ||
! width="267px" | '''Enemies''' | ! width="267px" | '''Enemies''' | ||
| Line 43: | Line 46: | ||
| | | | ||
{{col-begin}} | {{col-begin}} | ||
*None | *None | ||
{{col-end}} | {{col-end}} | ||
|} | |} | ||
=== | ==Treasures== | ||
{| class="wikitable"style="text-align:center" | |||
|- | |||
! Item | |||
! Description | |||
|- | |||
| {{center|[[File:KEY Furniture Pyramid.png|75px]]<br>'''Pyramid'''}} | |||
| ''Some say that this decorative object has healing powers.'' | |||
|- | |||
| {{center|[[File:KEY Furniture Camel Pillow.png|75px]]<br>'''Camel Pillow'''}} | |||
| ''This camel pillow has two humps. One for you and one for a friend!'' | |||
|- | |||
| {{center|[[File:KEY CD Soundtrack Item.png|75px]]<br>'''[[Quilty Square]] Soundtrack'''}} | |||
| ''This new music plays in Quilty Square.'' | |||
|} | |||
== | ==Names in other languages== | ||
{{Names | |||
|ja=ほのおのピラミッド | |||
|jaR=Honō no piramiddo | |||
|jaM=Pyramid of fire | |||
|frA=Temple tempéré | |||
|frAM=Temperate temple | |||
|frE=Temple ardent | |||
|frEM=Burning temple | |||
|it=Tempio Ardore | |||
|itM=Heat Temple | |||
|ko=화염 피라미드 | |||
|koR=hwayeom pilamideu | |||
|koM=Flame pyramid | |||
|esA=Templo templado | |||
|esAM=Tepid temple | |||
|esE=Templo de Lava | |||
|esEM=Lava Temple | |||
|de=Temperamentstempel | |||
|deM=Temperament temple | |||
}} | |||
==Video | ==Video walkthrough== | ||
{{Youtube|0mkTEy-5yio|300|100% walkthrough of Temper Temple.}} | {{Youtube|0mkTEy-5yio|300|100% walkthrough of Temper Temple.}} | ||
| Line 62: | Line 95: | ||
[[Category:Hot Land locations]] | [[Category:Hot Land locations]] | ||
[[Category:Stages in Kirby's Epic Yarn]] | [[Category:Stages in Kirby's Epic Yarn]] | ||
Latest revision as of 22:43, 12 May 2024
| ||||||||||||||
| ||||||||||||||
| ||||||||||||||
|
| ||||||||||||||

Temper Temple is the sixth stage (the first extra stage) of Hot Land in Kirby's Epic Yarn and Kirby's Extra Epic Yarn, unlocked by using the Hourglass Patch earned by doing well in the Hot Wings fight. This area takes place in an enclosed temple filled with fire and lava, making use of the Fire Engine Metamortex. Completing this stage is necessary to obtain the Candle Patch and unlock Dusk Dunes.
Temper Temple is the inspiration for Stage 2 of Slash & Bead in Kirby's Extra Epic Yarn.
Patch animation[edit]
Throwing this patch causes a large hourglass to form, which then becomes filled with sand. When it turns over, the sand fills a pyramid in the background to give it color. After this, the hourglass disappears, and the door to Temper Temple opens.
Overview[edit]
The entirety of this stage makes use of the Fire Engine transformation. Through this stage, there are three separate sections which involve Kirby riding along moving platforms over magma pits while dousing fire spouts, Embas and Embacondas. The first involves a single platform, but the other two have a platform which splits in two and goes on slightly different paths before joining back together. After the third platform ride, Kirby can pass through a Reel Gate and finish the stage.
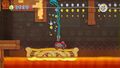
Kirby sprays for some beads
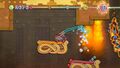
Kirby sprays away the fire wall
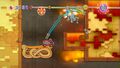
Kirby clears the way upward
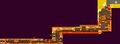
Stage map


Medal Bead scores[edit]
- Bronze - 300 points
- Silver - 600 points
- Gold - 900 points
Enemies[edit]
| Enemies | Mid-Bosses | ||
|---|---|---|---|
|
|
|
Treasures[edit]
| Item | Description |
|---|---|
 Pyramid |
Some say that this decorative object has healing powers. |
Camel Pillow |
This camel pillow has two humps. One for you and one for a friend! |
| This new music plays in Quilty Square. |

Names in other languages[edit]
| Language | Name | Meaning |
|---|---|---|
| Japanese | ほのおのピラミッド Honō no piramiddo |
Pyramid of fire |
| Canadian French | Temple tempéré | Temperate temple |
| European French | Temple ardent | Burning temple |
| German | Temperamentstempel | Temperament temple |
| Italian | Tempio Ardore | Heat Temple |
| Korean | 화염 피라미드 hwayeom pilamideu |
Flame pyramid |
| Latin American Spanish | Templo templado | Tepid temple |
| European Spanish | Templo de Lava | Lava Temple |
Video walkthrough[edit]
100% walkthrough of Temper Temple.
|