Cabbage Cavern: Difference between revisions
m (→Room 14) |
|||
| (43 intermediate revisions by 9 users not shown) | |||
| Line 1: | Line 1: | ||
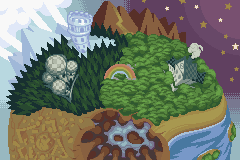
[[File:KatAM S CabbageCavern2. | {{Infobox-K&tAMLevel | ||
|image= [[File:KatAM S CabbageCavern2.png]] | |||
'''Cabbage Cavern''' is the third cardinal area of the [[Mirror World]]. The few [[Mirror | |caption= [[Kirby]] worming his way through the many cramped tunnels and spaces of '''Cabbage Cavern''' | ||
|level= 3 | |||
|rooms= 21 | |||
|goal= 1 | |||
|connect= [[Rainbow Route]] <br> [[Olive Ocean]] <br> [[Radish Ruins]] | |||
|mid-boss= [[Batafire]] <br> [[Bonkers]] <br> [[Box Boxer]] | |||
|boss= [[Moley]] | |||
|theme music=[[File:Cave Rocky Area KaTAM.mp3]] | |||
|theme title="[[Forest Stage|Cave/Rocky Area]]" | |||
|description=Clip of the "Cave/Rocky Area" theme from ''[[Kirby & The Amazing Mirror]]'' | |||
|previous= [[Moonlight Mansion]] | |||
|next=[[Mustard Mountain]] | |||
}} | |||
'''Cabbage Cavern''' is the third cardinal area of the [[Mirror World]], located directly south of [[Rainbow Route]] and its [[Rainbow Route - Central Circle|Central Circle]]. The few [[Mirror Door]]s leading to it are characterized by a rocky brown frame, in contrast to the mostly purple-hued terrain of the area itself, though a few of the rooms here deviate with rocky blue surfaces such as the regions surrounding the [[Mid-Boss]] [[Batafire]] and [[Boss]] [[Moley]]. In Cabbage Cavern, [[Kirby]] navigates through many narrow tunnels and close-quarter enemy encounters, and traverses [[hazard]]s such as [[spike]] beds, [[bottomless pit]]s, and [[Water (environment)|water]] currents. [[Copy Ability|Copy Abilities]] which have good horizontal and/or vertical reach are most useful for this area, since enemies are liable to come from many different directions. In a few niches, a [[stake]]-pounding ability such as [[Hammer]] or [[Stone]] will allow access to otherwise-unreachable [[Treasure Chest|treasure chests]]. | |||
Unique treasures found in this area include two [[Spray Paint]]s | Unique treasures found in this area include two [[Spray Paint]]s - sapphire and chocolate - two [[Notes|Sound Files]] which can be found in out-of-the-way treasure chests, and a single [[Dimension Mirror|Mirror Shard]], which is guarded by Moley at the cavern's deepest point. When any of the three [[Big Switch]]es are activated, a corresponding hub with a mirror door will be opened to access other areas. From Cabbage Cavern, it is possible to travel to areas in Rainbow Route, [[Olive Ocean]], and [[Radish Ruins]]. | ||
== | ==Enemies, Bosses, and Abilities in Cabbage Cavern== | ||
=== | {| width=65% | ||
[[File:KatAM | |<tabs> | ||
<tab name="Enemies"> | |||
{| class="wikitable" | |||
!Image | |||
!Name | |||
!style="border-style: solid; border-width: 1px 3px 1px 1px"|Copy Ability | |||
!Image | |||
!Name | |||
!style="border-style: solid; border-width: 1px 3px 1px 1px"|Copy Ability | |||
!Image | |||
!Name | |||
!style="border-style: solid; border-width: 1px 3px 1px 1px"|Copy Ability | |||
!Image | |||
!Name | |||
!Copy Ability | |||
|- | |||
|align=center|[[File:KNiDL Blipper sprite.png]] | |||
|[[Blipper]] | |||
|style="border-style: solid; border-width: 1px 3px 1px 1px" align=center|None | |||
|align=center|[[File:KNiDL Flamer sprite.png]] | |||
|[[Flamer]] | |||
|style="border-style: solid; border-width: 1px 3px 1px 1px" align=center|[[Burning]] | |||
|align=center|[[File:KatAMHeavyKnight.png]] | |||
|[[Heavy Knight]] | |||
|style="border-style: solid; border-width: 1px 3px 1px 1px" align=center|[[Sword]] | |||
|align=center|[[File:KatAM Snooter.png]] | |||
|[[Snooter]] | |||
|align=center|None | |||
|- | |||
|align=center|[[File:KatAMBlockin.png]] | |||
|[[Blockin]] | |||
|style="border-style: solid; border-width: 1px 3px 1px 1px" align=center|N/A | |||
|align=center|[[File:KatAMFoley.png]] | |||
|[[Foley]] | |||
|style="border-style: solid; border-width: 1px 3px 1px 1px" align=center|[[Bomb]] | |||
|align=center|[[File:KNiDL Rocky sprite.png]] | |||
|[[Rocky]] | |||
|style="border-style: solid; border-width: 1px 3px 1px 1px" align=center|[[Stone]] | |||
|align=center|[[File:KNiDL Sparky sprite.png]] | |||
|[[Sparky]] | |||
|align=center|[[Spark]] | |||
|- | |||
|align=center|[[File:KNiDL Bomber sprite.png]] | |||
|[[Bomber]] | |||
|style="border-style: solid; border-width: 1px 3px 1px 1px" align=center|[[Crash]] | |||
|align=center|[[File:KatAMGiantRocky.png]] | |||
|[[Giant Rocky]] | |||
|style="border-style: solid; border-width: 1px 3px 1px 1px" align=center|[[Stone]] | |||
|align=center|[[File:KatAMRolyPoly.png]] | |||
|[[Roly-Poly]] | |||
|style="border-style: solid; border-width: 1px 3px 1px 1px" align=center|None | |||
|align=center|[[File:KNiDL Sword Knight sprite.png]] | |||
|[[Sword Knight]] | |||
|align=center|[[Sword]] | |||
|- | |||
|align=center|[[File:KatAMBoxin.png]] | |||
|[[Boxin]] | |||
|style="border-style: solid; border-width: 1px 3px 1px 1px" align=center|[[Fighter]] | |||
|align=center|[[File:KNiDL Glunk sprite.png]] | |||
|[[Glunk]] | |||
|style="border-style: solid; border-width: 1px 3px 1px 1px" align=center|None | |||
|align=center|[[File:KNiDL Scarfy sprite.png]] | |||
|[[Scarfy]] | |||
|style="border-style: solid; border-width: 1px 3px 1px 1px" align=center|N/A | |||
|align=center|[[File:KNiDL UFO enemy sprite.png]] | |||
|[[UFO (enemy)|UFO]] | |||
|align=center|[[UFO]] | |||
|- | |||
|align=center|[[File:KNiDL Bronto Burt sprite.png]] | |||
|[[Bronto Burt]] | |||
|style="border-style: solid; border-width: 1px 3px 1px 1px" align=center|None | |||
|align=center|[[File:KNiDL Gordo sprite.png]] | |||
|[[Gordo]] | |||
|style="border-style: solid; border-width: 1px 3px 1px 1px" align=center|N/A | |||
|align=center|[[File:KatAMShooty.png]] | |||
|[[Shooty]] | |||
|style="border-style: solid; border-width: 1px 3px 1px 1px" align=center|None | |||
|align=center|[[File:KNiDL Waddle Dee sprite.png]] | |||
|[[Waddle Dee]] | |||
|align=center|None | |||
|- | |||
|align=center|[[File:KatAMChip.png]] | |||
|[[Chip]] | |||
|style="border-style: solid; border-width: 1px 3px 1px 1px" align=center|None | |||
|align=center|[[File:KatAMHaley.png]] | |||
|[[Haley]] | |||
|style="border-style: solid; border-width: 1px 3px 1px 1px" align=center|None | |||
|align=center|[[File:KNiDL Sir Kibble sprite.png]] | |||
|[[Sir Kibble]] | |||
|style="border-style: solid; border-width: 1px 3px 1px 1px" align=center|[[Cutter]] | |||
|align=center|[[File:KNiDL Waddle Doo sprite.png]] | |||
|[[Waddle Doo]] | |||
|align=center|[[Beam]] | |||
|- | |||
|align=center|[[File:KaTAM Droppy.png]] | |||
|[[Droppy]] | |||
|style="border-style: solid; border-width: 1px 3px 1px 1px" align=center|None (default) | |||
!colspan=9| | |||
= | |} | ||
{| | </tab> | ||
! | <tab name="Mid-Bosses"> | ||
{| class="wikitable" | |||
!Sprite | |||
!Name | |||
!Copy Ability | |||
|- | |||
|align=center|[[File:KatAMBatafire.png]] | |||
|[[Batafire]] | |||
|[[Burning]] | |||
|- | |||
|align=center|[[File:KNiDL Bonkers sprite.png]] | |||
|[[Bonkers]] | |||
|[[Hammer]] | |||
|- | |- | ||
| | |align=center|[[File:KatAMBoxBoxer.png]] | ||
|[[Box Boxer]] | |||
|[[Fighter]] | |||
|} | |} | ||
{| | </tab> | ||
! | <tab name="Boss"> | ||
{| class="wikitable" | |||
!Sprite | |||
!Name | |||
!Copy Ability | |||
|- | |- | ||
| | |align=center|[[File:KatAMMoley.png]] | ||
|[[Moley]] | |||
|[[Wheel]], [[Burning]], [[Bomb]], [[Stone]], [[Cutter]] (various objects he throws can be swallowed for abilities) | |||
|} | |||
</tab> | |||
</tabs> | |||
|} | |} | ||
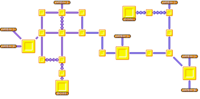
==Map== | ==Map== | ||
{{ | {{Navmap-KaTAM-CabC}} | ||
Cabbage Cavern is a fairly small area, consisting primarily of a single path through its breadth. It has numerous connections to Rainbow Route from above, but has very few connections to anywhere else. Under normal circumstances, Kirby and his clones will not spend too much time traveling through this area. Overall, there are 16 normal rooms, three hubs, and one Goal room. | |||
Cabbage Cavern is a fairly small area, consisting primarily of a single path through its breadth. It has numerous connections to Rainbow Route from above, but has very few connections to anywhere else. Under normal circumstances, Kirby and his clones will not spend too much time | |||
Cabbage Cavern is bordered to the north by [[Rainbow Route]], to the south-east by [[Olive Ocean]], and to the west by [[Radish Ruins]]. | Cabbage Cavern is bordered to the north by [[Rainbow Route]], to the south-east by [[Olive Ocean]], and to the west by [[Radish Ruins]]. | ||
Cabbage Cavern has one Goal room. Completing this room takes Kirby and his clones to the [[Goal Game]], then returns them to the | Cabbage Cavern has one Goal room. Completing this room takes Kirby and his clones to the [[Goal Game]], then returns them to the [[Rainbow Route - Central Circle|Central Circle]] of Rainbow Route. | ||
For a full synopsis of what's in each room, click on any room on the map to head to the corresponding page. | For a full synopsis of what's in each room, click on any room on the map to head to the corresponding page. | ||
==Gallery== | ==Gallery== | ||
{{center| | |||
<gallery> | <gallery widths=200> | ||
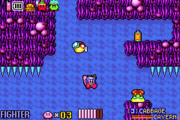
File:KatAM S CabbageCavern3. | File:KatAM S CabbageCavern3.png|A tunnel. | ||
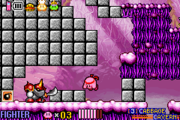
File:KatAM S CabbageCavern4. | File:KatAM S CabbageCavern4.png|An underwater passage. | ||
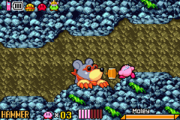
File:KatAM S CabbageCavern5. | File:KatAM S CabbageCavern5.png|Another area of Cabbage Cavern. | ||
File:KatAM S CabbageCavern6. | File:KatAM S CabbageCavern6.png|Kirby, battling Moley. | ||
File:KatAM S CabbageCavern1.png|Basic map of Cabbage Cavern. | |||
</gallery> | </gallery> | ||
}} | |||
==Names in other languages== | |||
{{Names | |||
|ja=キャベッジキャバーン | |||
|jaR=Kyabejji Kyabān | |||
|jaM=Cabbage Cavern | |||
|de=Kohl-kaverne | |||
|deM=Cabbage Cavern | |||
|es=Gruta del Repollo | |||
|esM=Cabbage Cavern | |||
|fr=Caverne des Choux | |||
|frM=Cabbage Cavern | |||
|it=Caverna de' Cavoletti | |||
|itM=Cabbage Cavern | |||
}} | |||
{{ | {{Navmap-KaTAM|coord1=124|coord2=110}} | ||
{{ | {{Navbox-KaTAM}} | ||
Latest revision as of 15:01, 26 April 2024
| ||||||||||||||||||
| ||||||||||||||||||
| ||||||||||||||||||
|
| ||||||||||||||||||

Cabbage Cavern is the third cardinal area of the Mirror World, located directly south of Rainbow Route and its Central Circle. The few Mirror Doors leading to it are characterized by a rocky brown frame, in contrast to the mostly purple-hued terrain of the area itself, though a few of the rooms here deviate with rocky blue surfaces such as the regions surrounding the Mid-Boss Batafire and Boss Moley. In Cabbage Cavern, Kirby navigates through many narrow tunnels and close-quarter enemy encounters, and traverses hazards such as spike beds, bottomless pits, and water currents. Copy Abilities which have good horizontal and/or vertical reach are most useful for this area, since enemies are liable to come from many different directions. In a few niches, a stake-pounding ability such as Hammer or Stone will allow access to otherwise-unreachable treasure chests.
Unique treasures found in this area include two Spray Paints - sapphire and chocolate - two Sound Files which can be found in out-of-the-way treasure chests, and a single Mirror Shard, which is guarded by Moley at the cavern's deepest point. When any of the three Big Switches are activated, a corresponding hub with a mirror door will be opened to access other areas. From Cabbage Cavern, it is possible to travel to areas in Rainbow Route, Olive Ocean, and Radish Ruins.
Enemies, Bosses, and Abilities in Cabbage Cavern[edit]
| ||||||||||||||||||||||||||||||||||||||||||||||||||||||||||||||||||||||||||||||||||||||||||||||||

Map[edit]
| Cabbage Cavern Area Map | |
|---|---|
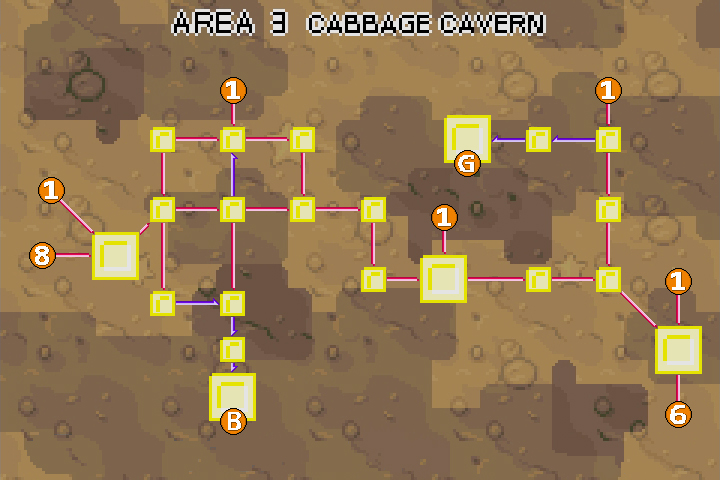 | |
Cabbage Cavern is a fairly small area, consisting primarily of a single path through its breadth. It has numerous connections to Rainbow Route from above, but has very few connections to anywhere else. Under normal circumstances, Kirby and his clones will not spend too much time traveling through this area. Overall, there are 16 normal rooms, three hubs, and one Goal room.
Cabbage Cavern is bordered to the north by Rainbow Route, to the south-east by Olive Ocean, and to the west by Radish Ruins.
Cabbage Cavern has one Goal room. Completing this room takes Kirby and his clones to the Goal Game, then returns them to the Central Circle of Rainbow Route.
For a full synopsis of what's in each room, click on any room on the map to head to the corresponding page.
Gallery[edit]

A tunnel.
An underwater passage.
Another area of Cabbage Cavern.
Kirby, battling Moley.
Basic map of Cabbage Cavern.


Names in other languages[edit]
| Language | Name | Meaning |
|---|---|---|
| Japanese | キャベッジキャバーン Kyabejji Kyabān |
Cabbage Cavern |
| French | Caverne des Choux | Cabbage Cavern |
| German | Kohl-kaverne | Cabbage Cavern |
| Italian | Caverna de' Cavoletti | Cabbage Cavern |
| Spanish | Gruta del Repollo | Cabbage Cavern |
| Regions in the Mirror World | |
|---|---|
 | |
| |||||||||||||||||||||||||||||