Candy Constellation: Difference between revisions
| (13 intermediate revisions by 7 users not shown) | |||
| Line 1: | Line 1: | ||
{{Infobox-K&tAMLevel | {{Infobox-K&tAMLevel | ||
|image= [[File:Candy Constellation Room 10.png]] | |image= [[File:KaTAM Candy Constellation Room 10.png]] | ||
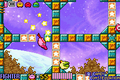
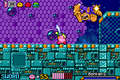
|caption= Kirby makes his way across metal platforms out in the open space of '''Candy Constellation'''. | |caption= Kirby makes his way across metal platforms out in the open space of '''Candy Constellation'''. | ||
|level= 9 | |level= 9 | ||
| Line 8: | Line 7: | ||
|connect= [[Rainbow Route]] | |connect= [[Rainbow Route]] | ||
|mid-boss= [[Bonkers]] <br> [[Box Boxer]] <br> [[Master Hand]] <br> [[Phan Phan]] | |mid-boss= [[Bonkers]] <br> [[Box Boxer]] <br> [[Master Hand]] <br> [[Phan Phan]] | ||
|boss= [[Master Hand]] | |boss= [[Master Hand & Crazy Hand]] | ||
|theme music=[[File:KatAM Space Area.mp3]] | |||
|theme title="[[Space Area]]" | |||
|description=Clip of the "Space Area" theme from ''[[Kirby & The Amazing Mirror]]'' | |||
|previous= [[Radish Ruins]] | |previous= [[Radish Ruins]] | ||
|next=[[Dimension Mirror#Kirby & The Amazing Mirror|The Mirror]] | |next=[[Dimension Mirror#Kirby & The Amazing Mirror|The Mirror]] | ||
}} | }} | ||
'''Candy Constellation''' is the ninth and final major area of the [[Mirror World]], presumed to be the outer space above the world proper. [[Kirby]] travels to the area to obtain the final [[Mirror Shard]] from [[Master Hand | '''Candy Constellation''' is the ninth and final major area of the [[Mirror World]], presumed to be the outer space above the world proper. [[Kirby]] travels to the area to obtain the final [[Mirror Shard]] from [[Master Hand & Crazy Hand]]. In addition to being outer space-themed, Candy Constellation appears to have a basic mechanical structure and technological appearance to its layout. As expected, [[Bottomless pit|deadly drop-offs]] are the primary hazard of the area. Also notorious are electric currents, [[spike]]s, floating cubes of [[Water (environment)|water]], and lots of enemies in the area. | ||
==Treasure== | ==Treasure== | ||
Kirby is able to obtain the [[Spray Paint|Red and Carbon spray paints]], a [[Vitality]], one [[Notes|Sound File]], the [[Jukebox|Sound Player]], and the [[Map (item)|Area Map]] for the Collection Room | Kirby is able to obtain the [[Spray Paint|Red and Carbon spray paints]], a [[Vitality]], one [[Notes|Sound File]], the [[Jukebox|Sound Player]], and the [[Map (item)|Area Map]] for the Collection Room, in addition to the many [[1-Up]]s, [[Energy Drink]]s, [[Battery (Kirby & The Amazing Mirror)|batteries]], [[food]], and [[Maxim Tomato]]es. | ||
====Enemies, Bosses, and Abilities in Candy Constellation==== | ====Enemies, Bosses, and Abilities in Candy Constellation==== | ||
{| width= | {| width=60% | ||
|<tabs> | |<tabs> | ||
<tab name="Enemies"> | <tab name="Enemies"> | ||
| Line 38: | Line 40: | ||
!Copy Ability | !Copy Ability | ||
|- | |- | ||
|align=center|[[File: | |align=center|[[File:KaTAM Bang Bang.png]] | ||
|[[Bang-Bang]] | |[[Bang-Bang]] | ||
|style="border-style: solid; border-width: 1px 3px 1px 1px" align=center|[[Missile]] | |style="border-style: solid; border-width: 1px 3px 1px 1px" align=center|[[Missile]] | ||
| Line 47: | Line 49: | ||
|[[Heavy Knight]] | |[[Heavy Knight]] | ||
|style="border-style: solid; border-width: 1px 3px 1px 1px" align=center|[[Sword]] | |style="border-style: solid; border-width: 1px 3px 1px 1px" align=center|[[Sword]] | ||
|align=center|[[File: | |align=center|[[File:KNiDL Scarfy sprite.png]] | ||
|[[Scarfy]] | |[[Scarfy]] | ||
|style="border-style: solid; border-width: 1px 3px 1px 1px" align=center|N/A | |style="border-style: solid; border-width: 1px 3px 1px 1px" align=center|N/A | ||
|align=center|[[File: | |align=center|[[File:KNiDL Sparky sprite.png]] | ||
|[[Sparky]] | |[[Sparky]] | ||
|align=center|[[Spark]] | |align=center|[[Spark]] | ||
|- | |- | ||
|align=center|[[File:Big Waddle Dee.png]] | |align=center|[[File:KaTAM Big Waddle Dee Sprite.png]] | ||
|[[Big Waddle Dee]] | |[[Big Waddle Dee]] | ||
|style="border-style: solid; border-width: 1px 3px 1px 1px" align=center|None | |style="border-style: solid; border-width: 1px 3px 1px 1px" align=center|None | ||
|align=center|[[File: | |align=center|[[File:KNiDL Flamer sprite.png]] | ||
|[[Flamer]] | |[[Flamer]] | ||
|style="border-style: solid; border-width: 1px 3px 1px 1px" align=center|[[Burning]] | |style="border-style: solid; border-width: 1px 3px 1px 1px" align=center|[[Burning]] | ||
|align=center|[[File: | |align=center|[[File:KNiDL Hot Head sprite.png]] | ||
|[[Hot Head]] | |[[Hot Head]] | ||
|style="border-style: solid; border-width: 1px 3px 1px 1px" align=center|[[Fire]] | |style="border-style: solid; border-width: 1px 3px 1px 1px" align=center|[[Fire]] | ||
|align=center|[[File:KatAMShadowKirby.png]] | |align=center|[[File:KatAMShadowKirby.png]] | ||
|[[Shadow Kirby]] | |[[Shadow Kirby]] | ||
|style="border-style: solid; border-width: 1px 3px 1px 1px" align=center| | |style="border-style: solid; border-width: 1px 3px 1px 1px" align=center|[[Bomb]] | ||
|align=center|[[File: | |align=center|[[File:KNiDL Sword Knight sprite.png]] | ||
|[[Sword Knight]] | |[[Sword Knight]] | ||
|align=center|[[Sword]] | |align=center|[[Sword]] | ||
|- | |- | ||
|align=center|[[File: | |align=center|[[File:KNiDL Blipper sprite.png]] | ||
|[[Blipper]] | |[[Blipper]] | ||
|style="border-style: solid; border-width: 1px 3px 1px 1px" align=center|None | |style="border-style: solid; border-width: 1px 3px 1px 1px" align=center|None | ||
| Line 76: | Line 78: | ||
|[[Foley]] | |[[Foley]] | ||
|style="border-style: solid; border-width: 1px 3px 1px 1px" align=center|[[Bomb]] | |style="border-style: solid; border-width: 1px 3px 1px 1px" align=center|[[Bomb]] | ||
|align=center|[[File: | |align=center|[[File:KNiDL Laser Ball sprite.png]] | ||
|[[Laser Ball]] | |[[Laser Ball]] | ||
|style="border-style: solid; border-width: 1px 3px 1px 1px" align=center|[[Laser]] | |style="border-style: solid; border-width: 1px 3px 1px 1px" align=center|[[Laser]] | ||
| Line 82: | Line 84: | ||
|[[Shooty]] | |[[Shooty]] | ||
|style="border-style: solid; border-width: 1px 3px 1px 1px" align=center|None | |style="border-style: solid; border-width: 1px 3px 1px 1px" align=center|None | ||
|align=center|[[File: | |align=center|[[File:KNiDL UFO enemy sprite.png]] | ||
|[[UFO (enemy)|UFO]] | |[[UFO (enemy)|UFO]] | ||
|align=center|[[UFO]] | |align=center|[[UFO]] | ||
|- | |- | ||
|align=center|[[File: | |align=center|[[File:KNiDL Bomber sprite.png]] | ||
|[[Bomber]] | |[[Bomber]] | ||
|style="border-style: solid; border-width: 1px 3px 1px 1px" align=center|[[Crash]] | |style="border-style: solid; border-width: 1px 3px 1px 1px" align=center|[[Crash]] | ||
| Line 92: | Line 94: | ||
|[[Giant Rocky]] | |[[Giant Rocky]] | ||
|style="border-style: solid; border-width: 1px 3px 1px 1px" align=center|[[Stone]] | |style="border-style: solid; border-width: 1px 3px 1px 1px" align=center|[[Stone]] | ||
|align=center|[[File: | |align=center|[[File:KaTAM Leap.png]] | ||
|[[Leap]] | |[[Leap]] | ||
|style="border-style: solid; border-width: 1px 3px 1px 1px" align=center|None | |style="border-style: solid; border-width: 1px 3px 1px 1px" align=center|None | ||
|align=center|[[File: | |align=center|[[File:KNiDL Shotzo sprite.png]] | ||
|[[Shotzo]] | |[[Shotzo]] | ||
|style="border-style: solid; border-width: 1px 3px 1px 1px" align=center|N/A | |style="border-style: solid; border-width: 1px 3px 1px 1px" align=center|N/A | ||
| Line 105: | Line 107: | ||
|[[Boxin]] | |[[Boxin]] | ||
|style="border-style: solid; border-width: 1px 3px 1px 1px" align=center|[[Fighter]] | |style="border-style: solid; border-width: 1px 3px 1px 1px" align=center|[[Fighter]] | ||
|align=center|[[File: | |align=center|[[File:KNiDL Glunk sprite.png]] | ||
|[[Glunk]] | |[[Glunk]] | ||
|style="border-style: solid; border-width: 1px 3px 1px 1px" align=center|None | |style="border-style: solid; border-width: 1px 3px 1px 1px" align=center|None | ||
|align=center|[[File: | |align=center|[[File:KNiDL Noddy sprite.png]] | ||
|[[Noddy]] | |[[Noddy]] | ||
|style="border-style: solid; border-width: 1px 3px 1px 1px" align=center|[[Sleep]] | |style="border-style: solid; border-width: 1px 3px 1px 1px" align=center|[[Sleep]] | ||
|align=center|[[File: | |align=center|[[File:KNiDL Sir Kibble sprite.png]] | ||
|[[Sir Kibble]] | |[[Sir Kibble]] | ||
|style="border-style: solid; border-width: 1px 3px 1px 1px" align=center|[[Cutter]] | |style="border-style: solid; border-width: 1px 3px 1px 1px" align=center|[[Cutter]] | ||
|align=center|[[File: | |align=center|[[File:KNiDL Waddle Doo sprite.png]] | ||
|[[Waddle Doo]] | |[[Waddle Doo]] | ||
|align=center|[[Beam]] | |align=center|[[Beam]] | ||
|- | |- | ||
|align=center|[[File: | |align=center|[[File:KNiDL Bronto Burt sprite.png]] | ||
|[[Bronto Burt]] | |[[Bronto Burt]] | ||
|style="border-style: solid; border-width: 1px 3px 1px 1px" align=center|None | |style="border-style: solid; border-width: 1px 3px 1px 1px" align=center|None | ||
|align=center|[[File: | |align=center|[[File:KNiDL Gordo sprite.png]] | ||
|[[Gordo]] | |[[Gordo]] | ||
|style="border-style: solid; border-width: 1px 3px 1px 1px" align=center|N/A | |style="border-style: solid; border-width: 1px 3px 1px 1px" align=center|N/A | ||
|align=center|[[File: | |align=center|[[File:KNiDL Rocky sprite.png]] | ||
|[[Rocky]] | |[[Rocky]] | ||
|style="border-style: solid; border-width: 1px 3px 1px 1px" align=center|[[Stone]] | |style="border-style: solid; border-width: 1px 3px 1px 1px" align=center|[[Stone]] | ||
| Line 130: | Line 132: | ||
|[[Snooter]] | |[[Snooter]] | ||
|style="border-style: solid; border-width: 1px 3px 1px 1px" align=center|None | |style="border-style: solid; border-width: 1px 3px 1px 1px" align=center|None | ||
|align=center|[[File: | |align=center|[[File:KNiDL Wheelie sprite.png]] | ||
|[[Wheelie]] | |[[Wheelie]] | ||
|align=center|[[Wheel]] | |align=center|[[Wheel]] | ||
|- | |- | ||
|align=center|[[File: | |align=center|[[File:KaTAM Cookin.png]] | ||
|[[Cookin]] | |[[Cookin]] | ||
|style="border-style: solid; border-width: 1px 3px 1px 1px" align=center|[[Cook]] | |style="border-style: solid; border-width: 1px 3px 1px 1px" align=center|[[Cook]] | ||
| Line 155: | Line 157: | ||
!Copy Ability | !Copy Ability | ||
|- | |- | ||
|align=center|[[File: | |align=center|[[File:KNiDL Bonkers sprite.png]] | ||
|[[Bonkers]] | |[[Bonkers]] | ||
|[[Hammer]] | |[[Hammer]] | ||
| Line 167: | Line 169: | ||
|[[Smash]] | |[[Smash]] | ||
|- | |- | ||
|align=center|[[File: | |align=center|[[File:KNiDL Phan Phan sprite.png]] | ||
|[[Phan Phan]] | |[[Phan Phan]] | ||
|[[Throw]] | |[[Throw]] | ||
| Line 188: | Line 190: | ||
==Map== | ==Map== | ||
{{Navmap-KaTAM-CanC}} | {{Navmap-KaTAM-CanC}} | ||
Much like [[Radish Ruins]], Candy Constellation consists of two distinct areas; the lower area, which is circuitous, and the upper area, which is largely linear. Candy Constellation is, however, the only area which has a Warp room that links to another part of the same area. There are 20 normal rooms, one Hub, three Chest rooms (one of which contains the area map), two Goal rooms, and one Warp room. The | Much like [[Radish Ruins]], Candy Constellation consists of two distinct areas; the lower area, which is circuitous, and the upper area, which is largely linear. Candy Constellation is, however, the only area which has a Warp room that links to another part of the same area. There are 20 normal rooms, one Hub, three Chest rooms (one of which contains the area map), two Goal rooms, and one Warp room. The bosses of this area are [[Master Hand & Crazy Hand]]. | ||
Candy Constellation is not directly connected to any other part of the Mirror World. The only way to reach it from outside is to take one of the three Warp Stars from [[Moonlight Mansion]], [[Mustard Mountain]], or [[Peppermint Palace]]. From there, Kirby can link the area back to the [[Rainbow Route - Central Circle|Central Circle]] by means of the one hub in the area. | Candy Constellation is not directly connected to any other part of the Mirror World. The only way to reach it from outside is to take one of the three Warp Stars from [[Moonlight Mansion]], [[Mustard Mountain]], or [[Peppermint Palace]]. From there, Kirby can link the area back to the [[Rainbow Route - Central Circle|Central Circle]] by means of the one hub in the area. | ||
| Line 198: | Line 200: | ||
==Gallery== | ==Gallery== | ||
<gallery> | <gallery> | ||
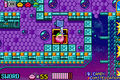
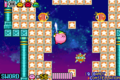
Candy Constellation Room 3.png|A hidden treasure cache | KaTAM Candy Constellation Room 3.png|A hidden treasure cache | ||
Candy Constellation Room 6.png|Traversing the metal walkways | KaTAM Candy Constellation Room 6.png|Traversing the metal walkways | ||
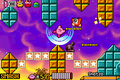
Candy Constellation Room 9.png|Moving past patrolling [[Gordo]]s | KaTAM Candy Constellation Room 9.png|Moving past patrolling [[Gordo]]s | ||
Candy Constellation Room 12.png|Passing through barricades | KaTAM Candy Constellation Room 12.png|Passing through barricades | ||
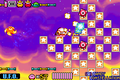
Candy Constellation Room 15.png|Clearing away enemies | KaTAM Candy Constellation Room 15.png|Clearing away enemies | ||
Candy Constellation Room 18.png|Busting barricades in open space | KaTAM Candy Constellation Room 18.png|Busting barricades in open space | ||
Candy Constellation Chest 3.png|Collecting the map | KaTAM Candy Constellation Chest 3.png|Collecting the map | ||
Candy Constellation Goal 2.png|Defeating [[Bonkers]] | KaTAM Candy Constellation Goal 2.png|Defeating [[Bonkers]] | ||
Candy Constellation Warp.png|Sailing past [[Star Block]]s | KaTAM Candy Constellation Warp.png|Sailing past [[Star Block]]s | ||
Candy Constellation Boss.png|Battle with [[Master Hand]] and [[Crazy Hand]] | KaTAM Candy Constellation Boss.png|Battle with [[Master Hand]] and [[Crazy Hand]] | ||
</gallery> | </gallery> | ||
Latest revision as of 14:51, 26 April 2024
| ||||||||||||||||||
| ||||||||||||||||||
| ||||||||||||||||||
|
| ||||||||||||||||||

Candy Constellation is the ninth and final major area of the Mirror World, presumed to be the outer space above the world proper. Kirby travels to the area to obtain the final Mirror Shard from Master Hand & Crazy Hand. In addition to being outer space-themed, Candy Constellation appears to have a basic mechanical structure and technological appearance to its layout. As expected, deadly drop-offs are the primary hazard of the area. Also notorious are electric currents, spikes, floating cubes of water, and lots of enemies in the area.
Treasure[edit]
Kirby is able to obtain the Red and Carbon spray paints, a Vitality, one Sound File, the Sound Player, and the Area Map for the Collection Room, in addition to the many 1-Ups, Energy Drinks, batteries, food, and Maxim Tomatoes.
Enemies, Bosses, and Abilities in Candy Constellation[edit]
| ||||||||||||||||||||||||||||||||||||||||||||||||||||||||||||||||||||||||||||||||||||||||||||||||||||||||||||||||||||||||||||||
Map[edit]
| Candy Constellation Area Map | |
|---|---|
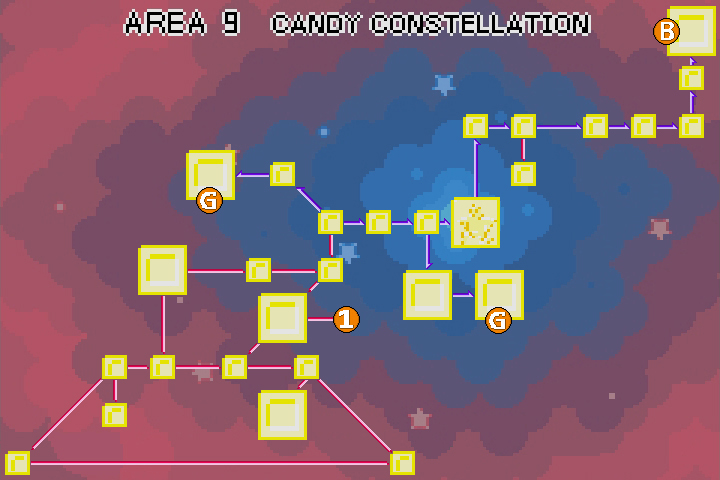 | |
Much like Radish Ruins, Candy Constellation consists of two distinct areas; the lower area, which is circuitous, and the upper area, which is largely linear. Candy Constellation is, however, the only area which has a Warp room that links to another part of the same area. There are 20 normal rooms, one Hub, three Chest rooms (one of which contains the area map), two Goal rooms, and one Warp room. The bosses of this area are Master Hand & Crazy Hand.
Candy Constellation is not directly connected to any other part of the Mirror World. The only way to reach it from outside is to take one of the three Warp Stars from Moonlight Mansion, Mustard Mountain, or Peppermint Palace. From there, Kirby can link the area back to the Central Circle by means of the one hub in the area.
Candy Constellation has two Goal rooms. Completing the Goal Game in each room will take Kirby and any friends with him back to the Central Circle of Rainbow Route.
For a full synopsis of what's in each room, click on any room on the map to head to the corresponding page.
Gallery[edit]
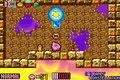
A hidden treasure cache
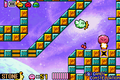
Traversing the metal walkways
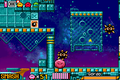
Moving past patrolling Gordos
Passing through barricades
Clearing away enemies
Busting barricades in open space
Collecting the map
Defeating Bonkers
Sailing past Star Blocks
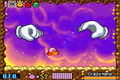
Battle with Master Hand and Crazy Hand


Names in other languages[edit]
| Language | Name | Meaning |
|---|---|---|
| Japanese | キャンディコンストレイション Kyandi Konsutoreishon |
Candy Constellation |
| French | Étoiles Bonbon | Candy Stars |
| German | Honig-galaxie | Honey Galaxy |
| Italian | Stelle Bonbon | Candy Stars |
| Spanish | Galaxia Pastel | Pastel Galaxy |
| Regions in the Mirror World | |
|---|---|
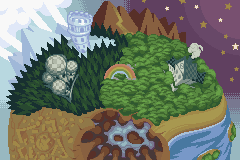 | |
| |||||||||||||||||||||||||||||