Kirby's Block Ball - Stage 7: Difference between revisions
No edit summary |
m (Text replacement - "cut-scene" to "cutscene") |
||
| (7 intermediate revisions by 4 users not shown) | |||
| Line 1: | Line 1: | ||
{{ | {{DISPLAYTITLE: ''Kirby's Block Ball'' - Stage 7}}{{Infobox-BlockBallStage | ||
{{Infobox-BlockBallStage | |||
|title=Stage 7 | |title=Stage 7 | ||
|image=[[File: | |image=[[File:KBBa Stage 7 selected.png]] | ||
|caption='''Stage 7''' from the stage selection screen. | |caption='''Stage 7''' from the stage selection screen. | ||
|score=125000 | |score=125000 | ||
| Line 10: | Line 9: | ||
|nextstage=[[Kirby's Block Ball - Stage 8|Stage 8]] | |nextstage=[[Kirby's Block Ball - Stage 8|Stage 8]] | ||
}} | }} | ||
'''Stage 7''' of ''[[Kirby's Block Ball]]'' is the seventh of eleven stages in the game, featured as a cloud island in the top-left of the map. This stage features five rounds and the [[Needle]] [[Copy Ability]], and hosts [[Kracko]] as its boss. The Border Line score for this stage is 125000 points. | '''Stage 7''' of ''[[Kirby's Block Ball]]'' is the seventh of eleven stages in the game, featured as a cloud island in the top-left of the map. This stage features five rounds and the [[Needle]] [[Copy Ability]], and hosts [[Kracko]] as its boss. The Border Line score for this stage is 125000 points. | ||
==Intro | ==Intro cutscene== | ||
[[File: | [[File:KBBa Stage 7 intro.png|thumb|left|A portion of the intro cutscene, demonstrating the Needle ability.]] | ||
After the stage is selected, a brief | After the stage is selected, a brief cutscene plays which demonstrates how the Needle ability works. Kirby bounces into a [[Spikey]] in the middle of the area to collect the ability. From there, he bounces upward and uses the ability to stick to a paddle up top, which holds him fast until released again. From there, Kirby unfurls and poses. | ||
{{clear|left}} | {{clear|left}} | ||
| Line 26: | Line 24: | ||
!Description | !Description | ||
|- | |- | ||
|[[File: | |[[File:KBBa Stage 7-1.png]]<br>Round 7-1 | ||
|The first area features a large block formation occupying the upper-right area, with a small lip where a [[Spikey]] can be found. A spike-less paddle can be used on the left-hand side, and a [[Warp Star]] can be found up in the upper-left corner above the Pinball Block which leads to a [[Sub-Game]]. The outer perimeter of the block formation is made of Power Blocks, which guard the Gray Blocks inside. Also inside is a Switch Star which activates a Bonus Chance when touched. | |The first area features a large block formation occupying the upper-right area, with a small lip where a [[Spikey]] can be found. A spike-less paddle can be used on the left-hand side, and a [[Warp Star]] can be found up in the upper-left corner above the Pinball Block which leads to a [[Sub-Game]]. The outer perimeter of the block formation is made of Power Blocks, which guard the Gray Blocks inside. Also inside is a Switch Star which activates a Bonus Chance when touched. | ||
The round ends once all Gray and Power Blocks are cleared away. | The round ends once all Gray and Power Blocks are cleared away. | ||
|- | |- | ||
|[[File: | |[[File:KBBa Stage 7-2.png]]<br>Round 7-2 | ||
|The second area features a porous block formation flanked on three sides by paddles and spike beds. The left and right walls of the formation are indestructible, and the top and bottom are made of Ability Blocks which can be cleared away with the Needle ability. Two Spikeys occupy the upper corners and a Switch Star can be accessed near the bottom to start a Bonus Chance. | |The second area features a porous block formation flanked on three sides by paddles and spike beds. The left and right walls of the formation are indestructible, and the top and bottom are made of Ability Blocks which can be cleared away with the Needle ability. Two Spikeys occupy the upper corners and a Switch Star can be accessed near the bottom to start a Bonus Chance. | ||
The round ends once all Gray Blocks are removed. | The round ends once all Gray Blocks are removed. | ||
|- | |- | ||
|[[File: | |[[File:KBBa Stage 7-3.png]]<br>Round 7-3 | ||
|The third area holds a more tightly-packed block formation with many lines of Ability Blocks inset. Two [[Chilly]]s guard the formation, and each holds a Block Flip item. Three paddles and spike beds surround the formation, leaving the right wall without them. Two Switch Stars can be collected inside the formation to start a Bonus Chance. | |The third area holds a more tightly-packed block formation with many lines of Ability Blocks inset. Two [[Chilly]]s guard the formation, and each holds a Block Flip item. Three paddles and spike beds surround the formation, leaving the right wall without them. Two Switch Stars can be collected inside the formation to start a Bonus Chance. | ||
The round ends once all White Blocks are removed. | The round ends once all White Blocks are removed. | ||
|- | |- | ||
|[[File: | |[[File:KBBa Stage 7-4.png]]<br>Round 7-4 (Target-Shooting) | ||
|The fourth area features three separate Star Block formations patrolled by [[Kracko Jr.]]. All sides except the top are bordered by spike beds and paddles. Once Kracko Jr. is hit four times, he retreats, leaving a Warp Star which can take Kirby to the Boss Area. | |The fourth area features three separate Star Block formations patrolled by [[Kracko Jr.]]. All sides except the top are bordered by spike beds and paddles. Once Kracko Jr. is hit four times, he retreats, leaving a Warp Star which can take Kirby to the Boss Area. | ||
The area is complete once Kirby touches the Warp Star. | The area is complete once Kirby touches the Warp Star. | ||
|- | |- | ||
|[[File: | |[[File:KBBa Kracko Jr.png]] [[File:KBBa Kracko.png]]<br>Round 7-5 (boss) | ||
|In the last area, Kirby must contend with Kracko Jr. who moves in a fighure-8 pattern around the area. After losing four hit points, Kracko Jr. transforms into [[Kracko]] and assumes a different pattern. Kracko attacks by shooting lightning which shrinks paddles on contact. Unlike other bosses, Kracko will only take damage if his eye is hit. After eight more hits, Kracko is defeated and the stage is clear. | |In the last area, Kirby must contend with Kracko Jr. who moves in a fighure-8 pattern around the area. After losing four hit points, Kracko Jr. transforms into [[Kracko]] and assumes a different pattern. Kracko attacks by shooting lightning which shrinks paddles on contact. Unlike other bosses, Kracko will only take damage if his eye is hit. After eight more hits, Kracko is defeated and the stage is clear. | ||
|} | |} | ||
{{Navbox-KBBa}} | |||
{{clear}} | {{clear}} | ||
Latest revision as of 22:50, 7 October 2022
| ||||||||||||
| ||||||||||||
|
| ||||||||||||
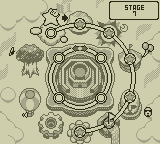
Stage 7 of Kirby's Block Ball is the seventh of eleven stages in the game, featured as a cloud island in the top-left of the map. This stage features five rounds and the Needle Copy Ability, and hosts Kracko as its boss. The Border Line score for this stage is 125000 points.
Intro cutscene[edit]
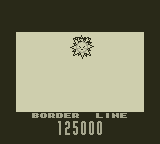
After the stage is selected, a brief cutscene plays which demonstrates how the Needle ability works. Kirby bounces into a Spikey in the middle of the area to collect the ability. From there, he bounces upward and uses the ability to stick to a paddle up top, which holds him fast until released again. From there, Kirby unfurls and poses.
Overview[edit]
Stage 7 consists of three Block Areas, one Target-Shooting Area featuring Kracko Jr., and a Boss Area against Kracko. These rooms are lain out as follows:
| Round | Description |
|---|---|
 Round 7-1 |
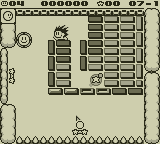
The first area features a large block formation occupying the upper-right area, with a small lip where a Spikey can be found. A spike-less paddle can be used on the left-hand side, and a Warp Star can be found up in the upper-left corner above the Pinball Block which leads to a Sub-Game. The outer perimeter of the block formation is made of Power Blocks, which guard the Gray Blocks inside. Also inside is a Switch Star which activates a Bonus Chance when touched.
The round ends once all Gray and Power Blocks are cleared away. |
 Round 7-2 |
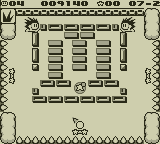
The second area features a porous block formation flanked on three sides by paddles and spike beds. The left and right walls of the formation are indestructible, and the top and bottom are made of Ability Blocks which can be cleared away with the Needle ability. Two Spikeys occupy the upper corners and a Switch Star can be accessed near the bottom to start a Bonus Chance.
The round ends once all Gray Blocks are removed. |
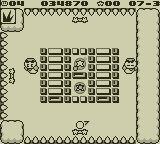 Round 7-3 |
The third area holds a more tightly-packed block formation with many lines of Ability Blocks inset. Two Chillys guard the formation, and each holds a Block Flip item. Three paddles and spike beds surround the formation, leaving the right wall without them. Two Switch Stars can be collected inside the formation to start a Bonus Chance.
The round ends once all White Blocks are removed. |
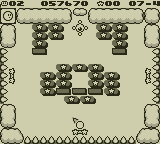 Round 7-4 (Target-Shooting) |
The fourth area features three separate Star Block formations patrolled by Kracko Jr.. All sides except the top are bordered by spike beds and paddles. Once Kracko Jr. is hit four times, he retreats, leaving a Warp Star which can take Kirby to the Boss Area.
The area is complete once Kirby touches the Warp Star. |
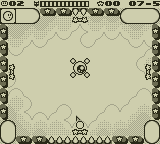 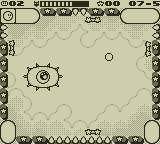 Round 7-5 (boss) |
In the last area, Kirby must contend with Kracko Jr. who moves in a fighure-8 pattern around the area. After losing four hit points, Kracko Jr. transforms into Kracko and assumes a different pattern. Kracko attacks by shooting lightning which shrinks paddles on contact. Unlike other bosses, Kracko will only take damage if his eye is hit. After eight more hits, Kracko is defeated and the stage is clear. |
| ||||||||||||||||||||||||||
