Ripple Star - Stage 3: Difference between revisions
(minor #cww) |
m (Text replacement - "\|theme title=\[\[(.*)\]\]" to "|theme title="$1"") |
||
| Line 7: | Line 7: | ||
|friend={{N}} | |friend={{N}} | ||
|theme music=[[File:K64 Ripple Star theme.mp3]] | |theme music=[[File:K64 Ripple Star theme.mp3]] | ||
|theme title=[[Ripple Star (theme)|Ripple Star]] | |theme title="[[Ripple Star (theme)|Ripple Star]]" | ||
|description=Clip of the theme music for Ripple Star - Stage 3. | |description=Clip of the theme music for Ripple Star - Stage 3. | ||
|previous=[[Ripple Star - Stage 2|Stage 2]] | |previous=[[Ripple Star - Stage 2|Stage 2]] | ||
Latest revision as of 20:30, 19 January 2024
| ||||||||||||||
| ||||||||||||||
| ||||||||||||||
|
| ||||||||||||||

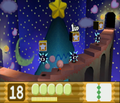
Ripple Star - Stage 3 is the third stage of Ripple Star in Kirby 64: The Crystal Shards, and the last regular stage in the game. This stage takes place inside the palace of Ripple Star, having Kirby move up the main tower past many enemy ambushes.
Overview[edit]
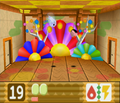
The stage begins inside a small treasury room, where many Point Stars are kept. Beyond the room's door is an ambush room, where Kirby has to defeat all the enemies that appear in order to move forward. A Crystal Shard will appear when this is done. Afterward, Kirby begins his ascent up the palace, climbing stairs around the base of the tree mural. He then enters the second ambush room, where the objective is the same.
From there, the stairs continue up the vertical mural, leading to two more ambush rooms as Kirby climbs to the top. The third ambush room also contains a hidden Crystal Shard which can be obtained if Burn-Needle is used, and the final room also holds a third and final shard when all enemies are cleared. The last room has Kirby climb up a stair walkway, where looming darkness can be seen from above. With few enemies present like N-Zs, all that Kirby has to do is just to reach the other side.
Crystal Shard guide[edit]
| Crystal Shard locations in Ripple Star - Stage 3 | ||||
|---|---|---|---|---|
 Shard 1 |
The first Crystal Shard appears after clearing out the first enemy ambush. | |||
 Shard 2 |
The second shard can be found under an orange and red floor in the third enemy ambush room. Kirby can break this floor open using Burn-Needle. | |||
 Shard 3 |
The third shard appears after the last enemy ambush is disposed of. | |||
Enemies, mid-bosses and abilities[edit]
| Image | Name | Copy Ability | Image | Name | Copy Ability | Image | Name | Copy Ability | Image | Name | Copy Ability | Image | Name | Copy Ability |
|---|---|---|---|---|---|---|---|---|---|---|---|---|---|---|
| Bo | None | Chilly | Gordo | N/A | Nruff | None | Sawyer | |||||||
| Bobo | Emp | Hack | Plugg | Scarfy | N/A | |||||||||
| Bonehead | None | Fishbone | Kacti | Pompey | Sirkibble | |||||||||
| Bouncy | None | Flora | None | Kany | None | Poppy Bros. Jr. | Skud | |||||||
| Bronto Burt | None | Frigis | Kapar | Propeller | Sparky | |||||||||
| Bumber | None | Gabon | None | Mariel | None (hazardous to inhale) | Pteran | None | Turbite | ||||||
| Burnis | Galbo | Mumbies | N/A | Punc | Yariko | None | ||||||||
| Cairn | Ghost Knight | N-Z | None | Rocky | Zoos | |||||||||
| Chacha | None | |||||||||||||
Gallery[edit]
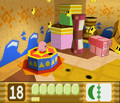
The first room Kirby finds himself in after riding the elevator from Stage 2
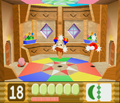
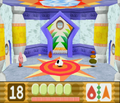
The first enemy ambush
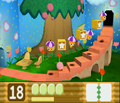
The base of the tree stairway
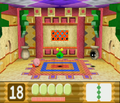
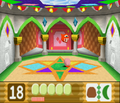
The second enemy ambush
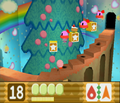
The second portion of the tree stairway
The third enemy ambush
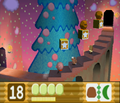
The third portion of the tree stairway
The fourth enemy ambush
The fourth and final portion of the tree stairway
The last enemy ambush


