Raisin Ruins - Stage 4: Difference between revisions
m (Text replacement - "{{Good}}↵" to "") |
No edit summary |
||
| Line 1: | Line 1: | ||
{{construction|This page is being refurbished to account for KRtDLD info. Hang tight. --[[User:Samwell|Samwell]] ([[User talk:Samwell|talk]]) 20:31, 24 February 2023 (UTC)}} | |||
{{Infobox-KRtDLStage | {{Infobox-KRtDLStage | ||
|image=[[File: | |image=[[File:KRtDLD Raisin Ruins Stage 4 select screenshot.png|350px]] | ||
|caption= | |caption='''Raisin Ruins - Stage 4''' in the [[level hub]]. | ||
|level=[[Raisin Ruins]] | |level=[[Raisin Ruins]] | ||
|super=[[Ultra Sword]] | |super=[[Ultra Sword]] | ||
| Line 9: | Line 10: | ||
|nextstage=[[Raisin Ruins - Stage 5]] | |nextstage=[[Raisin Ruins - Stage 5]] | ||
}} | }} | ||
'''Raisin Ruins - Stage 4''' (simply called '''Stage 4''' or '''2-4''' in-game) is the fourth stage of [[Raisin Ruins]] in ''Kirby's Return to Dream Land'' and its remake—''[[Kirby's Return to Dream Land Deluxe]]''. There are five [[Energy Sphere]]s in this stage. | |||
'''Raisin Ruins - Stage 4''' is the fourth stage of [[Raisin Ruins]] in ''Kirby's Return to Dream Land''. There are five [[Energy Sphere]]s in this stage. | |||
==Overview== | ==Overview== | ||
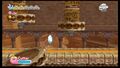
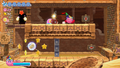
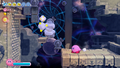
The stage starts out in a wide desert plain, at the foot of another large ruin, with a [[ | [[File:KRtDLD Raisin Ruins Stage 4 screenshot 02.png|thumb|250px|Kirby tries to work his way past the sand conveyor belts inside the ruins while dodging its inhabitants.]] | ||
The stage starts out in a wide desert plain, at the foot of another large ruin, with a [[key]] just to the right, and a [[Scarfy|Hunter Scarfy]] guarding it. [[Kirby]] must quickly move up a staircase with horizontally moving stairs, avoiding the Scarfies, in order to unlock a gate at the top of the staircase. Once Kirby unlocks the gate, he can enter the ruins after slipping past a [[Poppy Bros. Jr.]]. | |||
Inside, Kirby will find himself fighting a series of sand treadmills which carry enemies of all sorts. | Inside, Kirby will find himself fighting a series of sand treadmills which carry enemies of all sorts. This sand conveyor belt can get quite fast in places, and eventually dump into [[bottomless pit]]s. The door to the next area can be found to the right. | ||
The next door leads to a dark passageway. Kirby can use a [[ | The next door leads to a dark passageway. Kirby can use a [[candle]] to light his way forward. There are a number of dead ends and foes along the path, but with the candle, Kirby should be able to see these threats coming. | ||
After emerging from the darkness, Kirby will need to move past fire blocks, then encounter [[Water Galboros]]. Defeating it grants access to the [[Water]] Ability, which can be used to douse the blocks. | After emerging from the darkness, Kirby will need to move past fire blocks, then encounter [[Water Galboros]]. Defeating it grants access to the [[Water]] Ability, which can be used to douse the blocks. | ||
From there, Kirby will need to move past many lines of firing [[Gigatzo]]. Here, an [[Invisibility Stone]] can be used to provide cover against the obstacles up ahead. | From there, Kirby will need to move past many lines of firing [[Gigatzo]]s. Here, an [[Invisibility Stone]] can be used to provide cover against the obstacles up ahead. | ||
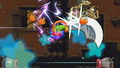
Once on the ruin exterior, Kirby can find and utilize the [[Ultra Sword]] ability to cut through giant ropes holding up large stone platforms. Behind the final one lies a rift to | Once on the ruin exterior, Kirby can find and utilize the [[Ultra Sword]] ability to cut through giant ropes holding up large stone platforms. Behind the final one lies a rift to [[Another Dimension]]. | ||
=== | ===Another Dimension rift=== | ||
The rift wall approaches from the right, prompting Kirby to run to the left. Along the way, several [[Shotzo]]s will need to be dislodged to allow for safe passage. At the end of this path, Kirby will then need to fight a red [[Sphere Doomer]] to complete this section. | The rift wall approaches from the right, prompting Kirby to run to the left. Along the way, several [[Shotzo]]s will need to be dislodged to allow for safe passage. At the end of this path, Kirby will then need to fight a red [[Sphere Doomer]] to complete this section. | ||
| Line 31: | Line 32: | ||
===Energy Sphere Guide=== | ===Energy Sphere Guide=== | ||
*A barrier in the floor in the conveyor section can be broken to access a side chamber. In this chamber, Kirby will need to hit a switch from afar and get through the gate quickly to get | *A barrier in the floor in the sand conveyor belt section can be broken to access a side chamber. In this chamber, Kirby will need to hit a switch from afar and get through the gate quickly to get the first sphere. | ||
*In the dark passage, | *In the dark passage, the second sphere can be found in an alcove in the ceiling. | ||
*Using the | *Using the Invisibility Stone, Kirby can access a side door where the third sphere can be collected. | ||
*The last two spheres can be obtained from the [[Sphere Doomer]] at the end of the rift. | *The last two spheres can be obtained from the [[Sphere Doomer]] at the end of the rift. | ||
==Enemies, Mid-Bosses and | ==Enemies, Mid-Bosses and abilities== | ||
{| style="border: 3px solid #E47575; {{round}};background: #F69D99" cellspacing="2" | {| style="border: 3px solid #E47575; {{round}};background: #F69D99" cellspacing="2" | ||
! width="420px" | '''Regular Enemies''' | ! width="420px" | '''Regular Enemies''' | ||
| Line 51: | Line 52: | ||
*[[Hot Head]] | *[[Hot Head]] | ||
*[[Scarfy|Hunter Scarfy]] | *[[Scarfy|Hunter Scarfy]] | ||
*[[Kabu]] | |||
{{col-break|width=33%}} | {{col-break|width=33%}} | ||
*[[Mumbies]] | *[[Mumbies]] | ||
*[[Noddy]] | *[[Noddy]] | ||
*[[Poppy Bros. Jr.]] | *[[Poppy Bros. Jr.]] | ||
*[[Puppet Waddle Dee]] | *[[Puppet Waddle Dee]] | ||
*[[Sandran]] <small>(KRtDLD only)</small> | |||
*[[Scarfy]] | *[[Scarfy]] | ||
{{col-break|width=34%}} | |||
*[[Shotzo]] | *[[Shotzo]] | ||
*[[Sir Kibble]] | *[[Sir Kibble]] | ||
*[[Super Blade Knight]] | *[[Super Blade Knight]] | ||
| Line 85: | Line 87: | ||
*[[Needle]] | *[[Needle]] | ||
{{col-break|width=50%}} | {{col-break|width=50%}} | ||
*[[Sand]] <small>(KRtDLD only)</small> | |||
*[[Sword]] | *[[Sword]] | ||
*[[Sleep]] | *[[Sleep]] | ||
| Line 97: | Line 100: | ||
==Gallery== | ==Gallery== | ||
===''Kirby's Return to Dream Land''=== | |||
<gallery> | <gallery> | ||
KRtDL Raisin Ruins Stage 4-1.jpg|Kirby sneaks by using the | KRtDL Raisin Ruins Stage 4 screenshot.png|Kirby bombs a Sir Kibble while maneuvering along one of the sand conveyor belts. | ||
KRtDL Raisin Ruins Stage 4-1.jpg|Kirby sneaks by using the Invisibility Stone. | |||
KRtDL Raisin Ruins Stage 4-2.jpg|Ultra Sword Kirby prepares to vanquish the statues. | KRtDL Raisin Ruins Stage 4-2.jpg|Ultra Sword Kirby prepares to vanquish the statues. | ||
KRtDL Raisin Ruins Stage 4-3.jpg|Kirby holds back the rift. | KRtDL Raisin Ruins Stage 4-3.jpg|Kirby holds back the rift. | ||
</gallery> | |||
===''Kirby's Return to Dream Land Deluxe''=== | |||
<gallery> | |||
KRtDLD Raisin Ruins Stage 4 screenshot 01.png|Kirby avoids the Hunter Scarfies as he makes his way to the ruin entrance. | |||
KRtDLD Raisin Ruins Stage 4 screenshot 03.png|Kirby works to solve a puzzle in an optional room. | |||
KRtDLD Raisin Ruins Stage 4 screenshot 04.png|Kirby uses a candle to light his way through a dark place. | |||
KRtDLD Raisin Ruins Stage 4 screenshot 05.png|Water Kirby uses his skills to hit a Bomb Block without getting in the path of some Ticks' needles. | |||
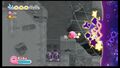
KRtDLD Raisin Ruins Stage 4 screenshot 06.png|Kirby reaches a barrier that he can pass through using the Invisibility Stone. | |||
KRtDLD Raisin Ruins Stage 4 screenshot 07.png|Ultra Sword Kirby slices some giant ropes along his path. | |||
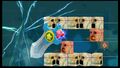
KRtDLD Raisin Ruins Stage 4 screenshot 08.png|In the rift, Kirby breaks a stair-like barrier holding some Shotzos up. | |||
</gallery> | </gallery> | ||
Revision as of 20:43, 26 February 2023
| ||||||||||||||
| ||||||||||||||
|
| ||||||||||||||

Raisin Ruins - Stage 4 (simply called Stage 4 or 2-4 in-game) is the fourth stage of Raisin Ruins in Kirby's Return to Dream Land and its remake—Kirby's Return to Dream Land Deluxe. There are five Energy Spheres in this stage.
Overview

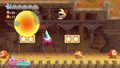
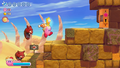
The stage starts out in a wide desert plain, at the foot of another large ruin, with a key just to the right, and a Hunter Scarfy guarding it. Kirby must quickly move up a staircase with horizontally moving stairs, avoiding the Scarfies, in order to unlock a gate at the top of the staircase. Once Kirby unlocks the gate, he can enter the ruins after slipping past a Poppy Bros. Jr..
Inside, Kirby will find himself fighting a series of sand treadmills which carry enemies of all sorts. This sand conveyor belt can get quite fast in places, and eventually dump into bottomless pits. The door to the next area can be found to the right.
The next door leads to a dark passageway. Kirby can use a candle to light his way forward. There are a number of dead ends and foes along the path, but with the candle, Kirby should be able to see these threats coming.
After emerging from the darkness, Kirby will need to move past fire blocks, then encounter Water Galboros. Defeating it grants access to the Water Ability, which can be used to douse the blocks.
From there, Kirby will need to move past many lines of firing Gigatzos. Here, an Invisibility Stone can be used to provide cover against the obstacles up ahead.
Once on the ruin exterior, Kirby can find and utilize the Ultra Sword ability to cut through giant ropes holding up large stone platforms. Behind the final one lies a rift to Another Dimension.
Another Dimension rift
The rift wall approaches from the right, prompting Kirby to run to the left. Along the way, several Shotzos will need to be dislodged to allow for safe passage. At the end of this path, Kirby will then need to fight a red Sphere Doomer to complete this section.
After the Sphere Doomer is defeated, Kirby may go back on the main path, and go on a ladder downward to the stage exit.
Energy Sphere Guide
- A barrier in the floor in the sand conveyor belt section can be broken to access a side chamber. In this chamber, Kirby will need to hit a switch from afar and get through the gate quickly to get the first sphere.
- In the dark passage, the second sphere can be found in an alcove in the ceiling.
- Using the Invisibility Stone, Kirby can access a side door where the third sphere can be collected.
- The last two spheres can be obtained from the Sphere Doomer at the end of the rift.
Enemies, Mid-Bosses and abilities
| Regular Enemies | Mid-Bosses | ||||
|---|---|---|---|---|---|
|
| ||||
| Abilities | Super Ability | ||||
|
|
|
Gallery
Kirby's Return to Dream Land
Kirby bombs a Sir Kibble while maneuvering along one of the sand conveyor belts.
Kirby sneaks by using the Invisibility Stone.
Ultra Sword Kirby prepares to vanquish the statues.
Kirby holds back the rift.


Kirby's Return to Dream Land Deluxe
Kirby avoids the Hunter Scarfies as he makes his way to the ruin entrance.
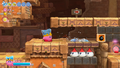
Kirby works to solve a puzzle in an optional room.

Kirby uses a candle to light his way through a dark place.
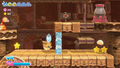
Water Kirby uses his skills to hit a Bomb Block without getting in the path of some Ticks' needles.
Kirby reaches a barrier that he can pass through using the Invisibility Stone.
Ultra Sword Kirby slices some giant ropes along his path.
In the rift, Kirby breaks a stair-like barrier holding some Shotzos up.


Video Walkthrough
100% walkthrough of Raisin Ruins - Stage 4.
|