Please remember that WiKirby contains spoilers, which you read at your own risk! See our general disclaimer for details.
Candy Constellation - Room 9: Difference between revisions
From WiKirby, your independent source of Kirby knowledge.
Jump to navigationJump to search
m (→Gallery) |
m (Text replacement - "\|theme title=\[\[(.*)\]\]" to "|theme title="$1"") |
||
| (9 intermediate revisions by 5 users not shown) | |||
| Line 1: | Line 1: | ||
{{Infobox-K&TAMRoom | {{Infobox-K&TAMRoom | ||
|image= [[File:Candy Constellation Room 9.png]] | |image= [[File:KaTAM Candy Constellation Room 9.png]] | ||
|caption=[[Kirby]] uses his downward special move in self-defense in '''Room 9'''. | |caption=[[Kirby]] uses his downward special move in self-defense in '''Room 9'''. | ||
|area=[[Candy Constellation]] | |area=[[Candy Constellation]] | ||
| Line 6: | Line 6: | ||
|to=[[Candy Constellation - Room 8|Room 8]]<br>[[Candy Constellation - Chest 2|Chest 2]] | |to=[[Candy Constellation - Room 8|Room 8]]<br>[[Candy Constellation - Chest 2|Chest 2]] | ||
|chest={{N}} | |chest={{N}} | ||
|theme music=[[File:KatAM Space Area.mp3]] | |||
|theme title="[[Space Area]]" | |||
|description=Clip of the "Space Area" theme from ''[[Kirby & The Amazing Mirror]]'' | |||
}} | }} | ||
'''Candy Constellation - Room 9''' is a room in [[Candy Constellation]], the ninth area of ''[[Kirby & The Amazing Mirror]]''. | '''Candy Constellation - Room 9''' is a room in [[Candy Constellation]], the ninth area of ''[[Kirby & The Amazing Mirror]]''. | ||
| Line 21: | Line 24: | ||
!Copy Ability | !Copy Ability | ||
|- | |- | ||
|align=center|[[File: | |align=center|[[File:KNiDL Gordo sprite.png]] | ||
|[[Gordo]] | |[[Gordo]] | ||
|N/A | |N/A | ||
| Line 29: | Line 32: | ||
|None | |None | ||
|- | |- | ||
|align=center|[[File: | |align=center|[[File:KNiDL Sparky sprite.png]] | ||
|[[Sparky]] | |[[Sparky]] | ||
|[[Spark]] | |[[Spark]] | ||
| Line 37: | Line 40: | ||
|None | |None | ||
|- | |- | ||
|align=center|[[File: | |align=center|[[File:KNiDL Waddle Doo sprite.png]] | ||
|[[Waddle Doo]] | |[[Waddle Doo]] | ||
|[[Beam]] | |[[Beam]] | ||
| Line 44: | Line 47: | ||
==Gallery== | ==Gallery== | ||
<gallery> | <gallery> | ||
KaTAM 9-9 Map.png|Composite map of the room | |||
</gallery> | </gallery> | ||
{{ | {{Navmap-KaTAM-CanC|coord1=259|coord2=245}} | ||
{{Navbox- | {{Navbox-KaTAM}} | ||
[[Category:Rooms in Candy Constellation]] | [[Category:Rooms in Candy Constellation]] | ||
Latest revision as of 19:13, 19 January 2024
| ||||||||||||||
| ||||||||||||||
|
| ||||||||||||||

Candy Constellation - Room 9 is a room in Candy Constellation, the ninth area of Kirby & The Amazing Mirror.
Links[edit]
This room links to Candy Constellation - Room 8 to the right, and Candy Constellation - Chest 2 to the left.
Overview[edit]
This room takes place in two parts. Entering from Room 8, Kirby must contend with Gordos and other hazards as he makes his way to the door to the second Chest room. Emerging from the Chest room, he can take an upper path past several enemies and barricades. Making use of the ability acquirable in the Chest room will make this a breeze. Kirby can also make use of this ability to smash through a metal blockade to get a 1-Up.
Enemies[edit]
| Sprite | Name | Copy Ability |
|---|---|---|
| Gordo | N/A | |
| Snooter | None | |
| Sparky | Spark | |
| Waddle Dee | None | |
| Waddle Doo | Beam |
Gallery[edit]

Composite map of the room
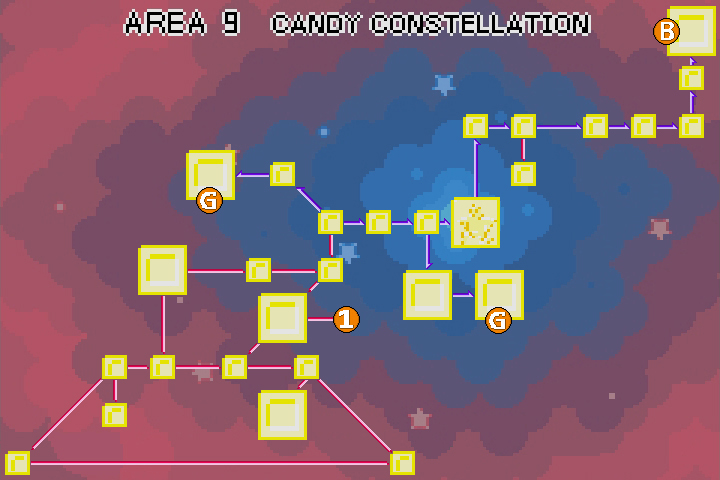
| Candy Constellation Area Map | |
|---|---|
 | |
| |||||||||||||||||||||||||||||