Cloudy Park - Stage 1 (Kirby's Dream Land 2): Difference between revisions
mNo edit summary |
mNo edit summary |
||
| (19 intermediate revisions by 7 users not shown) | |||
| Line 1: | Line 1: | ||
{{ | {{DISPLAYTITLE: Cloudy Park - Stage 1 (''Kirby's Dream Land 2'')}}{{Infobox-KDL2Stage | ||
|title=Cloudy Park - Stage 1 | |||
{{Infobox-KDL2Stage | |image=[[File:KDL2 Cloudy Park 1-1.png]] | ||
|image= [[File:Cloudy Park | |caption=[[Kirby]] takes aim with his [[Parasol]]. | ||
|caption= Kirby | |level=[[Cloudy Park (Kirby's Dream Land 2)|Cloudy Park]] | ||
|level= [[Cloudy Park (Kirby's Dream Land 2)|Cloudy Park]] | |stage=1 | ||
|stage= 1 | |animal=[[Rick]] | ||
|animal= [[Rick]] | |rainbow drop={{N}} | ||
|rainbow drop= {{N}} | |midboss=[[Jumper Shoot]] | ||
|midboss= [[Jumper Shoot]] | |previous=[[Red Canyon - Stage 6]] | ||
|previous= | |next=[[Cloudy Park - Stage 2 (Kirby's Dream Land 2)|Stage 2]] | ||
|next= [[Cloudy Park - Stage 2 (Kirby's Dream Land 2)|Stage 2]] | |||
}} | }} | ||
{{About|the stage in [[Kirby's Dream Land 2]]|the stage in [[Kirby's Dream Land 3]]|[[Cloudy Park - Stage 1 (Kirby's Dream Land 3)]]}} | |||
'''Cloudy Park - Stage 1''' is the first stage of [[Cloudy Park (Kirby's Dream Land 2)|Cloudy Park]] in ''[[Kirby's Dream Land 2]]''. | '''Cloudy Park - Stage 1''' is the first stage of [[Cloudy Park (Kirby's Dream Land 2)|Cloudy Park]] in ''[[Kirby's Dream Land 2]]''. | ||
| Line 21: | Line 21: | ||
The door leads to a series of cloud platforms that lead upward past currents and Gordos. At the top, a [[Maxim Tomato]] and the stage exit can be found under Star Blocks. | The door leads to a series of cloud platforms that lead upward past currents and Gordos. At the top, a [[Maxim Tomato]] and the stage exit can be found under Star Blocks. | ||
==Enemies | ==Enemies and Mid-Bosses== | ||
{| | {| width=50% | ||
! | |<tabs> | ||
! | <tab name="Enemies"> | ||
{| class="wikitable" | |||
| | !Sprite | ||
!Name | |||
!style="border-style: solid; border-width: 1px 3px 1px 1px"|Copy Ability | |||
!Sprite | |||
!Name | |||
!Copy Ability | |||
|- | |||
|align=center|[[File:KDL2 Bouncy Ty sprite.png]] | |||
|[[Bouncy|Bouncy Ty]] | |||
|style="border-style: solid; border-width: 1px 3px 1px 1px"|None | |||
|align=center|[[File:KDL2 Propeller Bomb sprite.png]] | |||
|[[Propeller|Propeller Bomb]] | |||
|None | |||
|- | |||
|align=center|[[File:KDL2 Bronto Burt sprite.png]] | |||
|[[Bronto Burt]] | |||
|style="border-style: solid; border-width: 1px 3px 1px 1px"|None | |||
|align=center|[[File:KDL2 Scarfy sprite.png]] | |||
|[[Scarfy]] | |||
| | |N/A | ||
|- | |||
|align=center|[[File:KDL2 Flamer sprite.png]] | |||
|[[Flamer]] | |||
|style="border-style: solid; border-width: 1px 3px 1px 1px"|[[Burning]] | |||
|align=center|[[File:KDL2 Shotzo sprite.png]] | |||
|[[Shotzo]] | |||
|N/A | |||
|- | |- | ||
|align=center|[[File:KDL2 Floaty the Drifter sprite.png]] | |||
|- | |[[Floaty the Drifter]] | ||
| | |style="border-style: solid; border-width: 1px 3px 1px 1px"|[[Parasol]] | ||
|align=center|[[File:KDL2 Sparky sprite.png]] | |||
|[[Sparky]] | |||
|[[Spark]] | |||
|- | |||
|align=center|[[File:KDL2 Gordo sprite.png]] | |||
|[[Gordo]] | |||
|style="border-style: solid; border-width: 1px 3px 1px 1px"|N/A | |||
|align=center|[[File:KDL2 Spikey sprite.png]] | |||
|[[Spikey]] | |||
|[[Needle]] | |||
|- | |||
|align=center|[[File:KDL2 Load Kibble sprite.png]] | |||
|[[Sir Kibble|Load Kibble]] | |||
|style="border-style: solid; border-width: 1px 3px 1px 1px"|[[Cutter]] | |||
|align=center|[[File:KDL2 Waddle Dee sprite.png]] | |||
|[[Waddle Dee]] | |||
|None | |||
|- | |||
|align=center|[[File:KDL2 Poppy Bros Jr sprite.png]] | |||
|[[Poppy Bros. Jr.]] | |||
|style="border-style: solid; border-width: 1px 3px 1px 1px"|None | |||
!colspan=3| | |||
|} | |} | ||
</tab> | |||
<tab name="Mid-Boss"> | |||
{| class="wikitable" width=25% | |||
!Sprite | |||
!Name | |||
!Copy Ability | |||
|- | |||
|align=center|[[File:KDL2 Jumpershoot sprite.png]] | |||
|[[Jumper Shoot]] | |||
|[[Parasol]] | |||
|} | |||
</tab> | |||
</tabs> | |||
|} | |||
==Gallery== | |||
<gallery> | |||
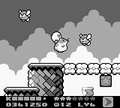
KDL2 Cloudy Park 1-2.png|Floating past a Gordo column | |||
KDL2 Cloudy Park 1-3.png|Knocking the support out from under a Shotzo | |||
KDL2 Cloudy Park 1-4.png|Battle with [[Jumper Shoot]] | |||
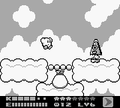
KDL2 Cloudy Park 1-5.png|Preparing to cross a fragile cloud bridge | |||
KDL2 Cloudy Park 1-6.png|Working in through cloud blocks | |||
KDL2 Cloudy Park 1-7.png|Traveling up the pillar passage | |||
KDL2 Cloudy Park 1-8.png|Exit at the pinnacle | |||
</gallery> | |||
{{clear}} | {{clear}} | ||
{{ | {{Navbox-KDL2}} | ||
Latest revision as of 14:27, 21 September 2022
| ||||||||||||||||
| ||||||||||||||||
|
| ||||||||||||||||

- This article is about the stage in Kirby's Dream Land 2. For the stage in Kirby's Dream Land 3, see Cloudy Park - Stage 1 (Kirby's Dream Land 3).
Cloudy Park - Stage 1 is the first stage of Cloudy Park in Kirby's Dream Land 2.
Overview[edit]
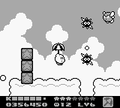
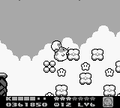
The stage begins in a flat cloudscape. To the right, the clouds begin to break up amidst Star Blocks and enemies. Near the end of the path, Kirby will have to contend with Gordos among wind currents.
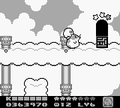
The door leads to a series of rocky outcroppings, patrolled by many baddies. Along the way, a side-passage can be accessed to save Rick from Jumper Shoot. The path continues past perilous platforms that break away when stepped on.
The door leads to a series of cloud platforms that lead upward past currents and Gordos. At the top, a Maxim Tomato and the stage exit can be found under Star Blocks.
Enemies and Mid-Bosses[edit]
| ||||||||||||||||||||||||||||||||||||||||||||||||||||||
Gallery[edit]
Floating past a Gordo column
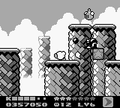
Knocking the support out from under a Shotzo
Battle with Jumper Shoot
Preparing to cross a fragile cloud bridge
Working in through cloud blocks
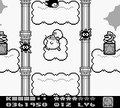
Traveling up the pillar passage
Exit at the pinnacle


| |||||||||||||||||||||||