Course 1 - Hole 2: Difference between revisions
(Created page with "{{image|screenshots}} {{Infobox-KDCHole |image= 300px |caption= Composite map of '''Course 1 - Hole 2''' from ''Kirby's Dream Course''...") |
mNo edit summary |
||
| (6 intermediate revisions by 2 users not shown) | |||
| Line 1: | Line 1: | ||
{{Infobox-KDCHole | {{Infobox-KDCHole | ||
|image= [[File:KDC Course 1 Hole 2 map.png|300px]] | |image= | ||
|caption= Composite | <tabs> | ||
<tab name="Main Game"> | |||
[[File:KDC Course 1 Hole 2 map.png|300px]] | |||
</tab> | |||
<tab name="Extra Game"> | |||
[[File:KDC Course 1 Hole 2 extra map.png|300px]] | |||
</tab> | |||
</tabs> | |||
|caption= Composite maps of '''Course 1 - Hole 2''' from ''[[Kirby's Dream Course]]''. | |||
|course= [[Course 1]] | |course= [[Course 1]] | ||
|ability= None | |ability= None | ||
| Line 11: | Line 18: | ||
== Summary == | == Summary == | ||
This is a small hole taking place on a rectangular platform with mild slopes in the upper-right region creating a basin and | This is a small hole taking place on a rectangular platform with mild slopes in the upper-right region creating a basin and [[bumper]]s guarding the lower-left. A small bumper island can be found in the middle between the flat area and the hilly region, which creates a potential split path. [[Kirby]] starts in the lower-most portion of the bumper area in a relatively isolated spot, and his targets are three [[Kabu]] which occupy the spaces above him; one being found just on the edge of the basin next to a [[Kick Panel]] and the other two inside the basin next to each-other. Three [[Whispy Woods]] can also be found on the course, but they can be ignored. Completing this hole is a straightforward matter if Kirby aims for the Kick Panel and plans his subsequent curve into the basin well enough. | ||
=== Extra Game === | === Extra Game === | ||
| Line 69: | Line 76: | ||
|- | |- | ||
|{{center|[[File:KDC Bumper sprite.png]]}} | |{{center|[[File:KDC Bumper sprite.png]]}} | ||
|Bumper | |[[Bumper]] | ||
|- | |- | ||
|{{center|[[File:KDC Kick Panel sprite.png]]}} | |{{center|[[File:KDC Kick Panel sprite.png]]}} | ||
|[[Kick Panel]] | |[[Kick Panel]] | ||
|} | |} | ||
== Gallery == | |||
<gallery> | |||
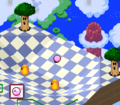
KDC Course 1 Hole 2 screenshot 01.png|Making the first move toward the Kick Panel | |||
KDC Course 1 Hole 2 screenshot 02.png|Rolling around the Kabu in the back | |||
</gallery> | |||
{{clear}} | {{clear}} | ||
{{Navbox- | {{Navbox-KDC}} | ||
[[Category:Course 1 holes]] | [[Category:Course 1 holes]] | ||
Latest revision as of 13:31, 21 September 2022
| ||||||||||
| ||||||||||
|
| ||||||||||


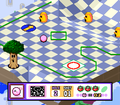
Course 1 - Hole 2 is the second hole of Course 1 in Kirby's Dream Course. It features a small slightly hilly landscape and introduces the Kick Panel.
Summary[edit]
This is a small hole taking place on a rectangular platform with mild slopes in the upper-right region creating a basin and bumpers guarding the lower-left. A small bumper island can be found in the middle between the flat area and the hilly region, which creates a potential split path. Kirby starts in the lower-most portion of the bumper area in a relatively isolated spot, and his targets are three Kabu which occupy the spaces above him; one being found just on the edge of the basin next to a Kick Panel and the other two inside the basin next to each-other. Three Whispy Woods can also be found on the course, but they can be ignored. Completing this hole is a straightforward matter if Kirby aims for the Kick Panel and plans his subsequent curve into the basin well enough.
Extra Game[edit]
In the Extra Game, the three Kabu are moved around to create a more difficult line-up, particularly since one of them has been moved all the way to the top of the slope on the upper-right portion of the board. One of the Whispy Woods has been moved into the basin, with a Gordo taking his place just outside the bumper walls. The Gordo's position makes him inconsequential to the hole strategy.
Enemies[edit]
|
Obstacles[edit]
| Sprite | Obstacle |
|---|---|
| Bumper | |
| Kick Panel |
Gallery[edit]
Making the first move toward the Kick Panel
Rolling around the Kabu in the back

