Course 2 - Hole 1: Difference between revisions
(Created page with "{{image|screenshots}} {{Infobox-KDCHole |image= 300px |caption= Composite map of '''Course 2 - Hole 1''' from ''Kirby's Dream Course''...") |
mNo edit summary |
||
| (7 intermediate revisions by 2 users not shown) | |||
| Line 1: | Line 1: | ||
{{Infobox-KDCHole | {{Infobox-KDCHole | ||
|image= [[File:KDC Course 2 Hole 1 map.png|300px]] | |image= | ||
|caption= Composite | <tabs> | ||
<tab name="Main Game"> | |||
[[File:KDC Course 2 Hole 1 map.png|300px]] | |||
</tab> | |||
<tab name="Extra Game"> | |||
[[File:KDC Course 2 Hole 1 extra map.png|300px]] | |||
</tab> | |||
</tabs> | |||
|caption= Composite maps of '''Course 2 - Hole 1''' from ''[[Kirby's Dream Course]]''. | |||
|course= [[Course 2]] | |course= [[Course 2]] | ||
|ability= None | |ability= None | ||
| Line 11: | Line 18: | ||
== Summary == | == Summary == | ||
The hole is a long rectangular platform with heavy embankments around the edges featuring [[bunker]]s which [[Kirby]] should not have to concern himself with, as all of the action should ideally take place in the narrow trench along the center. Kirby starts at the upper-left end of the trench, and three enemies lay down the line in front of him. Two of these enemies - [[Gaspar]] and [[Mr. P. Umpkin]] float off the ground, meaning Kirby will need to make a fly shot to hit them. If he overshoots, there is a [[Kick Panel]] on the other side of the trench that can push him back. | The hole is a long rectangular platform with heavy embankments around the edges featuring [[bunker]]s which [[Kirby]] should not have to concern himself with, as all of the action should ideally take place in the narrow trench along the center. Kirby starts at the upper-left end of the trench, and three enemies lay down the line in front of him. Two of these enemies - [[Gaspar]] and [[Mr. P. Umpkin]] - float off the ground, meaning Kirby will need to make a fly shot to hit them. If he overshoots, there is a [[Kick Panel]] on the other side of the trench that can push him back. | ||
=== Extra Game === | === Extra Game === | ||
| Line 79: | Line 86: | ||
|[[Kick Panel]] | |[[Kick Panel]] | ||
|} | |} | ||
== Gallery == | |||
<gallery> | |||
KDC Course 2 Hole 1 screenshot 01.png|Preparing a shot which will hit all of the flying foes | |||
KDC Course 2 Hole 1 screenshot 02.png|Moving toward the last enemy, transforming into the cup | |||
</gallery> | |||
{{clear}} | {{clear}} | ||
{{Navbox- | {{Navbox-KDC}} | ||
[[Category:Course 2 holes]] | [[Category:Course 2 holes]] | ||
Latest revision as of 12:24, 21 September 2022
| ||||||||||
| ||||||||||
|
| ||||||||||


Course 2 - Hole 1 is the first hole of Course 2 in Kirby's Dream Course. It takes place on a long straight board featuring a line of enemies at varying heights from the ground. The hole serves to introduce flying enemies and the sand bunker.
Summary[edit]
The hole is a long rectangular platform with heavy embankments around the edges featuring bunkers which Kirby should not have to concern himself with, as all of the action should ideally take place in the narrow trench along the center. Kirby starts at the upper-left end of the trench, and three enemies lay down the line in front of him. Two of these enemies - Gaspar and Mr. P. Umpkin - float off the ground, meaning Kirby will need to make a fly shot to hit them. If he overshoots, there is a Kick Panel on the other side of the trench that can push him back.
Extra Game[edit]
In the Extra Game, Kirby's start position is moved to the middle of the trench, pushing Gaspar and Mr. P. Umpkin back to the right side and replacing Squishy with Waddle Dee, who now sits where the main game starting point is. Other than that, the board is the same.
Enemies[edit]
|
Obstacles[edit]
| Sprite | Obstacle |
|---|---|
| Bunker | |
| Kick Panel |
Gallery[edit]
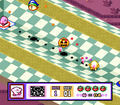
Preparing a shot which will hit all of the flying foes
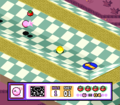
Moving toward the last enemy, transforming into the cup

