Course 3 - Hole 3: Difference between revisions
mNo edit summary |
mNo edit summary |
||
| (5 intermediate revisions by 2 users not shown) | |||
| Line 1: | Line 1: | ||
{{Infobox-KDCHole | {{Infobox-KDCHole | ||
|image= | |image= | ||
| Line 16: | Line 15: | ||
|next= [[Course 3 - Hole 4]] | |next= [[Course 3 - Hole 4]] | ||
}} | }} | ||
'''Course 3 - Hole 3''' is the third hole of [[Course 3]] in ''[[Kirby's Dream Course]]''. It takes place in a small area defined by two encirclements of | '''Course 3 - Hole 3''' is the third hole of [[Course 3]] in ''[[Kirby's Dream Course]]''. It takes place in a small area defined by two encirclements of [[bumper]]s. | ||
== Summary == | == Summary == | ||
The hole consists of a small rectangular board, on which are two separate areas which are mostly encircled by bumper walls. [[Kirby]] starts in the left of these bumper-bordered areas along with a [[Broom Hatter|Broomhatter]] and [[Whispy Woods]]. In the right encirclement are two more Broomhatters. Two [[Gordo]]s can be seen further right outside of the bumper walls. Each encirclement also contains a small dimple in the terrain which may be useful for launching Kirby from one to the other. | The hole consists of a small rectangular board, on which are two separate areas which are mostly encircled by [[bumper]] walls. [[Kirby]] starts in the left of these bumper-bordered areas along with a [[Broom Hatter|Broomhatter]] and [[Whispy Woods]]. In the right encirclement are two more Broomhatters. Two [[Gordo]]s can be seen further right outside of the bumper walls. Each encirclement also contains a small dimple in the terrain which may be useful for launching Kirby from one to the other. | ||
=== Extra Game === | === Extra Game === | ||
| Line 82: | Line 81: | ||
|- | |- | ||
|{{center|[[File:KDC Bumper sprite.png]]}} | |{{center|[[File:KDC Bumper sprite.png]]}} | ||
|Bumper | |[[Bumper]] | ||
|} | |} | ||
== Gallery == | |||
<gallery> | |||
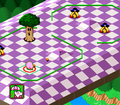
KDC Course 3 Hole 3 screenshot 01.png|Surveying the surrounding board | |||
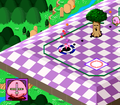
KDC Course 3 Hole 3 screenshot 02.png|Planning a leap over Whispy Woods | |||
</gallery> | |||
{{clear}} | {{clear}} | ||
{{Navbox- | {{Navbox-KDC}} | ||
[[Category:Course 3 holes]] | [[Category:Course 3 holes]] | ||
Latest revision as of 21:15, 21 September 2022
| ||||||||||
| ||||||||||
|
| ||||||||||


Course 3 - Hole 3 is the third hole of Course 3 in Kirby's Dream Course. It takes place in a small area defined by two encirclements of bumpers.
Summary[edit]
The hole consists of a small rectangular board, on which are two separate areas which are mostly encircled by bumper walls. Kirby starts in the left of these bumper-bordered areas along with a Broomhatter and Whispy Woods. In the right encirclement are two more Broomhatters. Two Gordos can be seen further right outside of the bumper walls. Each encirclement also contains a small dimple in the terrain which may be useful for launching Kirby from one to the other.
Extra Game[edit]
In the Extra Game, Kirby starts inside the small opening in the left-hand bumper encirclement. In the left pocket is a Gordo and a Starman, and in the right is another Gordo and a Broomhatter. All other enemies are removed.
Enemies[edit]
|
Obstacles[edit]
| Sprite | Obstacle |
|---|---|
| Bumper |
Gallery[edit]
Surveying the surrounding board
Planning a leap over Whispy Woods

