Dangerous Dinner - Stage 1: Difference between revisions
mNo edit summary |
GetPunnedOn (talk | contribs) (→Another Dimension rift: Revised reversion, as this section of the rift is unique as there are no gigatzos that endanger you.) |
||
| (9 intermediate revisions by 7 users not shown) | |||
| Line 5: | Line 5: | ||
|super=[[Snow Bowl]] | |super=[[Snow Bowl]] | ||
|sphere=5 | |sphere=5 | ||
|midboss=[[Water Galboros]], [[Sphere Doomer]] ( | |midboss=[[Water Galboros]], [[Sphere Doomer]] (Ice) | ||
|theme music=[[File:KRtDL Haldera Volcano Sample.oga]] | |||
|theme title="[[Haldera Volcano (theme)|Haldera Volcano]]" | |||
|description=Clip of the theme that primarily plays in Dangerous Dinner - Stage 1. | |||
|previousstage=[[Egg Engines - Stage 6]] | |previousstage=[[Egg Engines - Stage 6]] | ||
|nextstage=[[Dangerous Dinner - Stage 2]] | |nextstage=[[Dangerous Dinner - Stage 2]] | ||
}} | }} | ||
'''Dangerous Dinner - Stage 1''' (simply called '''Stage 1''' or '''7-1''' in-game) is the first stage of [[Dangerous Dinner]] in ''Kirby's Return to Dream Land'' and its remake—''[[Kirby's Return to Dream Land Deluxe]]''. There are five [[Energy Sphere]]s in this stage. | '''Dangerous Dinner - Stage 1''' (simply called '''Stage 1''' or '''7-1''' in-game) is the first stage of [[Dangerous Dinner]] in ''[[Kirby's Return to Dream Land]]'' and its remake—''[[Kirby's Return to Dream Land Deluxe]]''. There are five [[Energy Sphere]]s in this stage. | ||
==Overview== | ==Overview== | ||
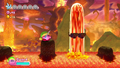
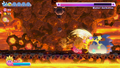
[[File:KRtDLD Dangerous Dinner Stage 1 screenshot 04.png|thumb|250px|Kirby narrowly avoids becoming a snack for a giant Iron Barbar emerging from the lava.]] | [[File:KRtDLD Dangerous Dinner Stage 1 screenshot 04.png|thumb|left|250px|Kirby narrowly avoids becoming a snack for a giant Iron Barbar emerging from the lava.]] | ||
Kirby begins this trek over a volcanic plain, with pools of gushing lava up ahead. Kirby will need to be careful as he crosses these pools, or he will find himself cooked well-done. | Kirby begins this trek over a volcanic plain, with pools of gushing lava up ahead. Kirby will need to be careful as he crosses these pools, or he will find himself cooked well-done. | ||
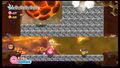
From there, Kirby finds himself in an underground tunnel leading diagonally downward. Here, Kirby will need to keep ahead of a number of magmatic [[boulder]]s rolling his way. | From there, Kirby finds himself in an underground tunnel leading diagonally downward. Here, Kirby will need to keep ahead of a number of magmatic [[boulder]]s rolling his way. | ||
The following area is another cave, where a great many [[Flamer]]s appear to greet our pink hero. | The following area is another cave, where a great many [[Flamer]]s appear to greet our pink hero. Past them, Kirby will have to contend with a [[Water Galboros]] while a [[Shotzo]] fires at him. After this [[Mid-Boss]] is defeated, Kirby can progress past a series of magma beds to reach the next area. | ||
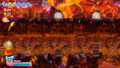
Kirby then finds himself in a more open area, with a thin path leading above a bed of magma. As Kirby progresses, he will need to watch out for the giant [[Iron Barbar]]s that want to gobble him up from below. | Kirby then finds himself in a more open area, with a thin path leading above a bed of magma. As Kirby progresses, he will need to watch out for the giant [[Iron Barbar]]s that want to gobble him up from below. | ||
| Line 24: | Line 27: | ||
===Another Dimension rift=== | ===Another Dimension rift=== | ||
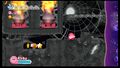
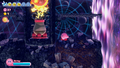
Kirby will need to progress to the left past a series of firing cannons, mostly [[Gigatzo]]s. Kirby will need to dislodge many of these cannons to make progress, while simply avoiding the others (and their effects). At the end of the path, Kirby will have to battle an icy [[Sphere Doomer]] while a Gigatzo fires upward from the floor. Once these are defeated, Kirby can exit the rift and find the stage exit to the left. | Kirby will need to progress to the left past a series of firing cannons, mostly [[Gigatzo]]s. Kirby will need to dislodge many of these cannons to make progress, while simply avoiding the others (and their effects). Afterwards, Kirby must pull down a series of switches, with crushing mechanisims in between. At the end of the path, Kirby will have to battle an icy [[Sphere Doomer]] while a Gigatzo fires upward from the floor. Once these are defeated, Kirby can exit the rift and find the stage exit to the left. | ||
===Energy Sphere guide=== | ===Energy Sphere guide=== | ||
| Line 70: | Line 73: | ||
| | | | ||
{{col-begin|width=50%}} | {{col-begin|width=50%}} | ||
*[[Sphere Doomer]] ( | *[[Sphere Doomer]] (Ice) | ||
*[[Water Galboros]] | *[[Water Galboros]] | ||
{{col-end}} | {{col-end}} | ||
| Line 110: | Line 113: | ||
KRtDL Dangerous Dinner Stage 1-2.jpg|Snow Bowl Kirby freezes a volcano solid. | KRtDL Dangerous Dinner Stage 1-2.jpg|Snow Bowl Kirby freezes a volcano solid. | ||
KRtDL Dangerous Dinner Stage 1-3.jpg|Gigatzo firing creates a crushing hazard for Kirby to contend with. | KRtDL Dangerous Dinner Stage 1-3.jpg|Gigatzo firing creates a crushing hazard for Kirby to contend with. | ||
KRTDL-map-B-7-1.jpg|Stage map | |||
</gallery> | </gallery> | ||
Latest revision as of 23:59, 21 August 2023
| ||||||||||||||
| ||||||||||||||
| ||||||||||||||
|
| ||||||||||||||

Dangerous Dinner - Stage 1 (simply called Stage 1 or 7-1 in-game) is the first stage of Dangerous Dinner in Kirby's Return to Dream Land and its remake—Kirby's Return to Dream Land Deluxe. There are five Energy Spheres in this stage.
Overview[edit]

Kirby begins this trek over a volcanic plain, with pools of gushing lava up ahead. Kirby will need to be careful as he crosses these pools, or he will find himself cooked well-done.
From there, Kirby finds himself in an underground tunnel leading diagonally downward. Here, Kirby will need to keep ahead of a number of magmatic boulders rolling his way.
The following area is another cave, where a great many Flamers appear to greet our pink hero. Past them, Kirby will have to contend with a Water Galboros while a Shotzo fires at him. After this Mid-Boss is defeated, Kirby can progress past a series of magma beds to reach the next area.
Kirby then finds himself in a more open area, with a thin path leading above a bed of magma. As Kirby progresses, he will need to watch out for the giant Iron Barbars that want to gobble him up from below.
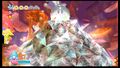
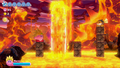
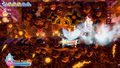
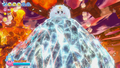
In the following area, Kirby can obtain the Snow Bowl ability. Using this, he can ride up several slopes, hitting igneous bowling pins and several enemies along the way. Up top, Kirby can insert himself into a caldera and freeze it solid, bursting the structure and revealing the rift to Another Dimension.
Another Dimension rift[edit]
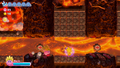
Kirby will need to progress to the left past a series of firing cannons, mostly Gigatzos. Kirby will need to dislodge many of these cannons to make progress, while simply avoiding the others (and their effects). Afterwards, Kirby must pull down a series of switches, with crushing mechanisims in between. At the end of the path, Kirby will have to battle an icy Sphere Doomer while a Gigatzo fires upward from the floor. Once these are defeated, Kirby can exit the rift and find the stage exit to the left.
Energy Sphere guide[edit]
- In the first cavern, Kirby can find a key while running down the crumbling hall. Carrying the key past this area will allow Kirby to unlock a gate containing the first sphere and a 1-Up.
- In the second cavern, after defeating Water Galboros, Kirby can use the Water ability to safely escort another key across a magma floor. On the other side, a gate can be unlocked to reach a side chamber. In here, another Water-based challenge will need to be solved to get the second sphere.
- Along the Iron Barbar walkway, one of them guards a Bomb Block barrier which, when destroyed, will reveal a door to a side chamber. In there, Kirby will need to guide a Key Dee across a series of gaps in order to get its key and obtain the sphere.
- The last two spheres can be obtained from the Sphere Doomer at the end of the rift.
Enemies, Mid-Bosses and abilities[edit]
| Regular Enemies | Mid-Bosses | ||||
|---|---|---|---|---|---|
|
| ||||
| Abilities | Super Ability | ||||
|
|
|
*Only appears in Extra Mode in Kirby's Return to Dream Land Deluxe
Gallery[edit]
Kirby's Return to Dream Land[edit]
Kirby times his progression through the lava fields.
Kirby keeps on his feet to avoid being intercepted by a magma boulder.
Snow Bowl Kirby freezes a volcano solid.
Gigatzo firing creates a crushing hazard for Kirby to contend with.
Stage map


Kirby's Return to Dream Land Deluxe[edit]
Kirby patiently waits for the spewing lava geyser to settle down.
Kirby runs for the key before it and he are flattened by falling boulders.
Kirby uses the Golem Smasher on Water Galboros.
Kirby helps get a Key Dee to its destination in a side room.
Snow Bowl Kirby rushes through an opening.
Kirby freezes a volcano solid.
Kirby waits for an opportunity to pass the pillar being forced downward by the recoil of a Gigatzo's firing.


Video walkthroughs[edit]
100% walkthrough of Dangerous Dinner - Stage 1 in Kirby's Return to Dream Land.
|
100% walkthrough of Dangerous Dinner - Stage 1 in Extra Mode in Kirby's Return to Dream Land Deluxe.
|