Egg Engines - Stage 5: Difference between revisions
m (Text replacement - "{{Good}}" to "") |
|||
| (14 intermediate revisions by 9 users not shown) | |||
| Line 1: | Line 1: | ||
{{Infobox-KRtDLStage | {{Infobox-KRtDLStage | ||
| image = [[File: | |image=[[File:KRtDLD Egg Engines Stage 5 select screenshot.png|350px]] | ||
| caption = | |caption='''Egg Engines - Stage 5''' in the [[level hub]]. | ||
| level = [[Egg Engines]] | |level=[[Egg Engines]] | ||
| super = | |super={{N}} | ||
| sphere = 5 | |sphere=5 | ||
| midboss = | |midboss={{N}} | ||
| previousstage = [[Egg Engines - Stage 4]] | |theme music=[[File:The Birthplace of Steel sample KRtDL.oga]] | ||
| nextstage = [[Egg Engines - Stage 6 | |theme title="[[The Birthplace of Steel]]" | ||
|description=Clip of the theme that primarily plays in Egg Engines - Stage 5. | |||
|previousstage=[[Egg Engines - Stage 4]] | |||
|nextstage=[[Egg Engines - Stage 6]] | |||
}} | }} | ||
'''Egg Engines - Stage 5''' is the fifth stage of [[Egg Engines]] in ''Kirby's Return to Dream Land''. There are five [[Energy Sphere]]s in this stage. | '''Egg Engines - Stage 5''' (simply called '''Stage 5''' or '''6-5''' in-game) is the fifth stage of [[Egg Engines]] in ''[[Kirby's Return to Dream Land]]'' and its remake—''[[Kirby's Return to Dream Land Deluxe]]''. There are five [[Energy Sphere]]s in this stage. | ||
==Overview== | ==Overview== | ||
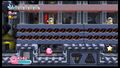
The stage begins in the factory interior, where Halcandle | [[File:KRtDLD Egg Engines Stage 5 screenshot 02.png|thumb|left|250px|This area features many rooms where ceilings come down and threaten to crush Kirby, requiring him to find pockets to hide in.]] | ||
The stage begins in the factory interior, where [[Halcandle Dee]]s can be seen running on some small conveyor belts. Further down the hall, a [[Waddle Doo]] can be swallowed for the [[Beam]] ability. Past that is a room where a large piston slowly presses the floor. More enemies and pistons are encountered as the hall continues to the right. At the end, a ceiling [[switch]] can be used to cause a piston to fall and crush a mass of hapless Halcandles guarding the doorway. Afterward, Kirby can nab a [[1-Up]] that appears in the piston. | |||
Kirby finds himself in a crushing chamber, and will have to dodge many falling platforms from the ceiling, lest he become a pink pancake. The door appears after enough crushers are dodged. | Kirby next finds himself in a crushing chamber, and will have to dodge many falling platforms from the ceiling, lest he become a pink pancake. The door appears after enough crushers are dodged. | ||
The next area has Kirby traversing several elevated platforms with conveyors on them over a long | The next area has Kirby traversing several elevated platforms with conveyors on them over a long [[bottomless pit]]. As the path progresses, the pit gives way to a super-fast conveyor belt which occasionally yields enemies zipping past along it. | ||
Kirby finds himself in another crushing room. He will need to avoid five more falling ceilings in more elaborate patterns before the door appears. | Kirby next finds himself in another crushing room. He will need to avoid five more falling ceilings in more elaborate patterns before the door appears. | ||
In the following area, Kirby will need to pass through several passages with lines of [[Gordo]]s and other enemies in the way. An [[Invisibility Stone]] can be found along the path, nullifying most of the hazards. Kirby can find the door at the bottom of this area. | In the following area, Kirby will need to pass through several passages with lines of [[Gordo]]s and other enemies in the way. An [[Invisibility Stone]] can be found along the path, nullifying most of the hazards. Kirby can find the door at the bottom of this area. | ||
Kirby finds himself in one more crushing room. This time, he will need to pass through a gap in the first falling ceiling, then avoid a second, then jump back down as both rise again to avoid getting crushed in the ceiling. The last series of crushers come down one-by-one forcing Kirby to the left. The stage exit then appears to the right as the last | Kirby finds himself in one more crushing room. This time, he will need to pass through a gap in the first falling ceiling, then avoid a second, then jump back down as both rise again to avoid getting crushed in the ceiling. The last series of crushers come down one-by-one forcing Kirby to the left. The stage exit then appears to the right as the last ones come down. | ||
===HAL Room | ===HAL Room=== | ||
Much like in [[Cookie Country]], there is a secret | Much like in [[Cookie Country - Stage 4]], there is a secret [[HAL Room]] in this stage. From the third room (with the conveyor belts) at the far end of the area, a conveyor brings down several Halcandle Dees from a chamber in the ceiling above the normal door. If Kirby goes to this chamber, there is a hidden doorway to the far right. The door leads to an exterior part of the factory, though still walled in. Kirby will need to make use of a few cannons and attempt to grab items that fall from barriers in the ceiling that break. At the far right, a Star Block formation in the shape of the word 'HAL' can be found, along with a Waddle Dee and Copy Essences for the [[Whip]], [[Water]], [[Leaf]] and [[Spear]] abilities. In ''Kirby's Return to Dream Land Deluxe'', two [[Don Puffle]]s are also present. Breaking the star blocks yields several tasty collectibles. A door to the right of this formation will take Kirby to the next intended room. | ||
In ''Kirby's Return to Dream Land'', the original [[Green Greens]] music plays in this room. However in ''Kirby's Return to Dream Land Deluxe'', this is instead replaced with the title screen and menu music from [[Scope Shot]], which was removed from the remake. | |||
==Enemies, Mid-Bosses and | ===Energy Sphere guide=== | ||
*In the first crushing room, the first sphere can be found to the left riding alongside one of the openings to the last crushing platform. | |||
*In the conveyor area, a round-trip door can be found guarded by an [[Armor Waddle Dee]] leading to a room where Kirby must convey a [[Key]] through some [[Gordo]]s to unlock a gate and get the second sphere. | |||
*In the second crushing room, the third sphere can be found high up in the nook of one of the falling platforms. | |||
*In the [[Invisibility Stone]] area, Kirby will need to pass through a crystal gate near the bottom and obtain the fourth sphere from behind some [[Degout]]s on guard. | |||
*In the final crushing room, the last sphere appears in the air as the last ceilings come down. Kirby will need to grab it before it is made unobtainable. | |||
==Enemies, Mid-Bosses and abilities== | |||
{| style="border: 3px solid #E47575; {{round}};background: #F69D99" cellspacing="2" | {| style="border: 3px solid #E47575; {{round}};background: #F69D99" cellspacing="2" | ||
! width="420px" | '''Regular Enemies''' | ! width="420px" | '''Regular Enemies''' | ||
| Line 43: | Line 48: | ||
{{col-begin}} | {{col-begin}} | ||
{{col-break|width=33%}} | {{col-break|width=33%}} | ||
*[[Armor Dee]] | *[[Armor Waddle Dee]] | ||
*[[Armoroid]] <small>(KRtDLD only)</small> | |||
*[[Bouncy]] | *[[Bouncy]] | ||
*[[Bowby]] | *[[Bowby]] | ||
| Line 49: | Line 55: | ||
*[[Broom Hatter]] | *[[Broom Hatter]] | ||
*[[Degout]] | *[[Degout]] | ||
*[[Don Puffle]] <small>(KRtDLD only)</small> | |||
{{col-break|width=33%}} | |||
*[[Galbo]] | *[[Galbo]] | ||
*[[Gigatzo]] | *[[Gigatzo]] | ||
*[[Gordo]] | *[[Gordo]] | ||
| Line 60: | Line 67: | ||
{{col-break|width=34%}} | {{col-break|width=34%}} | ||
*[[Rocky]] | *[[Rocky]] | ||
*[[Sandran]] <small>(KRtDLD only)</small> | |||
*[[Shelt]] | *[[Shelt]] | ||
*[[Sir Kibble]] | *[[Sir Kibble]] | ||
| Line 81: | Line 89: | ||
*[[Beam]] | *[[Beam]] | ||
*[[Cutter]] | *[[Cutter]] | ||
*[[Festival]] <small>(KRtDLD only)</small> | |||
*[[Fighter]] | *[[Fighter]] | ||
*[[Fire]] | *[[Fire]] | ||
*[[Leaf]] | *[[Leaf]] | ||
*[[Mecha]] <small>(KRtDLD only)</small> | |||
*[[Mike]] | *[[Mike]] | ||
{{col-break|width=50%}} | |||
*[[Needle]] | *[[Needle]] | ||
*[[Sand]] <small>(KRtDLD only)</small> | |||
*[[Sleep]] | *[[Sleep]] | ||
*[[Spear]] | *[[Spear]] | ||
| Line 99: | Line 110: | ||
{{col-end}} | {{col-end}} | ||
|} | |} | ||
== Trivia == | |||
* In ''Kirby's Return to Dream Land'', the track "[[VS. Robo Dedede|Pressure Panic]]" plays in all three crushing rooms. However, in ''Kirby's Return to Dream Land Deluxe'', the track "[[Heavy Lobster (theme)|Climactic Clash! Robo Dedede]]" - a remix of the Heavy Lobster theme from ''[[Kirby Super Star Ultra]]'' - plays during the third crushing room instead. This particular remix of the theme was taken from [[Scope Shot]], which does not appear in ''Kirby's Return to Dream Land Deluxe''. | |||
==Gallery== | ==Gallery== | ||
=== ''Kirby's Return to Dream Land'' === | |||
<gallery> | <gallery> | ||
KRtDL Egg Engines Stage 5-1.jpg|Kirby waits in a tight space. | KRtDL Egg Engines Stage 5-1.jpg|Kirby waits in a tight space. | ||
KRtDL Egg Engines Stage 5-2.jpg|Kirby shows Armor Dee it still can be inhaled. | KRtDL Egg Engines Stage 5 screenshot.png|Kirby seeks to avoid becoming a pancake. | ||
KRtDL Egg Engines Stage 5-2.jpg|Kirby shows Armor Waddle Dee it still can be inhaled. | |||
KRtDL Egg Engines Stage 5-3.jpg|Kirby gets engulfed by a Gigatzo's fire. | KRtDL Egg Engines Stage 5-3.jpg|Kirby gets engulfed by a Gigatzo's fire. | ||
KRTDL-map-B-6-5.jpg|Stage map | |||
</gallery> | |||
=== ''Kirby's Return to Dream Land Deluxe'' === | |||
<gallery> | |||
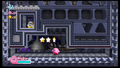
KRtDLD Egg Engines Stage 5 screenshot 01.png|Kirby bides his time waiting for the crusher to lift back up. | |||
KRtDLD Egg Engines Stage 5 screenshot 03.png|Kirby hops along isolated conveyor belt platforms over a yawning abyss. | |||
KRtDLD Egg Engines Stage 5 screenshot 04.png|Kirby tosses a key that he intends to pick up again soon in a side room. | |||
KRtDLD Egg Engines Stage 5 screenshot 05.png|Kirby makes his way to the door before the Halcandle Dees can reach him. | |||
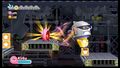
KRtDLD Egg Engines Stage 5 screenshot 06.png|Kirby floats up to quickly nab an Energy Sphere that was brought down with another crusher. | |||
KRtDLD Egg Engines Stage 5 screenshot 07.png|Kirby uses an Invisibility Stone to slip by a wall of Gordos. | |||
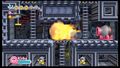
KRtDLD Egg Engines Stage 5 screenshot 08.png|Kirby moves quickly to the Goal Door before the last crushers can come down on him. | |||
</gallery> | </gallery> | ||
==Video | ==Video walkthroughs== | ||
{{Youtube|nKov74BZakc|300|100% walkthrough of Egg Engines - Stage 5.}} | {{Youtube|nKov74BZakc|300|100% walkthrough of Egg Engines - Stage 5 in ''Kirby's Return to Dream Land''.}} | ||
{{Youtube|lGB1wCP1yTM|300|100% walkthrough of Egg Engines - Stage 5 in Extra Mode in ''Kirby's Return to Dream Land Deluxe'' (including the HAL Room).}} | |||
{{clear}} | {{clear}} | ||
{{Navbox-KRtDL/KRtDLD}} | {{Navbox-KRtDL/KRtDLD}} | ||
Latest revision as of 15:06, 17 August 2023
| ||||||||||||||
| ||||||||||||||
| ||||||||||||||
|
| ||||||||||||||

Egg Engines - Stage 5 (simply called Stage 5 or 6-5 in-game) is the fifth stage of Egg Engines in Kirby's Return to Dream Land and its remake—Kirby's Return to Dream Land Deluxe. There are five Energy Spheres in this stage.
Overview[edit]

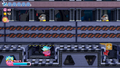
The stage begins in the factory interior, where Halcandle Dees can be seen running on some small conveyor belts. Further down the hall, a Waddle Doo can be swallowed for the Beam ability. Past that is a room where a large piston slowly presses the floor. More enemies and pistons are encountered as the hall continues to the right. At the end, a ceiling switch can be used to cause a piston to fall and crush a mass of hapless Halcandles guarding the doorway. Afterward, Kirby can nab a 1-Up that appears in the piston.
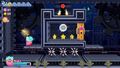
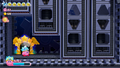
Kirby next finds himself in a crushing chamber, and will have to dodge many falling platforms from the ceiling, lest he become a pink pancake. The door appears after enough crushers are dodged.
The next area has Kirby traversing several elevated platforms with conveyors on them over a long bottomless pit. As the path progresses, the pit gives way to a super-fast conveyor belt which occasionally yields enemies zipping past along it.
Kirby next finds himself in another crushing room. He will need to avoid five more falling ceilings in more elaborate patterns before the door appears.
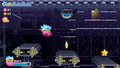
In the following area, Kirby will need to pass through several passages with lines of Gordos and other enemies in the way. An Invisibility Stone can be found along the path, nullifying most of the hazards. Kirby can find the door at the bottom of this area.
Kirby finds himself in one more crushing room. This time, he will need to pass through a gap in the first falling ceiling, then avoid a second, then jump back down as both rise again to avoid getting crushed in the ceiling. The last series of crushers come down one-by-one forcing Kirby to the left. The stage exit then appears to the right as the last ones come down.
HAL Room[edit]
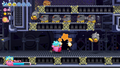
Much like in Cookie Country - Stage 4, there is a secret HAL Room in this stage. From the third room (with the conveyor belts) at the far end of the area, a conveyor brings down several Halcandle Dees from a chamber in the ceiling above the normal door. If Kirby goes to this chamber, there is a hidden doorway to the far right. The door leads to an exterior part of the factory, though still walled in. Kirby will need to make use of a few cannons and attempt to grab items that fall from barriers in the ceiling that break. At the far right, a Star Block formation in the shape of the word 'HAL' can be found, along with a Waddle Dee and Copy Essences for the Whip, Water, Leaf and Spear abilities. In Kirby's Return to Dream Land Deluxe, two Don Puffles are also present. Breaking the star blocks yields several tasty collectibles. A door to the right of this formation will take Kirby to the next intended room.
In Kirby's Return to Dream Land, the original Green Greens music plays in this room. However in Kirby's Return to Dream Land Deluxe, this is instead replaced with the title screen and menu music from Scope Shot, which was removed from the remake.
Energy Sphere guide[edit]
- In the first crushing room, the first sphere can be found to the left riding alongside one of the openings to the last crushing platform.
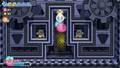
- In the conveyor area, a round-trip door can be found guarded by an Armor Waddle Dee leading to a room where Kirby must convey a Key through some Gordos to unlock a gate and get the second sphere.
- In the second crushing room, the third sphere can be found high up in the nook of one of the falling platforms.
- In the Invisibility Stone area, Kirby will need to pass through a crystal gate near the bottom and obtain the fourth sphere from behind some Degouts on guard.
- In the final crushing room, the last sphere appears in the air as the last ceilings come down. Kirby will need to grab it before it is made unobtainable.
Enemies, Mid-Bosses and abilities[edit]
| Regular Enemies | Mid-Boss | ||||
|---|---|---|---|---|---|
|
| ||||
| Abilities | Super Ability | ||||
|
|
|
Trivia[edit]
- In Kirby's Return to Dream Land, the track "Pressure Panic" plays in all three crushing rooms. However, in Kirby's Return to Dream Land Deluxe, the track "Climactic Clash! Robo Dedede" - a remix of the Heavy Lobster theme from Kirby Super Star Ultra - plays during the third crushing room instead. This particular remix of the theme was taken from Scope Shot, which does not appear in Kirby's Return to Dream Land Deluxe.
Gallery[edit]
Kirby's Return to Dream Land[edit]
Kirby waits in a tight space.
Kirby seeks to avoid becoming a pancake.
Kirby shows Armor Waddle Dee it still can be inhaled.
Kirby gets engulfed by a Gigatzo's fire.
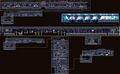
Stage map


Kirby's Return to Dream Land Deluxe[edit]
Kirby bides his time waiting for the crusher to lift back up.
Kirby hops along isolated conveyor belt platforms over a yawning abyss.
Kirby tosses a key that he intends to pick up again soon in a side room.
Kirby makes his way to the door before the Halcandle Dees can reach him.
Kirby floats up to quickly nab an Energy Sphere that was brought down with another crusher.
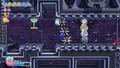
Kirby uses an Invisibility Stone to slip by a wall of Gordos.
Kirby moves quickly to the Goal Door before the last crushers can come down on him.


Video walkthroughs[edit]
100% walkthrough of Egg Engines - Stage 5 in Kirby's Return to Dream Land.
|
100% walkthrough of Egg Engines - Stage 5 in Extra Mode in Kirby's Return to Dream Land Deluxe (including the HAL Room).
|