White Wafers - Stage 2: Difference between revisions
Jellytost♡ (talk | contribs) mNo edit summary |
m (Minor fix) |
||
| (11 intermediate revisions by 5 users not shown) | |||
| Line 1: | Line 1: | ||
{{Infobox-KRtDLStage | {{Infobox-KRtDLStage | ||
|image=[[File: | |image=[[File:KRtDLD White Wafers Stage 2 select screenshot.png|350px]] | ||
|caption= | |caption='''White Wafers - Stage 2''' in the [[level hub]]. | ||
|level=[[White Wafers]] | |level=[[White Wafers]] | ||
|super=[[Grand Hammer]] | |super=[[Grand Hammer]] | ||
|sphere=4 | |sphere=4 | ||
|midboss=[[Super Bonkers]], [[Sphere Doomer]] ( | |midboss=[[Super Bonkers]], [[Sphere Doomer]] (Spark) | ||
|theme music=[[File:On the Path of Frosty Roadblocks sample KRtDL.oga]] | |||
|theme title="[[On the Path of Frosty Roadblocks]]" | |||
|description=Clip of the theme that primarily plays in White Wafers - Stage 2. | |||
|previousstage=[[White Wafers - Stage 1]] | |previousstage=[[White Wafers - Stage 1]] | ||
|nextstage=[[White Wafers - Stage 3]] | |nextstage=[[White Wafers - Stage 3]] | ||
}} | }} | ||
'''White Wafers - Stage 2''' (simply called '''Stage 2''' or '''4-2''' in-game) is the second stage of [[White Wafers]] in ''[[Kirby's Return to Dream Land]]'' and its remake—''[[Kirby's Return to Dream Land Deluxe]]'', and marks the first appearance of the [[Grand Hammer]] [[Super Ability]]. There are four [[Energy Sphere]]s in this stage. | |||
'''White Wafers - Stage 2''' is the second stage of [[White Wafers]] in ''Kirby's Return to Dream Land'', and marks the first appearance of the [[Grand Hammer]] [[Super Ability]]. There are four [[Energy Sphere]]s in this stage. | |||
==Overview== | ==Overview== | ||
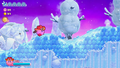
The stage begins out on the tundra, where Kirby will need to make his way past icy fissures spitting out [[Mopoo]] and snowmen prone to crumble atop him. At the end, a grotto can be found where Kirby can practice his [[Ninja]] skills. | [[File:KRtDLD White Wafers Stage 2 screenshot 03.png|thumb|left|250px|Fire Kirby ignites a fuse as he speeds past more frozen tunnels.]] | ||
The stage begins out on the tundra, where Kirby will need to make his way past icy fissures spitting out [[Mopoo]] and snowmen prone to crumble atop him. At the end, a grotto can be found where Kirby can practice his [[Ninja]] skills after swallowing the local [[Moonja]]. | |||
Through the door is an icy tunnel with lots of falling | Through the door is an icy tunnel with lots of falling [[icicle]]s. The path ahead is lined with foes, and a [[Cannon|Fuse Cannon]] can be found up ahead. Past that is the door forward. | ||
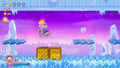
The path leads out of the cave, across a series of perilous icy slopes. Up ahead is a [[Stomper Boot]], which Kirby can use to traverse the numerous spike pits up ahead. At the end of this path, a number of [[Rocky|Rockies]] guarding the next door. | The path leads out of the cave, across a series of perilous icy slopes. Up ahead is a [[Stomper Boot]], which Kirby can use to traverse the numerous spike pits up ahead. At the end of this path, a number of [[Rocky|Rockies]] are guarding the next door. | ||
The next area is a sloped tunnel, where Kirby can try some [[Stone]] sliding. He will need to take care, however, as sliding for too long will lead to dangerous situations. | The next area is a sloped tunnel, where Kirby can try some [[Stone]] sliding. He will need to take care, however, as sliding for too long will lead to dangerous situations. | ||
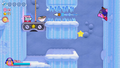
From there, the last tunnel can be accessed, starting with a fight against [[Super Bonkers]]. Defeating him yields the [[Grand Hammer]] ability, which Kirby will need if he wants to destroy the [[Strike Box]]es up ahead. Near the end of the tunnel, a pair of extra large boxes will need to be destroyed to reveal the rift to | From there, the last tunnel can be accessed, starting with a fight against [[Super Bonkers]]. Defeating him yields the [[Grand Hammer]] ability, which Kirby will need if he wants to destroy the [[Strike Box]]es up ahead. Near the end of the tunnel, a pair of extra large boxes will need to be destroyed to reveal the rift to [[Another Dimension]]. | ||
=== | ===Another Dimension rift=== | ||
Kirby will need to head to the right while using many [[ | Kirby will need to head to the right while using many [[key]]s on gates and spitting the hapless [[Waddle Dee]]s. The second half of this stretch involves a [[Crackler]], which Kirby can use to clear the [[Puppet Waddle Dee]]s and tall barriers they stand on. Once through the door, Kirby will need to do battle with an electric [[Sphere Doomer]] to clear this rift. | ||
From there, the stage exit can be found just to the right from where the rift appeared. | From there, the stage exit can be found just to the right from where the rift appeared. | ||
===Energy Sphere | ===Energy Sphere guide=== | ||
*In the initial ice cave, Kirby will need to use the [[Fire]] ability to light a [[Fuse]] behind an ice block barricade, then make it to the cannon up ahead. Taking the cannon leads to a room where Kirby will need to quickly make it through a gate, but mind the spikes on the other side to reach | *In the initial ice cave, Kirby will need to use the [[Fire]] ability to light a [[Fuse]] behind an ice block barricade, then make it to the cannon up ahead. Taking the cannon leads to a room where Kirby will need to quickly make it through a gate, but mind the spikes on the other side to reach the first sphere. | ||
*In the [[Stomper Boot]] section, Kirby can uncover a round-trip door by breaking some blocks in a spike pit. Inside the room, Kirby will need to use a series of rising [[Mopoo]] as stepping stones to reach the sphere up on the ledge. | *In the [[Stomper Boot]] section, Kirby can uncover a round-trip door by breaking some blocks in a spike pit. Inside the room, Kirby will need to use a series of rising [[Mopoo]] as stepping stones to reach the second sphere up on the ledge. | ||
*The last two spheres can be obtained from the [[Sphere Doomer]] at the end of the rift. | *The last two spheres can be obtained from the [[Sphere Doomer]] at the end of the rift. | ||
==Enemies, Mid-Bosses and | ==Enemies, Mid-Bosses and abilities== | ||
{| style="border: 3px solid #E47575; {{round}};background: #F69D99" cellspacing="2" | {| style="border: 3px solid #E47575; {{round}};background: #F69D99" cellspacing="2" | ||
! width="420px" | '''Regular Enemies''' | ! width="420px" | '''Regular Enemies''' | ||
| Line 42: | Line 44: | ||
{{col-begin}} | {{col-begin}} | ||
{{col-break|width=33%}} | {{col-break|width=33%}} | ||
*[[Armor Dee]] | *[[Armor Waddle Dee]] | ||
*[[Armoroid]] <small>(KRtDLD only)</small> | |||
*[[Bouncy]] | *[[Bouncy]] | ||
*[[Broom Hatter]] | *[[Broom Hatter]] | ||
| Line 48: | Line 51: | ||
*[[Como]] | *[[Como]] | ||
*[[Galbo]] | *[[Galbo]] | ||
{{col-break|width=33%}} | |||
*[[Gordo]] | *[[Gordo]] | ||
*[[Moonja]] | *[[Moonja]] | ||
*[[Mopoo]] | *[[Mopoo]] | ||
| Line 55: | Line 58: | ||
*[[Puppet Waddle Dee]] | *[[Puppet Waddle Dee]] | ||
*[[Rocky]] | *[[Rocky]] | ||
*[[Sandran]] <small>(KRtDLD only)</small> | |||
{{col-break|width=34%}} | |||
*[[Scarfy]] | *[[Scarfy]] | ||
*[[Shelt]] | *[[Shelt]] | ||
*[[Shotzo]] | *[[Shotzo]] | ||
| Line 66: | Line 70: | ||
| | | | ||
{{col-begin|width=50%}} | {{col-begin|width=50%}} | ||
*[[Sphere Doomer]] ( | *[[Sphere Doomer]] (Spark) | ||
*[[Super Bonkers]] | *[[Super Bonkers]] | ||
{{col-end}} | {{col-end}} | ||
| Line 81: | Line 85: | ||
*[[Fire]] | *[[Fire]] | ||
*[[Ice]] | *[[Ice]] | ||
*[[Mecha]] <small>(KRtDLD only)</small> | |||
*[[Ninja]] | *[[Ninja]] | ||
{{col-break|width=50%}} | {{col-break|width=50%}} | ||
*[[Sand]] <small>(KRtDLD only)</small> | |||
*[[Spark]] | *[[Spark]] | ||
*[[Stone]] | *[[Stone]] | ||
| Line 95: | Line 101: | ||
==Gallery== | ==Gallery== | ||
===''Kirby's Return to Dream Land''=== | |||
<gallery> | <gallery> | ||
KRtDL White Wafers Stage 2 screenshot.png|Kirby skates gracefully past the snowmen that try to fall on him. | |||
KRtDL White Wafers Stage 2-1.jpg|Kirby burns through the tunnel. | KRtDL White Wafers Stage 2-1.jpg|Kirby burns through the tunnel. | ||
KRtDL White Wafers Stage 2-2.jpg|Grand Hammer Kirby strikes the [[Strike Box]]. | KRtDL White Wafers Stage 2-2.jpg|Grand Hammer Kirby strikes the [[Strike Box]]. | ||
KRtDL White Wafers Stage 2-3.jpg|Kirby busts the barriers in the rift. | KRtDL White Wafers Stage 2-3.jpg|Kirby busts the barriers in the rift. | ||
KRTDL-map-A-4-2.jpg|Stage map | |||
</gallery> | |||
===''Kirby's Return to Dream Land Deluxe''=== | |||
<gallery> | |||
KRtDLD White Wafers Stage 2 screenshot 01.png|Kirby carefully navigates past falling snowmen on icy terrain. | |||
KRtDLD White Wafers Stage 2 screenshot 02.png|Ninja Kirby tosses a knife at a rope while clinging to a wall. | |||
KRtDLD White Wafers Stage 2 screenshot 04.png|Kirby uses a Stomper Boot to break some golden blocks. | |||
KRtDLD White Wafers Stage 2 screenshot 05.png|Stone Kirby slides steadily down an icy cavern. | |||
KRtDLD White Wafers Stage 2 screenshot 06.png|Kirby avoids the attack of Super Bonkers. | |||
KRtDLD White Wafers Stage 2 screenshot 07.png|Grand Hammer Kirby strikes a [[Strike Box]]. | |||
KRtDLD White Wafers Stage 2 screenshot 08.png|Kirby will need to drop his key momentarily to clear out this obstruction in the rift. | |||
KRtDLD White Wafers Stage 2 screenshot 09.png|Ninja Kirby releases an explosive counter against the Sphere Doomer. | |||
</gallery> | </gallery> | ||
==Video | ==Video walkthroughs== | ||
{{Youtube|52cAWx3MD9Y|300|100% walkthrough of White Wafers - Stage 2.}} | {{Youtube|52cAWx3MD9Y|300|100% walkthrough of White Wafers - Stage 2 in ''Kirby's Return to Dream Land''.}} | ||
{{Youtube|SQ3xM7DKujI|300|100% walkthrough of White Wafers - Stage 2 in Extra Mode in ''Kirby's Return to Dream Land Deluxe''.}} | |||
{{clear}} | {{clear}} | ||
{{Navbox-KRtDL}} | {{Navbox-KRtDL/KRtDLD}} | ||
Latest revision as of 14:04, 23 June 2023
| ||||||||||||||
| ||||||||||||||
| ||||||||||||||
|
| ||||||||||||||

White Wafers - Stage 2 (simply called Stage 2 or 4-2 in-game) is the second stage of White Wafers in Kirby's Return to Dream Land and its remake—Kirby's Return to Dream Land Deluxe, and marks the first appearance of the Grand Hammer Super Ability. There are four Energy Spheres in this stage.
Overview[edit]

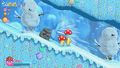
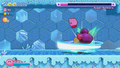
The stage begins out on the tundra, where Kirby will need to make his way past icy fissures spitting out Mopoo and snowmen prone to crumble atop him. At the end, a grotto can be found where Kirby can practice his Ninja skills after swallowing the local Moonja.
Through the door is an icy tunnel with lots of falling icicles. The path ahead is lined with foes, and a Fuse Cannon can be found up ahead. Past that is the door forward.
The path leads out of the cave, across a series of perilous icy slopes. Up ahead is a Stomper Boot, which Kirby can use to traverse the numerous spike pits up ahead. At the end of this path, a number of Rockies are guarding the next door.
The next area is a sloped tunnel, where Kirby can try some Stone sliding. He will need to take care, however, as sliding for too long will lead to dangerous situations.
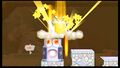
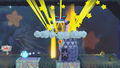
From there, the last tunnel can be accessed, starting with a fight against Super Bonkers. Defeating him yields the Grand Hammer ability, which Kirby will need if he wants to destroy the Strike Boxes up ahead. Near the end of the tunnel, a pair of extra large boxes will need to be destroyed to reveal the rift to Another Dimension.
Another Dimension rift[edit]
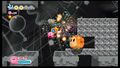
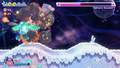
Kirby will need to head to the right while using many keys on gates and spitting the hapless Waddle Dees. The second half of this stretch involves a Crackler, which Kirby can use to clear the Puppet Waddle Dees and tall barriers they stand on. Once through the door, Kirby will need to do battle with an electric Sphere Doomer to clear this rift.
From there, the stage exit can be found just to the right from where the rift appeared.
Energy Sphere guide[edit]
- In the initial ice cave, Kirby will need to use the Fire ability to light a Fuse behind an ice block barricade, then make it to the cannon up ahead. Taking the cannon leads to a room where Kirby will need to quickly make it through a gate, but mind the spikes on the other side to reach the first sphere.
- In the Stomper Boot section, Kirby can uncover a round-trip door by breaking some blocks in a spike pit. Inside the room, Kirby will need to use a series of rising Mopoo as stepping stones to reach the second sphere up on the ledge.
- The last two spheres can be obtained from the Sphere Doomer at the end of the rift.
Enemies, Mid-Bosses and abilities[edit]
| Regular Enemies | Mid-Bosses | ||||
|---|---|---|---|---|---|
|
| ||||
| Abilities | Super Ability | ||||
|
|
|
Gallery[edit]
Kirby's Return to Dream Land[edit]
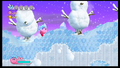
Kirby skates gracefully past the snowmen that try to fall on him.
Kirby burns through the tunnel.
Grand Hammer Kirby strikes the Strike Box.
Kirby busts the barriers in the rift.
Stage map


Kirby's Return to Dream Land Deluxe[edit]
Kirby carefully navigates past falling snowmen on icy terrain.
Ninja Kirby tosses a knife at a rope while clinging to a wall.
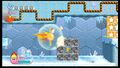
Kirby uses a Stomper Boot to break some golden blocks.
Stone Kirby slides steadily down an icy cavern.
Kirby avoids the attack of Super Bonkers.
Grand Hammer Kirby strikes a Strike Box.

Kirby will need to drop his key momentarily to clear out this obstruction in the rift.
Ninja Kirby releases an explosive counter against the Sphere Doomer.


Video walkthroughs[edit]
100% walkthrough of White Wafers - Stage 2 in Kirby's Return to Dream Land.
|
100% walkthrough of White Wafers - Stage 2 in Extra Mode in Kirby's Return to Dream Land Deluxe.
|