User:DeepFriedCabbage/Sandbox: Difference between revisions
(They're in 51 episodes!) Tag: Disambiguation links |
mNo edit summary |
||
| Line 168: | Line 168: | ||
Kirby Lor Starcutter and a Magician of Falsehood key art.jpg|For ''[[Kirby: Lor Starcutter and a Magician of Falsehood]]'' | Kirby Lor Starcutter and a Magician of Falsehood key art.jpg|For ''[[Kirby: Lor Starcutter and a Magician of Falsehood]]'' | ||
</gallery>}} | </gallery>}} | ||
Revision as of 03:55, 11 November 2023
This is my sandbox! I mainly put unfinished revisions of pages here.
Kirby's Labyrinth Rescue!
| ||||||||||||||||||||||
| ||||||||||||||||||||||
|
| ||||||||||||||||||||||

| “ | Magolor, whom Kirby had fought before, turned up suddenly saying "Rescue my friend for me!" While it’s suspicious, Kirby and his friend go to the Great Labyrinth of the Mirror to save his friend. An unexpected encounter awaits them in the great labyrinth......!? | ” | — Unofficial translation of the description of Kirby's Labyrinth Rescue |
Kirby's Labyrinth Rescue[2] is the sixth volume of the the Kirby novel series, published exclusively in Japan on February 15th, 2016.[3] In this novel,_
This novel takes inspiration from Kirby & The Amazing Mirror, Kirby's Return to Dream Land, Kirby: Triple Deluxe, and Kirby and the Rainbow Curse. This is also the first novel that does not introduce any original characters.
Characters
| Characters of "Kirby's Labyrinth Rescue!" | |||||
|---|---|---|---|---|---|
| Main characters | |||||
| Supporting & minor characters | |||||
| For characters lacking illustrations, see this page | |||||


Plot synopsis
Chapter 1: Magolor's Request

The story opens in Kirby's house, where Kirby is looking at an extra-large castella cake that Chef Kawasaki prepared for him to try. But before Kirby can eat the cake, Waddle Dee bursts into his house. He tells Kirby that they are in great trouble, and urges Kirby to come with him and leave the cake.
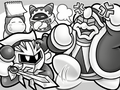
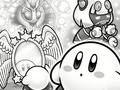
They both come to a square at the foot of Mt. Dedede. There, they find the Lor Starcutter and meet Meta Knight, King Dedede and most surprisingly, Magolor. Magolor greets the group happily, in much contrast to the group's bitterness toward him. Magolor asks Kirby to help him save his friend, who was captured in the "Great Labyrinth of the Mirror" when he was swallowed by the Dimension Mirror. Kirby is not sure if he can trust Magolor after being manipulated by him before, and none of the others trust him either. After Magolor sees that nobody believes him, he caters to Kirby's care for his friends to try and convince him to help, which makes Kirby agree to help him, but not anybody else. Magolor then caters to King Dedede's love for food, by saying that his friend is rich and will treat him with a great feast for saving him, which makes King Dedede also agree to help. Magolor flies with Kirby and King Dedede on the Lor Starcutter, leaving the others behind. Meta Knight and Waddle Dee remain suspicious of Magolor, and they fly after him on the Halberd to make sure his trickery doesn't cause anything bad to happen.
After Meta Knight and Waddle Dee board the Lor Starcutter, Magolor explains to the group about the Dimension Mirror that his friend had, which can project someone's wish to make it a reality. Magolor tells them that after showing his friend the Mirror, he was swallowed by it and got trapped. He shows them the Dimension Mirror, which he had been keeping in one of the Lor's rooms. After Kirby touches the Mirror, he is dragged into it and vanishes. King Dedede throws Magolor into the Mirror and jumps in as well, followed by Meta Knight and Waddle Dee.
Chapter 2: The Great Labyrinth of the Mirror!

Kirby lands in the Mirror World, and starts exploring. He finds an apple and happily inhales it, along with a small creature that was lurking next to it. This causes Kirby to shrink. After this, the other four land in the Mirror World as well, and they are unable to find the tiny Kirby. They hear Kirby calling out, and Waddle Dee eventually finds him. King Dedede slyly picks up the tiny Kirby, and blows him away with one snort from his nose. Everyone is mad at him for this, but Dedede tries to press on without Kirby.
Blown away by King Dedede's nose, Kirby bumps into a tree. He notices a hole in the tree's root, and jumps in. He lands in a large cave, and heads toward light shining from the end of the cave. Meanwhile, King Dedede is aimlessly leading everyone around the forest. Waddle Dee hears Kirby's voice beneath the ground, and gets everyone to listen. Kirby exclaims that there is a hidden path underground, and Meta Knight tells everyone to start digging. Instead, King Dedede smashes his hammer against the ground several times, which makes a hole open up. The four jump in, and find Kirby in the large cave. He points out a Mirror Door in the cave, which leads to next area. The five jump into the Mirror Door.
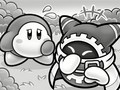
Kirby tumbles out the other end of the Mirror Door, and the small creature jumps out of his mouth. It angrily scolds him, and Kirby realizes that he got back to his normal size. Meta Knight points out that the creature is called Minny, and that Kirby obtained the Mini ability from inhaling it carelessly. Waddle Dee congratulates Kirby for finding the path, and the two happily hold hands. King Dedede gets suspicious that the two are friends, and yells at Waddle Dee. Waddle Dee insists that he was about to seize Kirby, and Kirby plays along by running away. While Dedede chases him, Magolor laughs at Waddle Dee for hiding his friendship with Kirby.
The group has a long journey through the Mirror World. King Dedede gets impatient, and wants to turn back. Meta Knight reminds him that it would be nearly impossible to navigate his way back through the labyrinth that is the Mirror World. Kirby announces to everyone that he found a mirror door that looks different from all the other ones they had entered. It has a much more elegant appearance. The group enters it, thinking they have finally reached the goal.
Chapter 3: Elline and Claycia

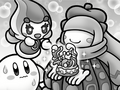
The group comes tumbling out the other side of the mirror door, which leads to someone's room. They meet a fairy, who Kirby immediately recognizes as Elline. She is confused at why they came out of her mirror, which she had bought recently. Meta Knight explains that they were in the Mirror World, and the mirror they entered must have been connected to hers. Elline points out that her friend Claycia picked out the mirror, and then she quickly starts angrily badmouthing Claycia. Kirby wonders what is wrong, and Elline explains that Claycia has been very rude lately; she would brush off Elline whenever she tried to talk to her. Kirby is very sad about this, and insists on asking Claycia about the problem. Kirby heads over to Claycia's workshop, and everyone except Elline and Magolor follow him.
Kirby knocks on Claycia's door, and she answers, yelling at him to be quiet. Kirby ignores this, and happily greets her. Claycia introduces herself as a master artist, who is focusing on her work. Kirby asks about her rudeness towards Elline. Claycia does not remember this, and says that she could not converse normally because she was so focused on her art. She goes on about how she believes she is a genius artist that no one understands, and then yells out in frustration that she has no ideas for her next piece. Kirby decides to help Claycia with her art. She says she would prefer to make it alone, but Kirby and the others go into her workshop anyway.
Chapter 4: Reconciling with Art

In Claycia's workshop, everyone looks at all her different creation, while Kirby wants to make his own piece of art. Claycia sees potential in his new perspective on art, and allows him to make something with her materials. King Dedede butts in, and starts making his own art too. Magolor is annoyed that they are getting off-track, but Meta Knight assures him that Kirby and Dedede will lose interest quickly.
After a short time, Kirby and King Dedede finish their art pieces, and Claycia asks them to describe their art. Kirby's piece is a dango, because he loves dangos. Dedede's piece represents his ambition to eat lots of different foods. At first, Claycia is immensely disappointed in them, but then she feels a lot of artistic inspiration. Kirby and Dedede gloat about this, until Claycia points out that their pieces were so horrible that they inspired her to fill the world with beautiful pieces instead. Claycia gets everyone to leave her workshop so she can start making her own artistic piece.
After a few hours, Claycia happily walks out of her workshop to show her beautiful sculpture to Elline. Only Elline can tell what it is supposed to be, and she is overjoyed to see it. Claycia explains that she was worrying about what kind of art to make for her, and apologizes for her rude behavior. Elline happily forgives her, which makes everyone relieved. With the pair finally reunited, Magolor points out that they can finally get back to the Mirror World. Elline and Claycia overhear this, and offer to help. Elline gets out a canvas that she used in her previous adventure with Kirby. She draws a rocket on the canvas, which flies out and combines with Kirby, turning him into the Kirby Rocket. Elline explains that this transformation allows Kirby to automatically fly towards his destination without getting lost. Claycia hands crayons to Waddle Dee so he can use them on the canvas whenever somebody wants to transform. Kirby and friends happily say their goodbyes to Elline and Claycia, and head back into the Mirror World.
Chapter 5: The Reunion with the Friend!?

Back in the Mirror World, Kirby leads the group through the labyrinth while in Rocket form. This form automatically moves across the correct path, allowing the group to reach their destination quickly. Along the way, King Dedede feels jealous of Kirby's Rocket form, and he tries to take the canvas from Waddle Dee. Meta Knight stops him, and reminds him that the canvas is only for emergencies. Kirby tells everyone that he found a barricaded door, and he hears a voice behind it. Magolor thinks his friend is behind the door, and rushes to it.
After hearing the voice too, Magolor confirms that it is coming from his friend, and he calls out for Taranza. Everyone is shocked at hearing this, because they had met Taranza before. Meta Knight grows more suspicious of Magolor for not revealing his friend's name until now. Rocket Kirby breaks the barricaded door by performing a few Star Dashes into it. This uses up his strength, and he transforms back into his usual self. With the door now open, Magolor leads the group in.
In the next room, the group finds a mirror that looks exactly the Dimension Mirror. Meta Knight points out that the mirror they entered was only a husk, and that this is the real mirror with the true power. Looking closer, the group finds Taranza gazing deeply into the Dimension Mirror. He is in a trance, with the mirror showing hallucinations of his greatest desires. He does not respond when the group calls to him. Meta Knight worries that the mirror will possess him, and orders everyone to break the mirror. Magolor insists that they do not, and accidentally says that the mirror is more important than Taranza. This slip-up makes the group lose all trust in him, and they prepare to destroy the mirror. King Dedede approaches Waddle Dee, and insists on becoming the King Dedede Rocket. Waddle Dee is still reluctant about this.
As Kirby and Meta Knight approach the mirror, Taranza notices that they are about to destroy it. He angrily shoots his controlling strings at Meta Knight, which tightly twine around him. Taranza is now in control of Meta Knight, and he makes him start attacking Kirby.
Chapter 6: What He Wished for

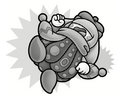
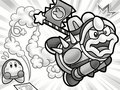
Waddle Dee notices that Kirby is in trouble, and finally gives the canvas and crayons to King Dedede. He draws his new form on the canvas, and transforms into the King Dedede Rocket. Dedede's new form is so poorly designed that he cannot control which way he goes, and he flies away from Kirby and Meta Knight.
As Taranza continues puppeteering Meta Knight, Kirby notices that Magolor is carrying the Dimension Mirror away. He points this out to Taranza, and the two of them chase after him. This distraction breaks the spell that was on Meta Knight. The King Dedede Rocket is still flying about, and accidentally charges into Magolor. The impact turns King Dedede back into his usual form, and Taranza grabs the mirror. Magolor lies to Taranza that Kirby and co. were trying to destroy the mirror. Taranza angrily attacks them. As Kirby remembers that he is defenseless without a Copy Ability, Waddle Dee runs in with the canvas. He had drawn a new form for Kirby on the canvas, which transforms him into the Kirby Tank. As Kirby is now able to fight back, Meta Knight tells him to aim one attack at Taranza, so Magolor's true nature can be revealed. Kirby shoots a bullet at Taranza, and sure enough, Magolor takes the mirror from him. As Kirby's tank form wears off, Waddle Dee points out that they have used up all of the canvas's paper.
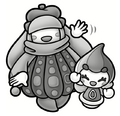
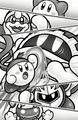
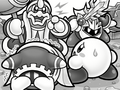
Magolor looks into the Dimension Mirror and wishes to become stronger. The power of the mirror makes Magolor grow to a gigantic size. King Dedede laughs at this, not showing the slightest bit of fear. Magolor tries to crush him, but Taranza grabs the king just in time. Now that Magolor has been empowered by the mirror, Taranza is free from its spell. Taranza reveals that Magolor had never been his friend, and Meta Knight explains to Taranza how Magolor manipluated him to get his hands on the mirror. The group dodges Magolor's attacks while having a hard time fighting back. Just then, Mirra comes up from the ground, complaining about the noise. Meta Knight instantly recognizes it as a creature with a gateway to the Mirror World. He threatens to cut Mirra if it moves, prompting it to stay in place. Meta Knight calls for Waddle Dee, and tells him to go into Mirra's door and find someone that Kirby can get a Copy Ability from. Waddle Dee jumps in, and Meta Knight goes back to fighting Magolor.
Chapter 7: Showdown with the Copy Ability!
_
Chapter 8: Parting with the Dream
_
Gallery
- Illustrations
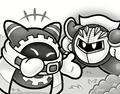
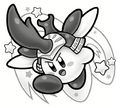
Magolor mocks Meta Knight for not believing him.

Magolor shows everyone the Dimension Mirror.

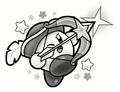
King Dedede throws Magolor into the mirror.
Magolor laughs at Waddle Dee for hiding his friendship with Kirby.

Kirby happily greets Claycia, who does not remember him.
Claycia gets frustrated when she cannot think of any ideas for her art.
Elline is ecstatic to see Claycia's beautiful sculpture, while Kirby can't tell what it's supposed to be.

Kirby transforms into the Kirby Rocket.
Elline and Claycia wave goodbye.
King Dedede is jealous of Kirby, and wants to be a rocket too.

Taranza does not want Kirby and Meta Knight to destroy the Dimension Mirror.

Taranza puppeteers Meta Knight to attack Kirby.
The King Dedede Rocket has trouble flying.

Magolor runs off with the Dimension Mirror as Kirby and Taranza chase him.

Kirby transforms into the Kirby Tank.


- Artwork

Kirby and Waddle Dee (colored)
Kirby (obi illustration)


Names in other languages
| Language | Name | Meaning |
|---|---|---|
| Japanese | 星のカービィ 大迷宮のトモダチを救え!の巻 hoshi no kābyi daimeikyū no tomodachi o sukue! no maki |
Kirby of the Stars: Save Your Friends in the Great Labyrinth! |
References
Gallery of unused files
- Kirby's Labyrinth Rescue!


- Others


