Colosseum: Difference between revisions
m (→Music) |
mNo edit summary |
||
| (43 intermediate revisions by 11 users not shown) | |||
| Line 1: | Line 1: | ||
{{Infobox-SubGame | {{Good}}{{Infobox-SubGame | ||
|image=[[File:KatFL Colosseum screenshot.png|300px]] | |image=[[File:KatFL Colosseum screenshot.png|300px]] | ||
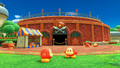
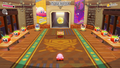
|caption=Wide view of the '''Colosseum''' in [[Waddle Dee Town]]. | |caption=Wide view of the '''Colosseum''' in [[Waddle Dee Town]]. | ||
|type= Boss Endurance | |type=Boss Endurance | ||
|levels= 3 | |levels=3 | ||
|players= 1-2 | |players=1-2 | ||
|appeared= <small>''[[Kirby and the Forgotten Land]]''</small> | |appeared=<small>''[[Kirby and the Forgotten Land]]''</small> | ||
|compare= [[The Arena]], [[The True Arena]], [[Helper to Hero]], [[The Ultimate Choice]] | |compare=[[The Arena]], [[The True Arena]], [[Helper to Hero]], [[The Ultimate Choice]] | ||
}} | }} | ||
{{about|the location in [[Kirby and the Forgotten Land]]|other colosseums throughout the series|[[Colosseum (disambiguation)]]}} | |||
{{Quote|Whoa! I can hear the crowd cheering from all the way out here!|[[Elfilin]], in reference to the '''Colosseum'''}} | {{Quote|Whoa! I can hear the crowd cheering from all the way out here!|[[Elfilin]], in reference to the '''Colosseum'''}} | ||
The '''Colosseum''' is a place in [[Waddle Dee Town]] that appears in ''[[Kirby and the Forgotten Land]]''. The amphitheater is northwest of the center plaza, and its construction is completed once Kirby finishes [[Wondaria Remains]]. Kirby can compete in this [[Boss Endurance]] [[Sub-Game]] by talking to the [[Commentator Waddle Dee]] out front, and it is similar to [[The Arena]] from past installments. There are a total of three different cups Kirby can compete in, which are unlocked after completing different requirements throughout the game. As each cup is unlocked, the exterior design of the amphitheater | The '''Colosseum''' is a place in [[Waddle Dee Town]] that appears in ''[[Kirby and the Forgotten Land]]''. The amphitheater is northwest of the center plaza, and its construction is completed once Kirby finishes [[Wondaria Remains]]. Kirby can compete in this [[Boss Endurance]] [[Sub-Game]] by talking to the [[Commentator Waddle Dee]] out front, and it is similar to [[The Arena]] from past installments. There are a total of three different cups Kirby can compete in, which are unlocked after completing different requirements throughout the game. As each cup is unlocked, the exterior design of the amphitheater changes slightly. Kirby is not required to enter the Colosseum after signing up, and he can exit the Colosseum via the pause menu at any time after entering. Coming out victorious in all three cups is required for [[100% completion]]. | ||
Kirby starts each cup and can rest in-between battles in the Colosseum's [[wikipedia:Colosseum#Arena and hypogeum|hypogeum]], serving as the rest area like in other [[:Category:Boss Endurance Modes|boss endurance modes]]. It contains a limited supply of [[food]] and at least one [[Copy Essence]] (with the type of food and number of Copy Essences varying based on the cup), as well as a display indicating who will be fought in the next battle and how many battles are left in the cup. A [[Bandana Waddle Dee|second player]] can also play alongside Kirby at any point. The order in which most of the bosses and mid-bosses are fought in is random, though each cup has at least one boss always fought at the same point. | |||
==Gameplay== | ==Gameplay== | ||
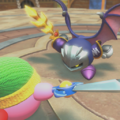
The Colosseum has three different difficulties in which Kirby can choose from: the Meta Knight Cup is the easiest and is unlocked alongside the Colosseum, The Ultimate Cup is unlocked after completing [[Lab Discovera]], and The Ultimate Cup Z is unlocked after completing the [[Isolated Isles: Forgo Dreams|Isolated Isles of Forgo Dreams]]. An exclusive item is unlocked after completing each cup for the first time: clearing the Meta Knight Cup rewards the [[Meta Knight Sword]] blueprint, while the others reward a rare [[figure]] each. | [[File:KatFL Colosseum Mid-Boss battle screenshot.png|thumb|250px|Kirby battling [[Wild Frosty]] in the Colosseum]] | ||
The Colosseum has three different difficulties in which Kirby can choose from: the Meta Knight Cup is the easiest and is unlocked alongside the Colosseum, The Ultimate Cup is unlocked after completing [[Lab Discovera]], and The Ultimate Cup Z is unlocked after completing the [[Isolated Isles: Forgo Dreams|Isolated Isles of Forgo Dreams]]. An exclusive item is unlocked after completing each cup for the first time: clearing the Meta Knight Cup rewards the [[Meta Knight Sword]] blueprint, while the others reward a rare [[figure]] each. If Kirby doesn't take the completion rewards and quits the game, the next time Kirby enters the game, Elfilin will notify him that he can still take them from Commentator Waddle Dee. | |||
Kirby can take in any [[Copy Ability]] and [[Stock Item]] he chooses, and [[amiibo]] can be used for their extra bonuses. Co-op is also available, with the second player playing as [[Bandana Waddle Dee]]. In-between battles, they can use a limited supply of [[ | When Kirby enters the Colosseum, his [[health]] is automatically fully restored. Kirby can take in any [[Copy Ability]] and [[Stock Item]] he chooses, and [[amiibo]] can be used for their extra bonuses. Co-op is also available, with the second player playing as [[Bandana Waddle Dee]]. In-between battles, they can use a limited supply of [[Food|Food Items]] for healing if needed, and can also pick up [[Star Coin]]s from chests. Before the final round, an additional food item can be found inside the last chest. Best times are kept for each cup, which also keep track of the difficulty (Spring Breeze Mode: green; Wild Mode: red) and when amiibo, items, and/or co-op are used. | ||
New to the boss endurance mode is that when Kirby loses in the Colosseum, he can spend [[Star Coin]]s to continue and restart from the last battle, but the timer resumes from the time he was defeated. The price starts | New to the boss endurance mode is that when Kirby loses in the Colosseum, he can spend [[Star Coin]]s to continue and restart from the last battle, but the timer resumes from the time he was defeated. The price starts at 100 Star Coins and then doubles for each subsequent defeat, up to 2000 Star Coins. | ||
==Colosseum Cups== | ==Colosseum Cups== | ||
[[File:KatFL Colosseum Meta Knight Cup menu screenshot.png|thumb|250px|The selection screen for the Meta Knight Cup, the first of the three cups in the Colosseum]] | |||
The Colosseum has three cups which represent different difficulties. The player health remains constant in each cup, however it varies depending on the game's difficulty. In addition, the game's difficulty has no influence on bosses such as their health and their action patterns. A preview image for each cup will show the specific bosses that are set to be fought during specific rounds each time an individual cup is entered. | The Colosseum has three cups which represent different difficulties. The player health remains constant in each cup, however it varies depending on the game's difficulty. In addition, the game's difficulty has no influence on bosses such as their health and their action patterns. A preview image for each cup will show the specific bosses that are set to be fought during specific rounds each time an individual cup is entered. | ||
The following lists information on the boss battles, how many healing items are given, and other factors in each Cup: | The following lists information on the boss battles, how many healing items are given, and other factors in each Cup: | ||
{| class="wikitable mw-collapsible mw-collapsed" border="1" cellpadding="2" | {| class="wikitable mw-collapsible mw-collapsed" border="1" cellpadding="2" | ||
!colspan= | !colspan=7|Colosseum Cups | ||
|- | |- | ||
!Difficulty | !Difficulty | ||
!Encounters | !Encounters | ||
!Unlock Requirements | !Unlock Requirements | ||
| Line 40: | Line 39: | ||
|- | |- | ||
![[File:KatFL Meta Knight Cup logo.png|200px]] | ![[File:KatFL Meta Knight Cup logo.png|200px]] | ||
| | | | ||
#[[Wild Frosty]] & [[Wild Bonkers]] | #[[Wild Frosty]] & [[Wild Bonkers]] | ||
| Line 53: | Line 51: | ||
**in the chest before the last battle | **in the chest before the last battle | ||
*1 [[Rare Stone]] | *1 [[Rare Stone]] | ||
*[[Meta Knight Sword]] Blueprint (first-time clear reward) | |||
|rowspan=2|2 | |rowspan=2|2 | ||
|rowspan=2| | |rowspan=2| | ||
*6 [[Maxim Tomato]]es | *6 [[Maxim Tomato]]es | ||
*6 [[Food| | *6 [[Food|Tomatoes]], each replacing a Maxim Tomato | ||
*1 [[Energy Drink]] in the chest before the last battle | *1 [[Energy Drink]] in the chest before the last battle | ||
|rowspan=3|400 <small>Spring Breeze Mode</small><br>250 <small>Wild Mode</small> | |rowspan=3|400 <small>Spring Breeze Mode</small><br>250 <small>Wild Mode</small> | ||
| Line 62: | Line 61: | ||
|- | |- | ||
![[File:KatFL The Ultimate Cup logo.png|200px]] | ![[File:KatFL The Ultimate Cup logo.png|200px]] | ||
| | | | ||
#[[Wild Frosty]] & [[Wild Bonkers]] | #[[Wild Frosty]] & [[Wild Bonkers]] | ||
| Line 72: | Line 70: | ||
#[[King Dedede]] | #[[King Dedede]] | ||
#[[Sillydillo]] | #[[Sillydillo]] | ||
#[[Forgo Dedede]] <small>Always fought | #[[Forgo Dedede]] <small>Always fought as the 9th opponent.</small> | ||
#[[Leongar]] <small>Always fought | #[[Leongar]] <small>Always fought as the 10th opponent.</small> | ||
#[[Fecto Forgo]] <small>Always fought second-to-last.</small> | #[[Fecto Forgo]] <small>Always fought second-to-last.</small> | ||
#[[Fecto Elfilis]] <small>Always fought last.</small> | #[[Fecto Elfilis]] <small>Always fought last.</small> | ||
| | |Beat the Meta Knight Cup and complete [[Lab Discovera]]. | ||
| | | | ||
*1500 [[Star Coin]]s | *1500 [[Star Coin]]s | ||
| Line 82: | Line 80: | ||
**1000 in the chest before the last battle | **1000 in the chest before the last battle | ||
*1 [[Rare Stone]] | *1 [[Rare Stone]] | ||
*[[Figure]] of [[Fecto Elfilis]] (first-time clear reward) | |||
|- | |- | ||
![[File:KatFL The Ultimate Cup Z logo.png|200px]] | ![[File:KatFL The Ultimate Cup Z logo.png|200px]] | ||
| | | | ||
#[[Wild Frosty]] & [[Wild Edge]] | #[[Wild Frosty]] & [[Wild Edge]] | ||
| Line 93: | Line 91: | ||
#[[Phantom King Dedede]] | #[[Phantom King Dedede]] | ||
#[[Phantom Sillydillo]] | #[[Phantom Sillydillo]] | ||
#[[Phantom Meta Knight]] <small>Always fought | #[[Phantom Meta Knight]] <small>Always fought as the 8th opponent.</small> | ||
#[[Phantom Forgo Dedede]] <small>Always fought | #[[Phantom Forgo Dedede]] <small>Always fought as the 9th opponent.</small> | ||
#[[Leongar|Forgo Leon]] <small>Always fought | #[[Leongar|Forgo Leon]] <small>Always fought as the 10th opponent.</small> | ||
#[[Morpho Knight]] <small>Always fought second-to-last.</small> | #[[Morpho Knight]] <small>Always fought second-to-last.</small> | ||
#[[Chaos Elfilis]] <small>Always fought last.</small> | #[[Chaos Elfilis]] <small>Always fought last.</small> | ||
| | |Beat The Ultimate Cup and complete the [[Isolated Isles: Forgo Dreams|Isolated Isles of Forgo Dreams]]. | ||
| | | | ||
*2500 [[Star Coin]]s | *2500 [[Star Coin]]s | ||
**500 in the chest before | **500 in the chest before battle 10 | ||
**1000 in the chest before the second-to-last battle | **1000 in the chest before the second-to-last battle | ||
**1000 in the chest before the last battle | **1000 in the chest before the last battle | ||
*3 [[Rare Stone]]s | *3 [[Rare Stone]]s | ||
*[[Figure]] of [[Chaos Elfilis]] (first-time clear reward) | |||
|1 | |1 | ||
| | | | ||
*6 [[Food| | *6 [[Food|Tomatoes]] | ||
*1 [[Food| | *1 [[Food|Cherry]] in the chest before the last battle | ||
|} | |} | ||
==List of | ==List of bosses== | ||
The following lists every [[boss]] and [[mid-boss]] in the Colosseum, with information on their [[ | The following lists every [[boss]] and [[mid-boss]] in the Colosseum, with information on their [[health]] and the difficulty levels in which they appear. Like in previous titles, the bosses usually have less health when fought in the Colosseum, this time with only about 70% or 60% of their max health. The Colosseum is the only area where [[Meta Knight]], [[Phantom Meta Knight]], and [[Chaos Elfilis]] can be fought; the former in the Meta Knight Cup and The Ultimate Cup, and the latter two in The Ultimate Cup Z. | ||
===Bosses=== | ===Bosses=== | ||
| Line 119: | Line 118: | ||
|- | |- | ||
!Boss | !Boss | ||
!HP<ref name="FL">[https://docs.google.com/file/d/1UF0W1OgjFWUjTaUEs_jakGtbVUA_vVHt/view ''Kirby and the Forgotten Land'' | !HP<ref name="FL">[https://docs.google.com/file/d/1UF0W1OgjFWUjTaUEs_jakGtbVUA_vVHt/view ''Kirby and the Forgotten Land'' damage and health spreadsheet (Japanese)] ([https://web.archive.org/web/20230523063313/https://docs.google.com/file/d/1UF0W1OgjFWUjTaUEs_jakGtbVUA_vVHt/view archive])</ref><br>([[Star Bullet]]=80) | ||
!Meta Knight Cup | !Meta Knight Cup | ||
!The Ultimate Cup | !The Ultimate Cup | ||
| Line 168: | Line 167: | ||
|{{Y}} | |{{Y}} | ||
|{{N}} | |{{N}} | ||
|Always the | |Always the 9th boss fought in The Ultimate Cup. | ||
|- | |- | ||
|'''[[Leongar]]''' | |'''[[Leongar]]''' | ||
| Line 175: | Line 174: | ||
|{{Y}} | |{{Y}} | ||
|{{N}} | |{{N}} | ||
|Always the | |Always the 10th boss fought in The Ultimate Cup. | ||
|- | |- | ||
|'''[[Fecto Forgo]]''' | |'''[[Fecto Forgo]]''' | ||
| Line 225: | Line 224: | ||
|colspan="2"|{{N}} | |colspan="2"|{{N}} | ||
|{{Y}} | |{{Y}} | ||
|Always the | |Always the 8th boss fought in The Ultimate Cup Z. | ||
|- | |- | ||
|'''[[Phantom Forgo Dedede]]''' | |'''[[Phantom Forgo Dedede]]''' | ||
| Line 231: | Line 230: | ||
|colspan="2"|{{N}} | |colspan="2"|{{N}} | ||
|{{Y}} | |{{Y}} | ||
|Always the | |Always the 9th boss fought in The Ultimate Cup Z. | ||
|- | |- | ||
|'''[[Forgo Leon]]''' | |'''[[Forgo Leon]]''' | ||
| Line 237: | Line 236: | ||
|colspan="2"|{{N}} | |colspan="2"|{{N}} | ||
|{{Y}} | |{{Y}} | ||
|Always the | |Always the 10th boss fought in The Ultimate Cup Z. | ||
|- | |- | ||
|'''[[Morpho Knight]]''' | |'''[[Morpho Knight]]''' | ||
| Line 259: | Line 258: | ||
!Ambush Type | !Ambush Type | ||
!HP<ref name="FL"/><br>([[Star Bullet]]=80) | !HP<ref name="FL"/><br>([[Star Bullet]]=80) | ||
|- | |- | ||
|'''[[Fleurina]]''' | |'''[[Fleurina]]''' | ||
|A: 2nd (Meta Knight Cup / The Ultimate Cup)<br>C: 2nd (The Ultimate Cup Z) | |A: 2nd (Meta Knight Cup / The Ultimate Cup)<br>C: 2nd (The Ultimate Cup Z) | ||
|270 (Meta Knight Cup / The Ultimate Cup)<br>480 (The Ultimate Cup Z) | |270 (Meta Knight Cup / The Ultimate Cup)<br>480 (The Ultimate Cup Z) | ||
|- | |- | ||
|'''[[Wild Bonkers]]''' | |'''[[Wild Bonkers]]''' | ||
|B: 2nd (Meta Knight Cup / The Ultimate Cup)<br>C: 1st (The Ultimate Cup Z) | |B: 2nd (Meta Knight Cup / The Ultimate Cup)<br>C: 1st (The Ultimate Cup Z) | ||
|270 (Meta Knight Cup / The Ultimate Cup)<br>480 (The Ultimate Cup Z) | |270 (Meta Knight Cup / The Ultimate Cup)<br>480 (The Ultimate Cup Z) | ||
|- | |- | ||
|'''[[Wild Edge]]''' | |'''[[Wild Edge]]''' | ||
|A: 1st (Meta Knight Cup / The Ultimate Cup)<br>D: 2nd (The Ultimate Cup Z) | |A: 1st (Meta Knight Cup / The Ultimate Cup)<br>D: 2nd (The Ultimate Cup Z) | ||
|270 (Meta Knight Cup / The Ultimate Cup)<br>480 (The Ultimate Cup Z) | |270 (Meta Knight Cup / The Ultimate Cup)<br>480 (The Ultimate Cup Z) | ||
|- | |- | ||
|'''[[Wild Frosty]]''' | |'''[[Wild Frosty]]''' | ||
|B: 1st (Meta Knight Cup / The Ultimate Cup)<br>D: 1st (The Ultimate Cup Z) | |B: 1st (Meta Knight Cup / The Ultimate Cup)<br>D: 1st (The Ultimate Cup Z) | ||
|270 (Meta Knight Cup / The Ultimate Cup)<br>480 (The Ultimate Cup Z) | |270 (Meta Knight Cup / The Ultimate Cup)<br>480 (The Ultimate Cup Z) | ||
|} | |} | ||
| Line 295: | Line 287: | ||
|- | |- | ||
|07 | |07 | ||
|Plundering Beast Battle | |[[Plundering Beast Battle]] | ||
|[[Yuuta Ogasawara]] | |[[Yuuta Ogasawara]] | ||
|Meta Knight Cup: [[ | |Meta Knight Cup: [[Mid-Boss]] battle | ||
| | | | ||
|- | |- | ||
|15 | |15 | ||
|VS. Dangerous Beast | |[[VS. Dangerous Beast]] | ||
|[[Hirokazu Ando]] | |[[Hirokazu Ando]] | ||
|Meta Knight Cup: [[boss]] battle | |Meta Knight Cup: [[boss]] battle | ||
| Line 310: | Line 302: | ||
|[[Yuki Shimooka]] | |[[Yuki Shimooka]] | ||
|Meta Knight Cup: rest area | |Meta Knight Cup: rest area | ||
|If this is performed | |If this track is performed at the [[Jukebox/Kirby and the Forgotten Land|Waddle Live! Corner Stage]], it will continue playing after entering the Meta Knight Cup. | ||
|- | |- | ||
|38 | |38 | ||
|Sword of the Surviving Guardian | |[[My Friend and the Sunset|Sword of the Surviving Guardian]] | ||
|Yuuta Ogasawara | |Yuuta Ogasawara | ||
|Boss battle: | |Boss battle: | ||
*[[Meta Knight]] | *[[Meta Knight]] | ||
*[[Phantom Meta Knight]] | *[[Phantom Meta Knight]] | ||
|If the cutscene is skipped, the intro will be skipped too. | |If the cutscene is skipped, the intro will be skipped too. The intro is also skipped upon retrying the battle or beginning the battle in The Ultimate Cup. | ||
|- | |- | ||
|39 | |39 | ||
| Line 329: | Line 321: | ||
|Interview | |Interview | ||
|Yuki Shimooka | |Yuki Shimooka | ||
|Meta Knight Cup & The Ultimate Cup: | |Meta Knight Cup & The Ultimate Cup: results display screen | ||
| | | | ||
|- | |- | ||
|50 | |50 | ||
|Roar of Dedede | |[[King Dedede's Theme|Roar of Dedede]] | ||
|Yuuta Ogasawara | |Yuuta Ogasawara | ||
|Boss battle: | |Boss battle: | ||
| Line 341: | Line 333: | ||
|- | |- | ||
|61 | |61 | ||
|Masked and Wild: D.D.D. | |[[Masked Dedede's Theme|Masked and Wild: D.D.D.]] | ||
|Yuki Shimooka | |Yuki Shimooka | ||
|Boss battle: | |Boss battle: | ||
| Line 349: | Line 341: | ||
|- | |- | ||
|66 | |66 | ||
|The Raging Lion Roars | |[[The Raging Lion Roars]] | ||
|Yuuta Ogasawara | |Yuuta Ogasawara | ||
|Boss battle: | |Boss battle: | ||
*[[Leongar]] | *[[Leongar]] | ||
*[[Forgo Leon]] | *[[Leongar#Forgo Leon|Forgo Leon]] | ||
| | | | ||
|- | |- | ||
|69 | |69 | ||
|Hunted by the Beast | |[[Hunted by the Beast]] | ||
|[[Jun Ishikawa]] | |[[Jun Ishikawa]] | ||
|Boss battle: [[Fecto Forgo]] | |Boss battle: [[Fecto Forgo]] | ||
| Line 363: | Line 355: | ||
|- | |- | ||
|71 | |71 | ||
|Two Planets Approach the Roche Limit | |[[Two Planets Approach the Roche Limit]] | ||
|Hirokazu Ando | |Hirokazu Ando | ||
|Boss battle: | |Boss battle: | ||
*[[Fecto Elfilis]] | *[[Fecto Elfilis]] | ||
*[[Chaos Elfilis]] | *[[Chaos Elfilis]] | ||
|For Chaos Elfilis, only the first part of the track is used in the first form, and only the second part is used in the second form after | |For Chaos Elfilis, only the first part of the track is used in the first form, and only the second part is used in the second form after its HP is at 70% or lower. | ||
|- | |- | ||
|72 | |72 | ||
| Line 380: | Line 372: | ||
|Yuki Shimooka | |Yuki Shimooka | ||
|The Ultimate Cup: rest area | |The Ultimate Cup: rest area | ||
|If this is performed | |If this track is performed at the Waddle Live! Corner Stage, it will continue playing after entering The Ultimate Cup. Before the 9th, 10th and 11th battles, it starts playing from around halfway through. Before the last battle, it starts playing near the end of the track. | ||
|- | |- | ||
|79 | |79 | ||
|The Ultimate Fight | |[[The Ultimate Fight]] | ||
|Yuki Shimooka | |Yuki Shimooka | ||
|The Ultimate Cup: boss battle | |The Ultimate Cup: Mid-Boss & boss battle | ||
| | |The song changes dynamically once the boss reaches the final phase. | ||
|- | |- | ||
|82 | |82 | ||
|VS. Psychic Power Given Form | |[[VS. Psychic Power Given Form]] | ||
|Yuki Shimooka | |Yuki Shimooka | ||
|The Ultimate Cup Z: | |The Ultimate Cup Z: Mid-Boss battle | ||
| | | | ||
|- | |- | ||
|84 | |84 | ||
|Eternal Echo of the Thrilling Tour-our-our | |[[Eternal Echo of the Thrilling Tour-our-our]] | ||
|Yuki Shimooka | |Yuki Shimooka | ||
|Chaos Elfilis: rest area, boss battle | |Chaos Elfilis: rest area, boss battle | ||
|This is used in the second form before | |The rest area uses a version without vocals, while the battle uses the vocals corresponding to the system language. This is used in the second form before Chaos Elfilis' HP is at 70% of its maximum health or lower, after which it switches to the second half of "Two Planets Approach the Roche Limit". | ||
|- | |- | ||
|85 | |85 | ||
|Morpho Knight | |[[Butterfly of Judgment: Morpho Knight|Morpho Knight]] | ||
|Yuuta Ogasawara | |Yuuta Ogasawara | ||
|Boss battle: [[Morpho Knight]] | |Boss battle: [[Morpho Knight]] | ||
|The intro is skipped in | |The intro is skipped in The Ultimate Cup Z. | ||
|- | |- | ||
|87 | |87 | ||
| Line 410: | Line 402: | ||
|Hirokazu Ando | |Hirokazu Ando | ||
|The Ultimate Cup Z: rest area | |The Ultimate Cup Z: rest area | ||
|If this is performed | |If this track is performed at the Waddle Live! Corner Stage, it will continue playing after entering The Ultimate Cup Z. Before the 8th, 9th, 10th and 11th battles, it starts playing from near the end right before the loop. | ||
|- | |- | ||
|88 | |88 | ||
|Decisive Battle: Ultimate Z | |[[Decisive Battle: Ultimate Z]] | ||
|Hirokazu Ando | |Hirokazu Ando | ||
|The Ultimate Cup Z: boss battle | |The Ultimate Cup Z: boss battle | ||
|The usage includes [[Phantom King Dedede]] and Phantom Forgo Dedede (phase 1). | |The song changes dynamically once the boss reaches the final phase. The usage includes [[Phantom King Dedede]] and Phantom Forgo Dedede (phase 1). | ||
|- | |- | ||
|89 | |89 | ||
| Line 433: | Line 425: | ||
|Hero Interview | |Hero Interview | ||
|Yuki Shimooka | |Yuki Shimooka | ||
|The Ultimate Cup Z: | |The Ultimate Cup Z: results display screen | ||
| | | | ||
|} | |} | ||
==Trivia== | ==Trivia== | ||
* | *There are two [[List of Present Codes in Kirby and the Forgotten Land|Present Code]]s found on the Colosseum. | ||
**"BRAWLINGCOLOSSEUM" can be found written over the top of Commentator Waddle Dee's tent on the exterior wall of the Colosseum. | |||
*The [[ | **"THANKYOUMETAKNIGHT" can be found written next to Meta Knight's watch tower on the exterior wall of the Colosseum after [[Lab Discovera]] is cleared. | ||
*For some reason, [[Elfilin]] is still captured in the capsule during the [[Leongar]] battle in | *The Waddle Dee watching the tournament bracket is random and may change the color every time Waddle Dee Town is reloaded. | ||
*The random [[Copy Essence]]s in the waiting room only pick [[Copy Abilities]] that are available and currently set in [[Waddle Dee's Weapons Shop]]. | |||
**[[Sleep]] is unavailable from the Copy Essences during The Ultimate Cup Z in the Colosseum, possibly to prevent infinite [[health]] recovery from Sleep and infinite stat boosts from [[Deep Sleep]]. | |||
**In speedruns, players may obtain [[Crash]] from the Copy Essences versus specific bosses. To maximize the chance of getting Crash in the waiting room, speedrunners need a dedicated save file which has the lowest possible number of abilities obtained. Besides [[Cutter]], [[Fire]] and [[Sword]] whose blueprints ([[Chakram Cutter]], [[Volcano Fire]] and [[Meta Knight Sword]] respectively) are guaranteed to be obtained in gameplay to unlock The Ultimate Cup Z, speedrunners only need to obtain Crash and [[Toy Hammer]] for that save file. The chance of getting Crash from a Copy Essence in this case will be 20%. | |||
*For some reason, [[Elfilin]] is still captured in the capsule during the [[Leongar]] battle in The Ultimate Cup. | |||
**After [[Forgo Leon]] is defeated in The Ultimate Cup Z, Leon won't appear in the background during the following [[Morpho Knight]] battle unlike the [[Forgo Land]] version. | **After [[Forgo Leon]] is defeated in The Ultimate Cup Z, Leon won't appear in the background during the following [[Morpho Knight]] battle unlike the [[Forgo Land]] version. | ||
*The Tomato Food Item is exclusive to the Colosseum in this game, and doesn't appear in the regular stages, referencing its common role as a healing item in [[Boss Endurance]] modes. | |||
==Gallery== | |||
<gallery> | |||
KatFL Colosseum level 1 screenshot.png|View of the first version of the Colosseum | |||
KatFL Colosseum level 2 screenshot.png|View of the second version of the Colosseum, available after completing Lab Discovera | |||
KatFL Colosseum The Ultimate Cup menu screenshot.png|The selection screen for The Ultimate Cup | |||
KatFL Colosseum The Ultimate Cup Z menu screenshot.png|The selection screen for The Ultimate Cup Z | |||
KatFL Colosseum lobby screenshot.png|Screenshot of Kirby in the Colosseum lobby, about to face Meta Knight | |||
KatFL Kirby House photo Meta Knight Cup.png|The photo added to [[Kirby's House]] after clearing Meta Knight Cup | |||
KatFL Kirby House photo The Ultimate Cup.png|The photo added to Kirby's House after clearing The Ultimate Cup | |||
KatFL Kirby House photo The Ultimate Cup Z.png|The photo added to Kirby's House after clearing The Ultimate Cup Z | |||
</gallery> | |||
==Names in other languages== | ==Names in other languages== | ||
| Line 462: | Line 471: | ||
|de=Kolosseum | |de=Kolosseum | ||
|deM=Colosseum | |deM=Colosseum | ||
|es=Coliseo | |||
|esM=Colosseum | |||
|th=Colosseum<ref>[https://www.youtube.com/watch?v=WeDQ2_uWPK0 Southeast Asian version of the ''Kirby and the Forgotten Land'' Overview Trailer w/ Thai subtitles]</ref> | |||
|thM=- | |||
|it=Colosseum | |||
|itM=- | |||
|nl=Colosseum | |||
|nlM=- | |||
}} | }} | ||
| Line 481: | Line 498: | ||
|de=Das Meta-Knight-Turnier | |de=Das Meta-Knight-Turnier | ||
|deM=The Meta-Knight-Tournament | |deM=The Meta-Knight-Tournament | ||
|es=La Copa Meta Knight | |||
|esM=The Meta Knight Cup | |||
|it=La Coppa Meta Knight | |||
|itM=The Meta Knight Cup | |||
|nl=De Meta Knight-Beker | |||
|nlM=The Meta Knight Cup | |||
}} | }} | ||
| Line 500: | Line 523: | ||
|de=Das Ultimativ-Turnier | |de=Das Ultimativ-Turnier | ||
|deM=The Ultimate-Tournament | |deM=The Ultimate-Tournament | ||
|es=La Copa Definitiva | |||
|esM=The Definitive Cup | |||
|it=La Coppa Definitiva | |||
|itM=The Ultimate Cup | |||
|nl=De Ultieme Beker | |||
|nlM=The Ultimate Cup | |||
}} | }} | ||
| Line 519: | Line 548: | ||
|de=Das Ultimativ-Turnier Z | |de=Das Ultimativ-Turnier Z | ||
|deM=The Ultimate-Tournament Z | |deM=The Ultimate-Tournament Z | ||
|es=La Copa Definitiva Z | |||
|esM=The Definitive Cup Z | |||
|it=La Coppa Definitiva Z | |||
|itM=The Ultimate Cup Z | |||
|nl=De Ultieme Beker Z | |||
|nlM=The Ultimate Cup Z | |||
}} | }} | ||
| Line 526: | Line 561: | ||
*[[Boss Endurance]] | *[[Boss Endurance]] | ||
*[[The Ultimate Choice]] | *[[The Ultimate Choice]] | ||
{{ref}} | {{ref}} | ||
{{Navbox-KatFL}} | {{Navbox-KatFL}} | ||
Latest revision as of 20:52, 5 February 2024
| ||||||||||||||||
|
| ||||||||||||||||

- This article is about the location in Kirby and the Forgotten Land. For other colosseums throughout the series, see Colosseum (disambiguation).
| “ | Whoa! I can hear the crowd cheering from all the way out here! | ” | — Elfilin, in reference to the Colosseum |
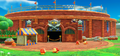
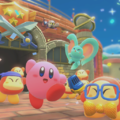
The Colosseum is a place in Waddle Dee Town that appears in Kirby and the Forgotten Land. The amphitheater is northwest of the center plaza, and its construction is completed once Kirby finishes Wondaria Remains. Kirby can compete in this Boss Endurance Sub-Game by talking to the Commentator Waddle Dee out front, and it is similar to The Arena from past installments. There are a total of three different cups Kirby can compete in, which are unlocked after completing different requirements throughout the game. As each cup is unlocked, the exterior design of the amphitheater changes slightly. Kirby is not required to enter the Colosseum after signing up, and he can exit the Colosseum via the pause menu at any time after entering. Coming out victorious in all three cups is required for 100% completion.
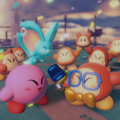
Kirby starts each cup and can rest in-between battles in the Colosseum's hypogeum, serving as the rest area like in other boss endurance modes. It contains a limited supply of food and at least one Copy Essence (with the type of food and number of Copy Essences varying based on the cup), as well as a display indicating who will be fought in the next battle and how many battles are left in the cup. A second player can also play alongside Kirby at any point. The order in which most of the bosses and mid-bosses are fought in is random, though each cup has at least one boss always fought at the same point.
Gameplay[edit]

The Colosseum has three different difficulties in which Kirby can choose from: the Meta Knight Cup is the easiest and is unlocked alongside the Colosseum, The Ultimate Cup is unlocked after completing Lab Discovera, and The Ultimate Cup Z is unlocked after completing the Isolated Isles of Forgo Dreams. An exclusive item is unlocked after completing each cup for the first time: clearing the Meta Knight Cup rewards the Meta Knight Sword blueprint, while the others reward a rare figure each. If Kirby doesn't take the completion rewards and quits the game, the next time Kirby enters the game, Elfilin will notify him that he can still take them from Commentator Waddle Dee.
When Kirby enters the Colosseum, his health is automatically fully restored. Kirby can take in any Copy Ability and Stock Item he chooses, and amiibo can be used for their extra bonuses. Co-op is also available, with the second player playing as Bandana Waddle Dee. In-between battles, they can use a limited supply of Food Items for healing if needed, and can also pick up Star Coins from chests. Before the final round, an additional food item can be found inside the last chest. Best times are kept for each cup, which also keep track of the difficulty (Spring Breeze Mode: green; Wild Mode: red) and when amiibo, items, and/or co-op are used.
New to the boss endurance mode is that when Kirby loses in the Colosseum, he can spend Star Coins to continue and restart from the last battle, but the timer resumes from the time he was defeated. The price starts at 100 Star Coins and then doubles for each subsequent defeat, up to 2000 Star Coins.
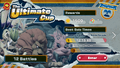
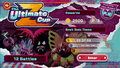
Colosseum Cups[edit]

The Colosseum has three cups which represent different difficulties. The player health remains constant in each cup, however it varies depending on the game's difficulty. In addition, the game's difficulty has no influence on bosses such as their health and their action patterns. A preview image for each cup will show the specific bosses that are set to be fought during specific rounds each time an individual cup is entered.
The following lists information on the boss battles, how many healing items are given, and other factors in each Cup:
| Colosseum Cups | ||||||
|---|---|---|---|---|---|---|
| Difficulty | Encounters | Unlock Requirements | Completion Rewards | Copy Essences | Healing Items | Player Health |
|
Complete Wondaria Remains. |
|
2 |
|
400 Spring Breeze Mode 250 Wild Mode | |
|
Beat the Meta Knight Cup and complete Lab Discovera. |
| ||||
|
Beat The Ultimate Cup and complete the Isolated Isles of Forgo Dreams. |
|
1 | |||
List of bosses[edit]
The following lists every boss and mid-boss in the Colosseum, with information on their health and the difficulty levels in which they appear. Like in previous titles, the bosses usually have less health when fought in the Colosseum, this time with only about 70% or 60% of their max health. The Colosseum is the only area where Meta Knight, Phantom Meta Knight, and Chaos Elfilis can be fought; the former in the Meta Knight Cup and The Ultimate Cup, and the latter two in The Ultimate Cup Z.
Bosses[edit]
| Bosses | |||||||||||
|---|---|---|---|---|---|---|---|---|---|---|---|
| Boss | HP[1] (Star Bullet=80) |
Meta Knight Cup | The Ultimate Cup | The Ultimate Cup Z | Notes | ||||||
| Gorimondo | 700 | ||||||||||
| Tropic Woods | 945 | ||||||||||
| Clawroline | 700 | ||||||||||
| Meta Knight | 1000 | Always the last boss fought in Meta Knight Cup. | |||||||||
| King Dedede | 1120 | ||||||||||
| Sillydillo | 1260 | ||||||||||
| Forgo Dedede | 560 (Phase 1) 630 (Phase 2) |
Always the 9th boss fought in The Ultimate Cup. | |||||||||
| Leongar | 1260 | Always the 10th boss fought in The Ultimate Cup. | |||||||||
| Fecto Forgo | 1120 | Always the second-to-last boss fought in The Ultimate Cup. | |||||||||
| Fecto Elfilis | 1750 | Always the last boss fought in The Ultimate Cup. | |||||||||
| Phantom Gorimondo | 1260 | ||||||||||
| Phantom Tropic Woods | 1400 | ||||||||||
| Phantom Clawroline | 1120 | ||||||||||
| Phantom King Dedede | 1190 | ||||||||||
| Phantom Sillydillo | 1330 | ||||||||||
| Phantom Meta Knight | 1000 | Always the 8th boss fought in The Ultimate Cup Z. | |||||||||
| Phantom Forgo Dedede | 640 (Phase 1) 720 (Phase 2) |
Always the 9th boss fought in The Ultimate Cup Z. | |||||||||
| Forgo Leon | 980 (Phase 1) 1400 (Phase 2) |
Always the 10th boss fought in The Ultimate Cup Z. | |||||||||
| Morpho Knight | 1500 | Always the second-to-last boss fought in The Ultimate Cup Z. | |||||||||
| Chaos Elfilis | 3400 (1st Form) 3000 (2nd Form) |
Always the last boss fought in The Ultimate Cup Z. | |||||||||
Mid-Bosses[edit]
| Mid-Bosses | |||||||||||
|---|---|---|---|---|---|---|---|---|---|---|---|
| Mid-Boss | Ambush Type | HP[1] (Star Bullet=80) | |||||||||
| Fleurina | A: 2nd (Meta Knight Cup / The Ultimate Cup) C: 2nd (The Ultimate Cup Z) |
270 (Meta Knight Cup / The Ultimate Cup) 480 (The Ultimate Cup Z) | |||||||||
| Wild Bonkers | B: 2nd (Meta Knight Cup / The Ultimate Cup) C: 1st (The Ultimate Cup Z) |
270 (Meta Knight Cup / The Ultimate Cup) 480 (The Ultimate Cup Z) | |||||||||
| Wild Edge | A: 1st (Meta Knight Cup / The Ultimate Cup) D: 2nd (The Ultimate Cup Z) |
270 (Meta Knight Cup / The Ultimate Cup) 480 (The Ultimate Cup Z) | |||||||||
| Wild Frosty | B: 1st (Meta Knight Cup / The Ultimate Cup) D: 1st (The Ultimate Cup Z) |
270 (Meta Knight Cup / The Ultimate Cup) 480 (The Ultimate Cup Z) | |||||||||
Music[edit]
| Tracks used in the Colosseum | ||||
|---|---|---|---|---|
| # | Title | Composer | Usage | Notes |
| 07 | Plundering Beast Battle | Yuuta Ogasawara | Meta Knight Cup: Mid-Boss battle | |
| 15 | VS. Dangerous Beast | Hirokazu Ando | Meta Knight Cup: boss battle | |
| 37 | Waiting Room | Yuki Shimooka | Meta Knight Cup: rest area | If this track is performed at the Waddle Live! Corner Stage, it will continue playing after entering the Meta Knight Cup. |
| 38 | Sword of the Surviving Guardian | Yuuta Ogasawara | Boss battle: | If the cutscene is skipped, the intro will be skipped too. The intro is also skipped upon retrying the battle or beginning the battle in The Ultimate Cup. |
| 39 | Try Again Tomorrow | Yuki Shimooka | Meta Knight Cup & The Ultimate Cup: failure | |
| 40 | Interview | Yuki Shimooka | Meta Knight Cup & The Ultimate Cup: results display screen | |
| 50 | Roar of Dedede | Yuuta Ogasawara | Boss battle:
|
|
| 61 | Masked and Wild: D.D.D. | Yuki Shimooka | Boss battle:
|
|
| 66 | The Raging Lion Roars | Yuuta Ogasawara | Boss battle: | |
| 69 | Hunted by the Beast | Jun Ishikawa | Boss battle: Fecto Forgo | |
| 71 | Two Planets Approach the Roche Limit | Hirokazu Ando | Boss battle: | For Chaos Elfilis, only the first part of the track is used in the first form, and only the second part is used in the second form after its HP is at 70% or lower. |
| 72 | The Fate of Two Worlds | Yuki Shimooka | Chaos Elfilis: second form cutscene | Only the intro is used. |
| 78 | Champion's Waiting Room | Yuki Shimooka | The Ultimate Cup: rest area | If this track is performed at the Waddle Live! Corner Stage, it will continue playing after entering The Ultimate Cup. Before the 9th, 10th and 11th battles, it starts playing from around halfway through. Before the last battle, it starts playing near the end of the track. |
| 79 | The Ultimate Fight | Yuki Shimooka | The Ultimate Cup: Mid-Boss & boss battle | The song changes dynamically once the boss reaches the final phase. |
| 82 | VS. Psychic Power Given Form | Yuki Shimooka | The Ultimate Cup Z: Mid-Boss battle | |
| 84 | Eternal Echo of the Thrilling Tour-our-our | Yuki Shimooka | Chaos Elfilis: rest area, boss battle | The rest area uses a version without vocals, while the battle uses the vocals corresponding to the system language. This is used in the second form before Chaos Elfilis' HP is at 70% of its maximum health or lower, after which it switches to the second half of "Two Planets Approach the Roche Limit". |
| 85 | Morpho Knight | Yuuta Ogasawara | Boss battle: Morpho Knight | The intro is skipped in The Ultimate Cup Z. |
| 87 | In Pursuit of Victory | Hirokazu Ando | The Ultimate Cup Z: rest area | If this track is performed at the Waddle Live! Corner Stage, it will continue playing after entering The Ultimate Cup Z. Before the 8th, 9th, 10th and 11th battles, it starts playing from near the end right before the loop. |
| 88 | Decisive Battle: Ultimate Z | Hirokazu Ando | The Ultimate Cup Z: boss battle | The song changes dynamically once the boss reaches the final phase. The usage includes Phantom King Dedede and Phantom Forgo Dedede (phase 1). |
| 89 | Try Again Tomorrow... Again! | Yuki Shimooka | The Ultimate Cup Z: failure | |
| 90 | Finding the Light | Yuki Shimooka | Cutscene of the same name after defeating Chaos Elfilis | |
| 91 | Hero Interview | Yuki Shimooka | The Ultimate Cup Z: results display screen | |
Trivia[edit]
- There are two Present Codes found on the Colosseum.
- "BRAWLINGCOLOSSEUM" can be found written over the top of Commentator Waddle Dee's tent on the exterior wall of the Colosseum.
- "THANKYOUMETAKNIGHT" can be found written next to Meta Knight's watch tower on the exterior wall of the Colosseum after Lab Discovera is cleared.
- The Waddle Dee watching the tournament bracket is random and may change the color every time Waddle Dee Town is reloaded.
- The random Copy Essences in the waiting room only pick Copy Abilities that are available and currently set in Waddle Dee's Weapons Shop.
- Sleep is unavailable from the Copy Essences during The Ultimate Cup Z in the Colosseum, possibly to prevent infinite health recovery from Sleep and infinite stat boosts from Deep Sleep.
- In speedruns, players may obtain Crash from the Copy Essences versus specific bosses. To maximize the chance of getting Crash in the waiting room, speedrunners need a dedicated save file which has the lowest possible number of abilities obtained. Besides Cutter, Fire and Sword whose blueprints (Chakram Cutter, Volcano Fire and Meta Knight Sword respectively) are guaranteed to be obtained in gameplay to unlock The Ultimate Cup Z, speedrunners only need to obtain Crash and Toy Hammer for that save file. The chance of getting Crash from a Copy Essence in this case will be 20%.
- For some reason, Elfilin is still captured in the capsule during the Leongar battle in The Ultimate Cup.
- After Forgo Leon is defeated in The Ultimate Cup Z, Leon won't appear in the background during the following Morpho Knight battle unlike the Forgo Land version.
- The Tomato Food Item is exclusive to the Colosseum in this game, and doesn't appear in the regular stages, referencing its common role as a healing item in Boss Endurance modes.
Gallery[edit]
View of the first version of the Colosseum
View of the second version of the Colosseum, available after completing Lab Discovera
The selection screen for The Ultimate Cup
The selection screen for The Ultimate Cup Z
Screenshot of Kirby in the Colosseum lobby, about to face Meta Knight
The photo added to Kirby's House after clearing Meta Knight Cup
The photo added to Kirby's House after clearing The Ultimate Cup
The photo added to Kirby's House after clearing The Ultimate Cup Z


Names in other languages[edit]
Colosseum[edit]
| Language | Name | Meaning |
|---|---|---|
| Japanese | コロシアム Koroshiamu |
Colosseum |
| Traditional Chinese | 競技場 Jìngjìchǎng |
Colosseum |
| Simplified Chinese | 竞技场 Jìngjìchǎng | |
| Dutch | Colosseum | - |
| French | Colisée | Colosseum |
| German | Kolosseum | Colosseum |
| Italian | Colosseum | - |
| Korean | 콜로세움 Kolloseum |
Colosseum |
| Spanish | Coliseo | Colosseum |
| Thai | Colosseum[2] |
- |
Meta Knight Cup[edit]
| Language | Name | Meaning |
|---|---|---|
| Japanese | メタナイトカップ Meta Naito Kappu |
Meta Knight Cup |
| Traditional Chinese | 魅塔騎士盃 Mèitǎ Qíshì Bēi |
Meta Knight Cup |
| Simplified Chinese | 魅塔骑士杯 Mèitǎ Qíshì Bēi | |
| Dutch | De Meta Knight-Beker | The Meta Knight Cup |
| French | La Coupe Meta Knight | The Meta Knight Cup |
| German | Das Meta-Knight-Turnier | The Meta-Knight-Tournament |
| Italian | La Coppa Meta Knight | The Meta Knight Cup |
| Korean | 메타 나이트 컵 Meta Naiteu Keop |
Meta Knight Cup |
| Spanish | La Copa Meta Knight | The Meta Knight Cup |
The Ultimate Cup[edit]
| Language | Name | Meaning |
|---|---|---|
| Japanese | The アルティメットカップ The Arutimetto Kappu |
The Ultimate Cup |
| Traditional Chinese | The 終極盃 The Zhōngjí Bēi |
The Ultimate Cup |
| Simplified Chinese | The 终极杯 The Zhōngjí Bēi | |
| Dutch | De Ultieme Beker | The Ultimate Cup |
| French | La Coupe ultime | The ultimate Cup |
| German | Das Ultimativ-Turnier | The Ultimate-Tournament |
| Italian | La Coppa Definitiva | The Ultimate Cup |
| Korean | The 얼티밋 컵 The Eoltimeot Keop |
The Ultimate Cup |
| Spanish | La Copa Definitiva | The Definitive Cup |
The Ultimate Cup Z[edit]
| Language | Name | Meaning |
|---|---|---|
| Japanese | The アルティメットカップ Z The Arutimetto Kappu Z |
The Ultimate Cup Z |
| Traditional Chinese | The 終極盃 Z The Zhōngjí Bēi Z |
The Ultimate Cup Z |
| Simplified Chinese | The 终极杯 Z The Zhōngjí Bēi Z | |
| Dutch | De Ultieme Beker Z | The Ultimate Cup Z |
| French | La Coupe ultime Z | The ultimate Cup Z |
| German | Das Ultimativ-Turnier Z | The Ultimate-Tournament Z |
| Italian | La Coppa Definitiva Z | The Ultimate Cup Z |
| Korean | The 얼티밋 컵 Z The Eoltimeot Keop Z |
The Ultimate Cup Z |
| Spanish | La Copa Definitiva Z | The Definitive Cup Z |