Course 7 - Hole 4: Difference between revisions
m (Text replacement - "{{Navbox-KDCrs}}" to "{{Navbox-KDC}}") |
Luigifan18 (talk | contribs) m (→Summary: Grammar check) |
||
| (4 intermediate revisions by one other user not shown) | |||
| Line 1: | Line 1: | ||
{{Infobox-KDCHole | {{Infobox-KDCHole | ||
|image= | |image= | ||
| Line 19: | Line 18: | ||
== Summary == | == Summary == | ||
This board is quite messy and uneven. Its main form is of a moderately-sized rectangular platform featuring a large sloping region separating two flatter (though still bumpy) areas. Along the top regions of the board are two [[Conveyor Belt]]s which can be used to get a little extra distance up or down the slopes. To the left, a pier-like structure extends out from the main platform, containing four neutral enemies in a line. [[Kirby]] | This board is quite messy and uneven. Its main form is of a moderately-sized rectangular platform featuring a large sloping region separating two flatter (though still bumpy) areas. Along the top regions of the board are two [[Conveyor Belt]]s which can be used to get a little extra distance up or down the slopes. To the left, a pier-like structure extends out from the main platform, containing four neutral enemies in a line. [[Kirby]] starts at the base of the main platform near this pier, and will need to deal with these concentrated enemies, along with a fifth up at the top of the slope. | ||
=== Extra Game === | === Extra Game === | ||
In the Extra Game, Kirby starts right in front of the pier. The enemy line-up and distribution has been radically changed: Now only two enemies | In the Extra Game, Kirby starts right in front of the pier. The enemy line-up and distribution has been radically changed: Now only two enemies — a [[Kabu]] and [[Wheelie]] — are found on the pier, and four enemies — a [[Togezo]], two [[Kabu]], and a [[Flamer]] — can be found along and near the main slope area. The [[Broom Hatter|Broomhatter]] up top is the same as before. | ||
== Enemies == | == Enemies == | ||
| Line 97: | Line 96: | ||
|- | |- | ||
|{{center|[[File:KDC Bumper sprite.png]]}} | |{{center|[[File:KDC Bumper sprite.png]]}} | ||
|Bumper | |[[Bumper]] | ||
|- | |- | ||
|{{center|[[File:KDC Conveyor Belt sprite.png]]}} | |{{center|[[File:KDC Conveyor Belt sprite.png]]}} | ||
Latest revision as of 22:49, 12 April 2024
| ||||||||||
| ||||||||||
|
| ||||||||||


Course 7 - Hole 4 is the fourth hole of Course 7 in Kirby's Dream Course. It features a disheveled uneven board with lots of slopes and a couple Conveyor Belts.
Summary[edit]
This board is quite messy and uneven. Its main form is of a moderately-sized rectangular platform featuring a large sloping region separating two flatter (though still bumpy) areas. Along the top regions of the board are two Conveyor Belts which can be used to get a little extra distance up or down the slopes. To the left, a pier-like structure extends out from the main platform, containing four neutral enemies in a line. Kirby starts at the base of the main platform near this pier, and will need to deal with these concentrated enemies, along with a fifth up at the top of the slope.
Extra Game[edit]
In the Extra Game, Kirby starts right in front of the pier. The enemy line-up and distribution has been radically changed: Now only two enemies — a Kabu and Wheelie — are found on the pier, and four enemies — a Togezo, two Kabu, and a Flamer — can be found along and near the main slope area. The Broomhatter up top is the same as before.
Enemies[edit]
Obstacles[edit]
| Sprite | Obstacle |
|---|---|
| Bumper | |
| Conveyor Belt |
Gallery[edit]
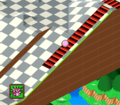
Riding up the right conveyor belt
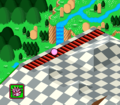
Riding down the left conveyor belt

