Gordo Course - Hole 5: Difference between revisions
m (Text replacement - "{{Navbox-KDCrs}}" to "{{Navbox-KDC}}") |
mNo edit summary |
||
| (3 intermediate revisions by the same user not shown) | |||
| Line 1: | Line 1: | ||
{{Infobox-KDCHole | {{Infobox-KDCHole | ||
|image= [[File:KDC Gordo Course Hole 5 screenshot 01.png]] | |image= [[File:KDC Gordo Course Hole 5 screenshot 01.png]] | ||
| Line 11: | Line 10: | ||
== Summary == | == Summary == | ||
This board is wide and square, with bumper fences around the edges. It is all-but flat, with the main feature being the massive field of [[Spike|Danger Zone]]s around the center. The corners of this board are safer, though each contains a [[Gordo]], and four bridges connect these corners, containing [[Starman|Starmen]] and [[Twister]]s next to a central [[Air Curtain]] on each one. The direct middle of the board is a single floor tile, where [[Kirby]] and [[Keeby]] start, meaning they will have to jump over the Danger Zones to get to safety. Any amount of rough-housing on this board will likely result in one or both contenders skipping across the spike beds, and a lot of naps will likely be needed to recuperate here. | This board is wide and square, with [[bumper]] fences around the edges. It is all-but flat, with the main feature being the massive field of [[Spike|Danger Zone]]s around the center. The corners of this board are safer, though each contains a [[Gordo]], and four bridges connect these corners, containing [[Starman|Starmen]] and [[Twister]]s next to a central [[Air Curtain]] on each one. The direct middle of the board is a single floor tile, where [[Kirby]] and [[Keeby]] start, meaning they will have to jump over the Danger Zones to get to safety. Any amount of rough-housing on this board will likely result in one or both contenders skipping across the spike beds, and a lot of naps will likely be needed to recuperate here. | ||
=== Extra Game === | === Extra Game === | ||
| Line 92: | Line 91: | ||
|- | |- | ||
|{{center|[[File:KDC Bumper sprite.png]]}} | |{{center|[[File:KDC Bumper sprite.png]]}} | ||
|Bumper | |[[Bumper]] | ||
|- | |- | ||
|{{center|[[File:KDC Danger Zone sprite.png]]}} | |{{center|[[File:KDC Danger Zone sprite.png]]}} | ||
Latest revision as of 13:35, 21 September 2022
| ||||||||||
| ||||||||||
|
| ||||||||||

Gordo Course - Hole 5 is the fifth hole of Gordo Course in Kirby's Dream Course. This hole features very wide fields of Danger Zones with thin bridges crossing it.
Summary[edit]
This board is wide and square, with bumper fences around the edges. It is all-but flat, with the main feature being the massive field of Danger Zones around the center. The corners of this board are safer, though each contains a Gordo, and four bridges connect these corners, containing Starmen and Twisters next to a central Air Curtain on each one. The direct middle of the board is a single floor tile, where Kirby and Keeby start, meaning they will have to jump over the Danger Zones to get to safety. Any amount of rough-housing on this board will likely result in one or both contenders skipping across the spike beds, and a lot of naps will likely be needed to recuperate here.
Extra Game[edit]
In the Extra Game, the starting position is moved to the lowermost corner. All of the Gordos have been removed, and most of the remaining enemies have been moved to the four corner areas, and made a little more diverse. The center point is now occupied by a UFO.
Enemies[edit]
Obstacles[edit]
| Sprite | Obstacle |
|---|---|
| Air Curtain | |
| Bumper | |
| Danger Zone |
Trivia[edit]
- Notably, the Extra Game version of this hole has no Gordos in it.
Gallery[edit]
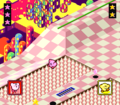
Kirby tries his best to avoid getting poked for the 20th time by spikes.
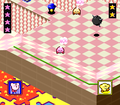
This is a very tiring stage.

